Acer’s home office monitors are fantastic, but like all electronic devices, issues can arise. An issue I’ve encountered from time to time is my monitor displaying the ‘no signal’ error.
If you encounter the Acer monitor no signal message, turn off and unplug your computer and the monitor. After 60 seconds, power on the monitor, followed by your computer. Next, ensure the correct input and display resolution settings are selected, inspect the display cables and disable DDC/CI.
In the event none of these fixes work, try connecting your monitor to a different device. If the display now works, there is an issue with your original connected device. In this case resetting the CMOS/BIOS and adjusting the RAM sticks should do the trick.
Let’s go through each of these common fixes you can try, in addition to a few others, in greater detail.
These troubleshooting steps will be aimed at both the display and your computer.
It is always best to start off with the easier, more likely solutions, and progress from there. I therefore highly recommend you run through each of these steps in the order outlined below.
Restart Monitor And Computer
It is essential to get the simple stuff out of the way as quickly as possible.
So, before diving in, go ahead and power down the monitor and PC. Be sure to also unplug any and all cables. Once 60 seconds have passed, try powering up the monitor first, followed by the computer second.
You would be amazed how many users have indicated that this simple process solved their problem. And yes, the order does matter…monitor FIRST, then computer SECOND.
Only after you have attempted restarting both devices without success should you proceed.
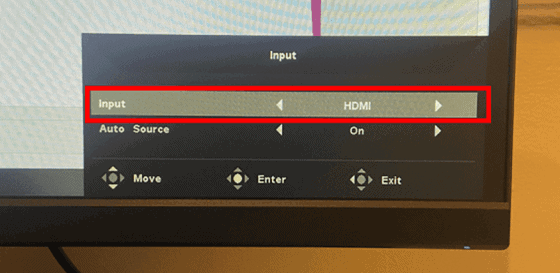
Confirm Selected Monitor Input Is Correct
It is not uncommon to assume there is a bigger issue at play, when in fact your monitor is set to the wrong input.
Acer monitors typically support DisplayPort (DP), HDMI, VGA and DVI display cables.
Identify which display cable you are using and then locate the input button. It will be located on the righthand side of your monitor, either on the back of the display or on the bottom.
For some models, you may need to navigate to the on screen display Main Menu first. If you find yourself struggling, search your model number in the Acer manual lookup for guidance.
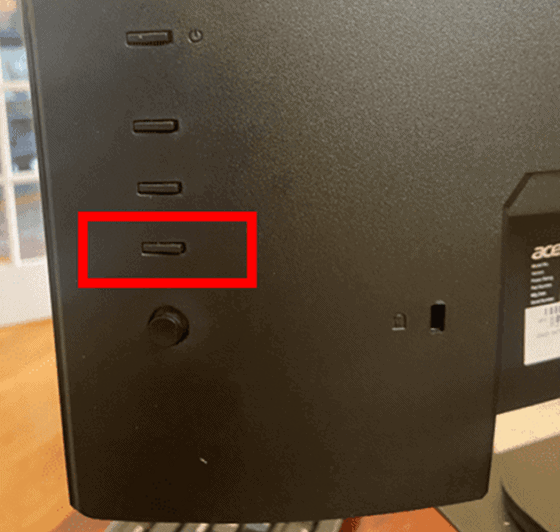
Once located, an on screen input box below will pop up on your screen. Navigate through the possible input options until it matches up with your specific cable!
Inspect Display Cables
Ok. You are now confident that the correct input is selected. Next, let’s take a closer look at the cable connection.
The goal here is to establish a secure connection between the monitor display port and the computer display port.
Beyond ‘no signal’ errors, poorly fitted cables can lead to a flickering display, and a bunch of other easily avoided problems.
It is worth noting that nearly all desktop PC’s have a graphics card unit located on the back of the computer with display ports.
If this applies to you, be sure that your monitor cable is connected into the graphic card port and NOT a port in the motherboard.
You should also take a closer look at the cables and cable heads. Be sure there is no obvious signs of wear and tear.
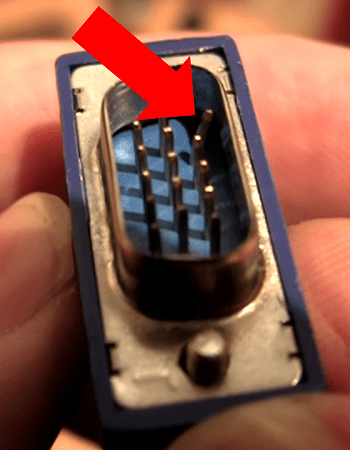
Even if everything looks great, try hooking up a different input cable than the one you are currently using.
As a quick reminder, when you swap out the cable, ensure you match up the input accordingly on your display.
When you made the change, did the issue resolve itself? If so, your cable was no good and you need a new one. If not, you can safely rule out the display cable as a suspect.
Disable Display Data Channel/Command Interface (DDC/CI)
Most Acer monitors these days come with a protocol called the Display Data Channel (DDC) / Command Interface (CI) enabled as a default setting.
Put simply, the DDC/CI is a communication protocol that, when connected to a device that supports it, allows monitor controls to be automatically sent via software to your display.
This protocol is designed to make installation easier because in theory all you need to do is plug the monitor in and go. At least that’s how it’s suppose to work.
In some cases the DDC/CI may result in faulty setting signals being transmitted to the display. To test if this is the case, try disabling this feature and determine if the error resolves.
Use the physical control buttons on the monitor to pull up the OSD main menu. Then navigate to System > DDC/CI and turn it Off.
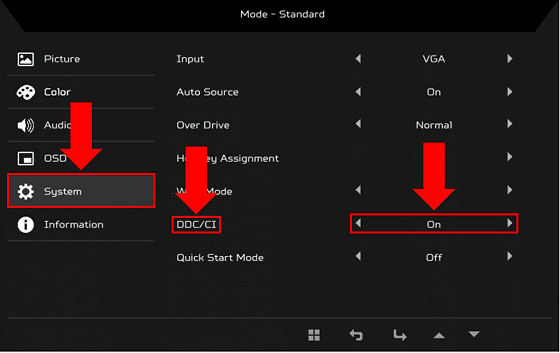
Now restart both the monitor and the connected device and test it out!
Lower Screen Resolution
All computer monitors have a minimum and maximum resolution that they are capable of displaying.
When your graphics card is attempting to display a resolution that is higher than your monitor’s maximum threshold, it malfunctions. In some instances, this can even result in your Acer not booting at all!
To remedy this, try booting up your computer in Safe Mode. By doing so, your PC will automatically revert to a resolution range that your monitor is able to support.
But this is only true while running Safe Mode! So you will need to manually adjust your computer’s resolution settings and select a lower standard display resolution.
Try Connecting A Different Device
If you have made it through each of the above fixes without any luck, the monitor is most likely not causing the issue.
You know the drill – let’s test this theory out!
Go ahead and try using the monitor with a different device. If your display now works, then you can be sure the monitor is functioning properly. That’s the good news. The bad news is this confirms that the original connected device is the culprit.
The top troubleshooting steps for a faulty connect device causing a no signal error involve opening the hardware up. Therefore, you should know how to properly ground yourself to avoid destroying your computer with electrostatic charge prior to proceeding further.
Reset CMOS/BIOS
The Complementary Metal Oxide Semiconductor (CMOS) battery in your PC provides power to the BIOS firmware. BIOS, or “Basic Input/Output System”, is responsible for managing the essential functions of your computer.
Resetting the BIOS to its default status can help solve a shocking number of issues.
Turn your PC off, remove all the cables, and ground yourself.
Now pop the CMOS battery out of the motherboard and press the power button to drain any excess remaining charge. After a couple minutes have passed, reinsert the battery.
That’s it! Boot up your computer and check to see if your display is working.
Adjust RAM Sticks
RAM (Random Access Memory) sticks not making proper connections is another leading culprit.
To rule this out, start by making sure your computer is off and the power cord unplugged.
Next, once you have grounded yourself, access and remove all of the RAM sticks. While they are out, it is also work making sure they aren’t damaged or covered with dust and debris.
Finally, place each of the sticks back into their appropriate seats. I also suggest you place them back in a different order than you found them in!
Final Thoughts
To fix the Acer monitor no signal problem, try these 8 troubleshooting steps:
- Restart monitor and computer
- Confirm selected monitor input is correct
- Inspect display cables
- Disable DDC/CI
- Lower screen resolution
- Check graphic card connection
- Reset CMOS/BIOS
- Adjust RAM sticks
If you’ve tried all of these fixes, and you’re still having issues, you can chat with Acer Service Center online or give them a call at (254) 298-4000.
As a last resort, Acer monitors have a three-year limited warranty…consider using it!

Chelsea Ashbrook is a Senior Manager of Corporate Digital Experience at Genentech. Chelsea received her B.A. from the University of Connecticut and has spent the last 11 years working in the technology field.

Thanks!! Helpful list of things not to forget.