Acer makes high quality computer monitors, but occasionally they can have some frustrating issues. One of the more common problems users report is their monitor not turning on. Here’s how to fix it.
If your Acer monitor won’t turn on, first confirm the monitor is actually set to ‘on’ and check the power and display cable connections. If the issue persists, ensure monitor is set to correct input and lower the display resolution. As a final measure, perform a factory reset.
Additional causes include PC related issues. First, test monitor with another device to confirm that the issue is PC related. Then update graphics driver and BIOS and ensure display cable is properly plugged into graphic card. Finally, reinsert RAM sticks and reset CMOS/BIOS.
Continue reading for further step-by-step instructions to get it back up and running!
We’ll start with the easier more obvious fixes, and work our way to some move involved troubleshooting steps.
Troubleshooting The Monitor
Step 1: Confirm Monitor Is ‘Actually’ Turned ON
You go to turn on your computer and all you see is a black monitor screen. Now what?
First, let’s make sure you monitor is actually turned ON.
Yes, way too obvious of a fix – I know. But since you typically only turn your monitor ON once and rarely need to again, this is a common mistake.
The ON button will be located on the front, bottom, or side panel of your monitor frame. It is typically on the right-hand side.
Double check that your monitor is set to ON before we get into more involved troubleshooting steps.
Step 2: Check Power Cable Connection
It is possible that your power cord is not securely inserted into the power socket.
Make sure that the power cable is firmly connected on both ends.
Check the connection on the back of your monitor and the power outlet on the wall.
Be sure to also examine your power cord for any obvious damage.
In some cases, your Acer monitor is just fine, and instead it is a failed power supply that is causing the issue.
Problems with the AC adapter for example are fairly common, particularly if the power cord is older.
For the motivated do-it-yourselfers, check out this video for how to troubleshoot the AC adapter.
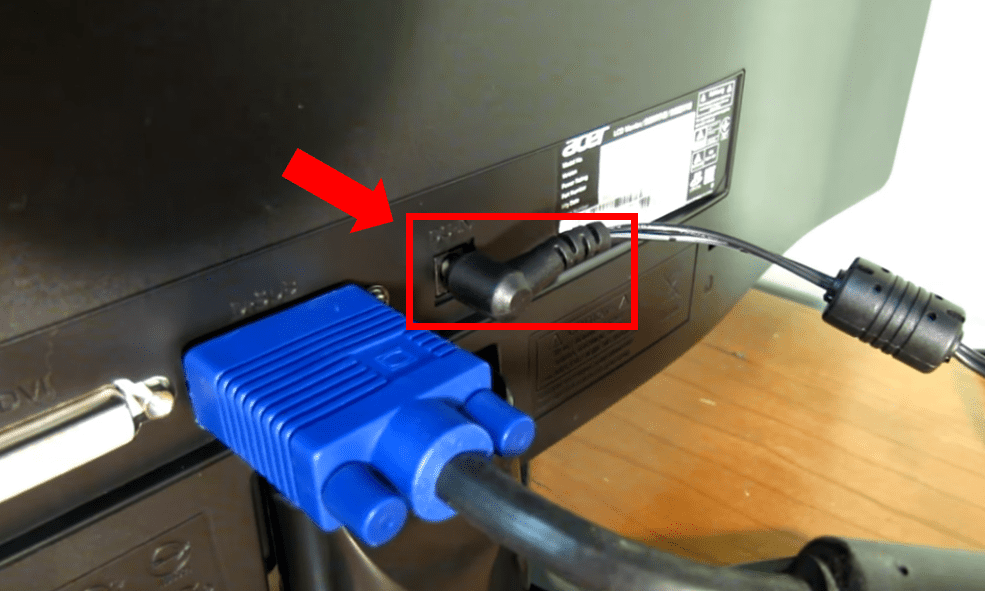
Step 3: Inspect Display Cable Connection
At this stage, you are certain the power is turned on and the power cable is secure.
The next step it to make sure there is a secure connection made with your display cable.
Common display cables include HDMI, DisplayPort (DP), VGA and DVI. A number of different failures, including no signal error, can be caused even if the connection is slightly broken on either end.
Regardless of the type of display cable you are using, an error can be caused even if the connection is slightly broken on either end.
That tiny space you see in the image below between the HDMI and the HDMI port in my laptop? That’s right – that was enough to result in a black monitor screen.
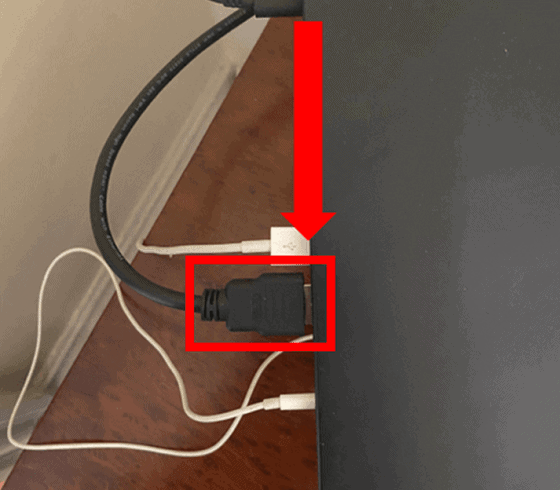
Try disconnecting and reconnecting the cable.
If you happen to be using a VGA or DVI cable, tighten the screws all the way to prevent future issues.
Lastly, if you have an extra cable laying around try swapping out the current display cable with a different one.
Ideally, you should attempt to use a different cable type.
For example, if you have been using an HDMI cable, try testing a DP cable and vice versa.
Step 4: Select The Correct Input
You need to also make sure your monitor is set to the correct Input.
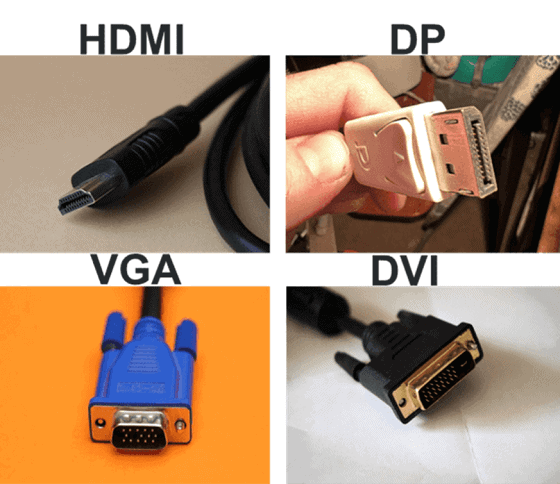
As a first step, you need to know exactly what kind of input cable you are using.
As mentioned, the most common display cables include HDMI, DisplayPort (DP), DVI and VGA.
Using the image below, identify which display cable you have.
Once you have identified the correct display cable, locate the Input button on your monitor.
The Input button can be found on the front, bottom, or side panel of your monitor frame.
Adjust the input options until you identify the input that matches your display cable.
Step 5: Adjust Display Resolution
There are a wide range of possible display resolutions that Acer monitors can relay back to your computer.
Your computer’s graphic card might currently be set on a display resolution that is higher than what your monitor can handle.
To fix this, try rebooting your computer in Safe Mode.
While in Safe Mode, your computer will automatically use a lower display resolution than normal use.
This will allow you the opportunity to go into your computer’s resolution settings and select a lower standard display resolution.
Not sure what resolutions your Acer monitor can support? You have two options:
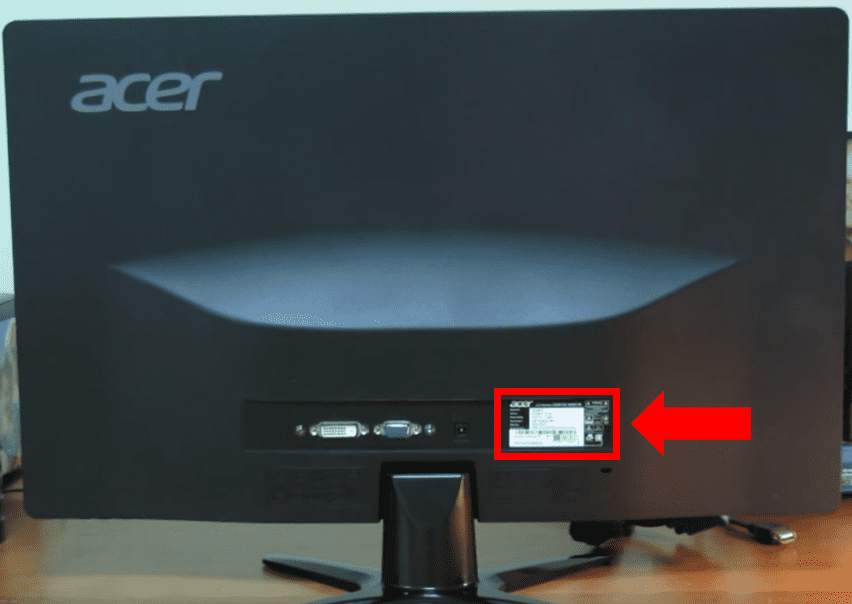
- The first option is to use your Acer model number on the back of your monitor and find the max resolution in the Acer user manual look up.
- The second option is to use a bit of trial-and-error by incrementally increasing your resolution. Wait approximately 30 seconds between each update and see whether the monitor remains on.
Step 6: Power Reset Your Monitor
Sometimes performing a power reset is enough to get it back up and running.
How To Power Reset Your Monitor:
- First, unplug the monitor.
- Then, press and hold the power button down for 30 seconds.
- Finally, reconnect the monitor and power it back on.
- If your monitor has an internal battery, you will need to unplug the monitor and then press the reset pinhole located next to the power port on the monitor.
Unsure whether your Acer monitor has an internal battery? Use the Acer user manual look up and your model number to find out!
Step 7: Test Monitor With Another Device
We are now at the end of the most common fixes IF your monitor is the source of the problem.
To confirm that the monitor itself is the issue, try using your monitor with another device.
This can be another laptop, desktop computer, game console, etc.
If your monitor display works with a different device, then you know your monitor is working properly. In this case your computer’s hardware is the culprit!
Troubleshooting The PC
You have now confirmed that your monitor works just fine with another device. What now? The issue may be PC related.
First, a few disclaimers. Steps 10 and 11 below require you to open and manipulate your laptop or desktop computer.
If your hardware is company property, it is best to leave these steps to your company’s IT Team.
If your hardware is personally owned, you may still wish to bring it in to a local computer repair shop.
However, if you do plan to proceed make sure you have done proper research. At a minimum you should know how to properly ground yourself to avoid destroying your computer with electrostatic charge.
Step 8: Update Graphics Driver And BIOS Operating Version
If your PC hardware is the problem, it is possible your graphics driver and/or your operating BIOS version may be outdated.
Check to make sure you have the latest graphics driver and BIOS updates by following the links below.
But your monitor won’t turn on, how can you check for updates?
If you are using a docked laptop, you should be all set. On the other hand, if you are using a desktop PC you’ll need to borrow a different monitor to make the update.
- Instructions on how to update graphics device for Windows.
- Instructions on how to update BIOS for Windows.
Step 9: Ensure Display Cable Is Plugged Into The Graphic Card And Not The Motherboard
Nearly all desktop PC’s have an on-board graphics unit with corresponding connections on the back of your computer.
If this applies to you, be sure that your monitor cable is connected directly into the graphic card and NOT the motherboard.
Often times with a desktop PC, this simple fix will do the trick.
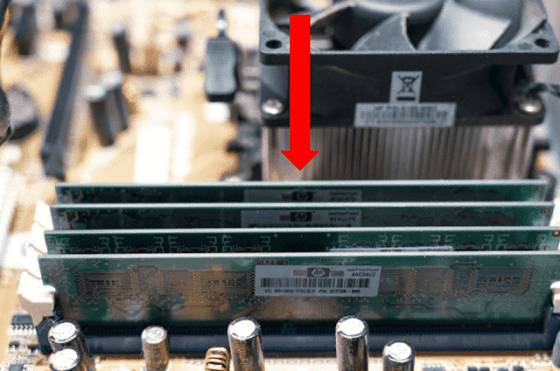
Step 10: Remove, Reorder, And Reinsert Your RAM Sticks
Your issue may be occurring because your RAM (Random Access Memory) sticks are not making a proper connection.
One way this issue can manifest is by not delivering power to your mouse and keyboard.
Therefore, if your mouse and keyboard are not working, poor RAM stick connection is likely the cause.
To fix this, first make sure your computer is powered OFF and the power cord is removed from the outlet.
Next, properly ground yourself and open your PC unit. Then fully remove each of your RAM sticks.
Finally reorder the sicks and reinsert them back into their respective RAM seats.
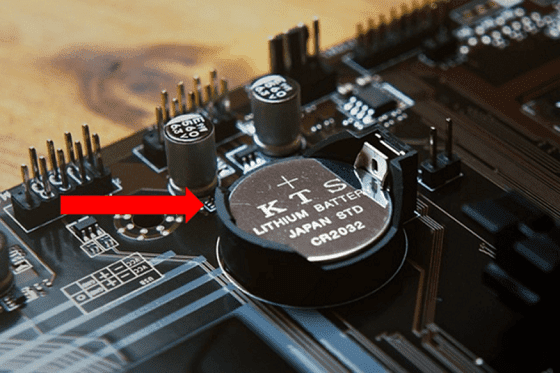
Step 11: Reset CMOS/BIOS
CMOS stands for Complementary Metal Oxide Semiconductor.
The CMOS battery in your laptop or computer powers the BIOS firmware. BIOS stands for “Basic Input/Output System” and it manages the essential functions of your computer.
Resetting your BIOS sets it back to its previous configurations. This can often fix a lot of different issues.
Once again make sure your computer is powered OFF, the power cord is removed, and you are properly grounded.
Next, remove the CMOS battery from the motherboard.
Hold down the power button to drain all excess remaining power.
After about a minute, reinsert the CMOS battery back into your PC.
Finally, reboot your computer and check to see if your display is working.
Acer Monitor Warranty
The unfortunate reality is these fixes simply won’t work for everyone. The good news though, is Acer monitor’s have a three-year limited warranty.
Additionally, if you are still having issues despite attempting each of these troubleshooting steps, you can contact Acer customer support.
Conclusion
Your Acer monitor not turning on can initially be alarming. No need to worry. Follow these 11 troubleshooting steps to get your monitor turned back on today:
- Confirm monitor is ‘actually’ ON
- Check power cable connection
- Check display cable connection
- Set monitor to correct Input
- Lower display resolution
- Factory reset monitor
- Test monitor with another device
- Update graphics driver and BIOS
- Ensure display cable is plugged into graphic card
- Reinsert RAM sticks
- Reset CMOS/BIOS
Hopefully this was helpful! If this post helped you solve your issue, or if you solved your issue some other way, be sure to leave me a comment below so that we can include it!

Chelsea Ashbrook is a Senior Manager of Corporate Digital Experience at Genentech. Chelsea received her B.A. from the University of Connecticut and has spent the last 11 years working in the technology field.
