My ASUS laptop had a two year streak of working flawlessly. Then one morning, despite no obvious damage or major changes, it wouldn’t boot up.
After a few failed attempts, I sat down and researched everything I could find on how to properly troubleshoot my device.
As it turns out, if your ASUS laptop won’t turn on, static build up is the most likely cause. Fortunately, the fix for static build up is simple. Turn off and unplug the laptop and remove the battery. Then long-press the power button for 60 seconds. It should boot up!
This straight forward power drain procedure will work for a strong majority of users. As with any tech based issue though, a single fix won’t solve the problem for everyone.
Ultimately, I discovered there are seven fundamental troubleshooting steps all users should try. Let’s review each of these fixes in greater detail.
Power Drain The Laptop
If your model has an external battery, you don’t need to go through the added steps of removing the laptop case. This makes the power draining process that much easier.
With the laptop off and unplugged, remove the battery. Then hold down the power button for 60 seconds. Lastly, clip the battery back in, plug the power cable in and turn the power on. It’s that simple!
For those of you with an internal battery, you’ll need to flip your laptop over and remove all the screws from the bottom of the case. This will also you to fully detach the bottom base and access the internal battery for removal.
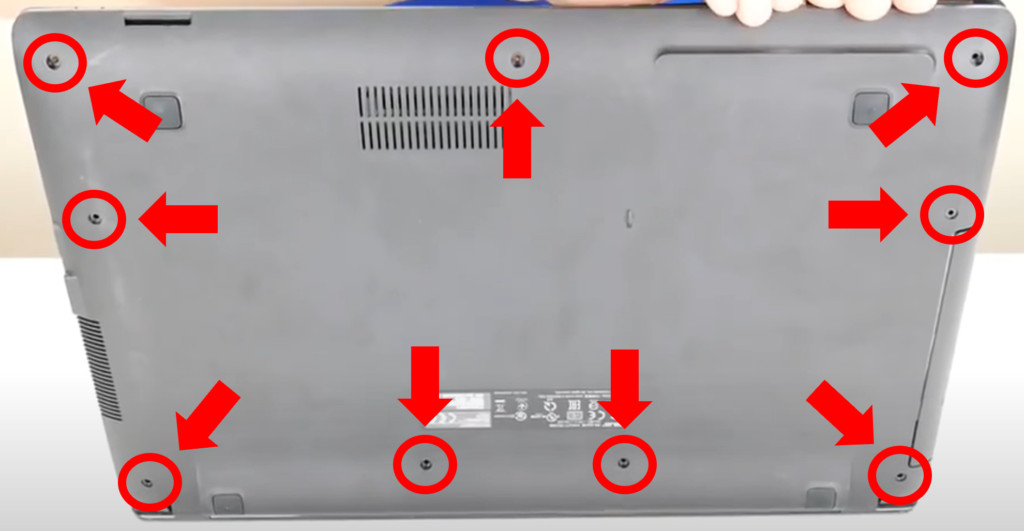
The battery rests on the motherboard in majority of ASUS laptop models. This means you can go ahead and pull the battery up and out.
However, in some cases, the battery may be secured down by either a screw or a clip.
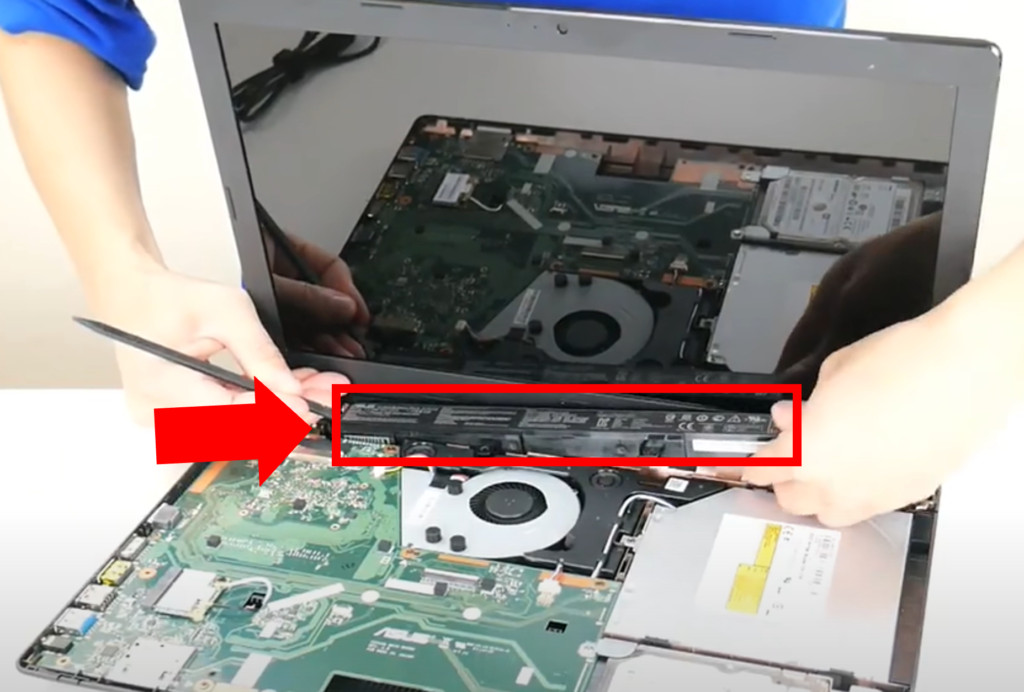
Once you have the battery removed, perform the same power drain procedure as detailed above.
Now reassemble the case, plug the power cord back in and turn it on! Your device should be fully functional now.
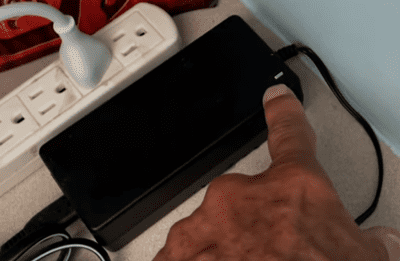
Test The Charger
If static build up is not causing the problem, the next two culprits in line are the charger and the battery. Let’s test them both to see if they are working they way they should be.
Perform another power drain, but this time once you complete it, do not plug the power cable back in. Go ahead and try to turn the laptop on with ONLY the battery.
In the event the device powers up, you can be sure that both the laptop and the battery are in good working condition. Great news!
Now for the bad news – your charger is no good and needs to be replaced.
Test The Battery
If the laptop still showed no signs of life, it’s time to test the battery.
Perform yet another power drain and this time, DO NOT reinsert the battery. Instead, only plug the charger back in and try to turn the laptop on.
If the laptop works, it is safe to say your battery is causing the issue. Once you purchase a new one, the issue should go away.
Inspect RAM Sticks
We have now performed a power drain and successfully tested the charger and battery. The next order of business is performing a close inspection of the Random Access Memory (RAM) sticks.
With the laptop off and unplugged, located the RAM compartment and open it up. Carefully remove the RAM sticks and look at them closely to ensure there is no visible damage.
Now, firmly reinsert the RAM stick(s) into their respective seats to ensure a secure connection is established.
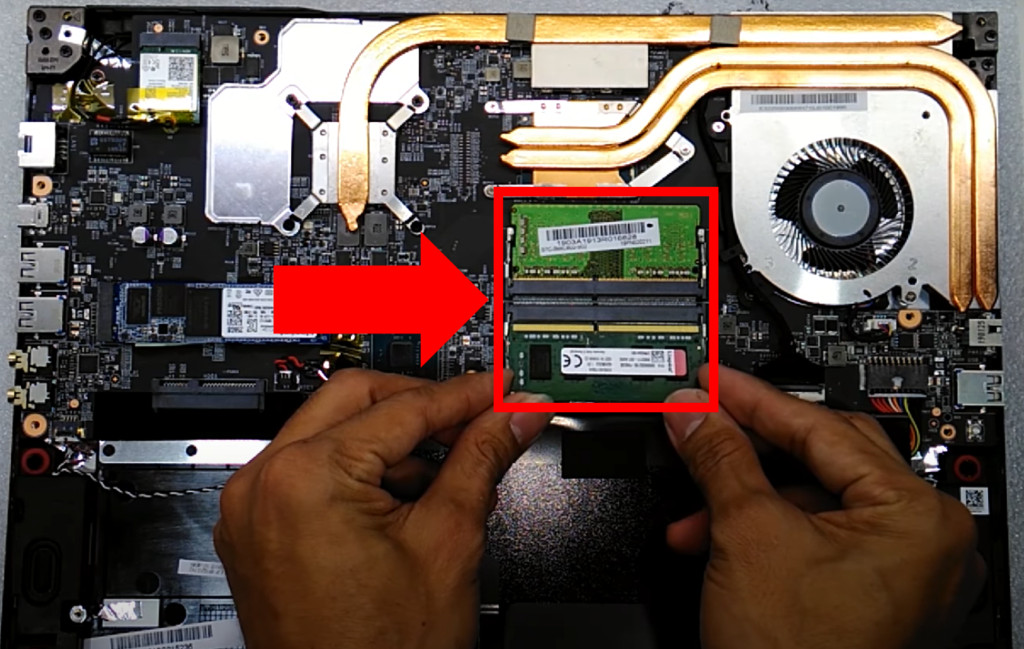
Whenever there is more than one RAM stick, it is best practice to reinsert them in a different order than you found them.
Resemble your laptop and try starting it up. If it boots, it is a good idea to check the RAM itself for any faults.
The easiest way to check the health of your newly reseated RAM sticks is to run the Windows Memory Diagnostic Tool. Type “Windows Memory Diagnostic Tool” into your search bar and click on it. Then select Restart now and check for problems.
Once your device has restarted, a RAM diagnostic report will appear. If no issues are uncovered then you are all set and no further action is needed.
Should the test surface any faults, you may need to purchase new RAM.
Reinsert CMOS Battery
A system board failure is another possible explanation for why your ASUS laptop is not turning on.
The quickest way to fix this is to remove the CMOS battery from the motherboard and reinsert it after about 20 minutes.
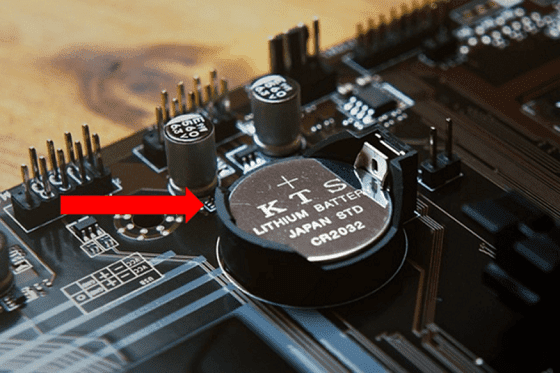
Depending on your laptop model, accessing your CMOS battery can prove very challenging. You can use the ASUS laptop manual lookup to find exactly where your CMOS battery is located.
Clean Or Replace Cooling Fan
While less likely, there may also be an issue with your CPU or GPU due to overheating.
In order to fix an overheating issue, you’ll need to inspect your laptop’s cooling fan.
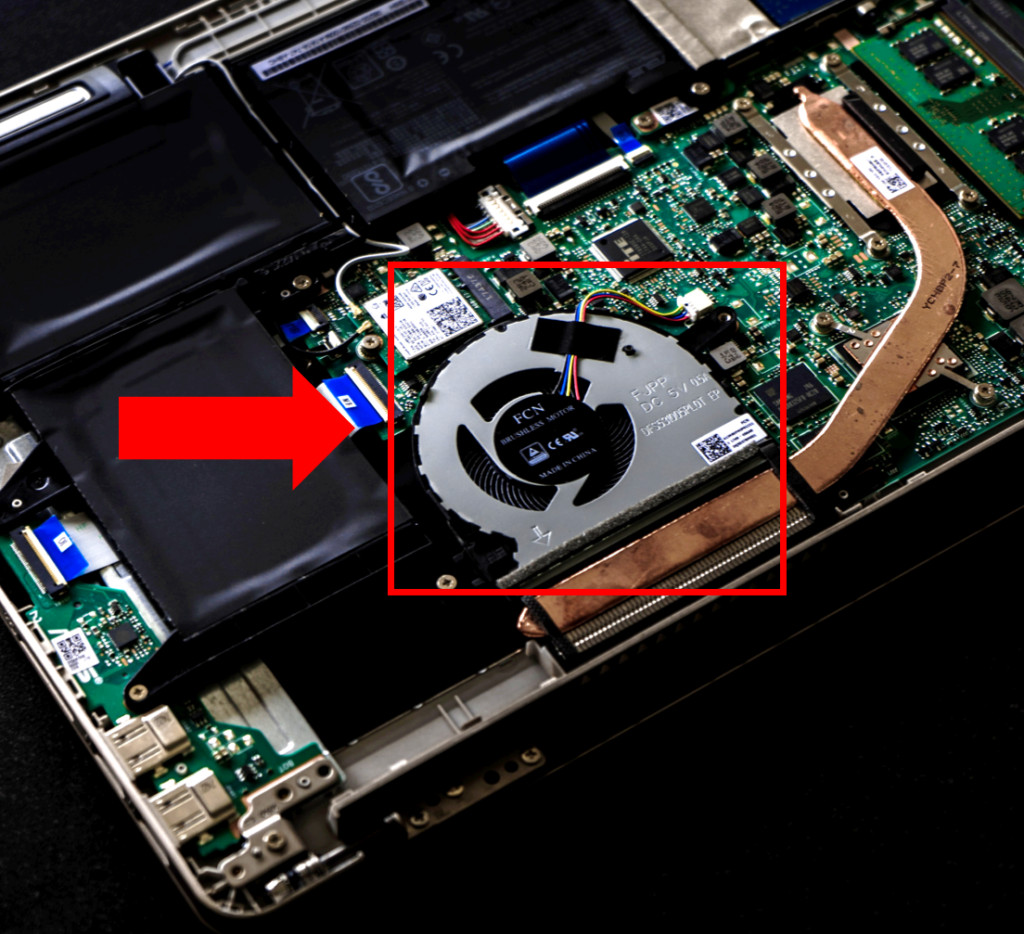
Overtime, a ton of dirt and dust can build up on the cooling fan, causing it to under-perform. To fix this, you will need to once again open up your laptop.
Once you have located the fan, grab a cotton swab and some isopropyl alcohol. Pour a small amount directly on the swab and then carefully clean the fan apparatus.
Be sure to also clean the exhaust port on the case that allows air to flow in and out of the laptop.
Allow enough time for the the isopropyl alcohol to fully dry (typically 30 minutes is sufficient) before reassembling the laptop and turning it on.
If the problem continues, you may need to consider replacing the cooling fan. Minimally, you should purchase an external cooling unit for your device.
Execute BIOS Recovery Process
If all else fails, you may be dealing with a BIOS chip or BIOS firmware corruption issue.
Often when this is the case, you will randomly hear a high pitch beeping sound or certain keys may flash
At startup, the very first thing your PC does is boot the BIOS. The BIOS firmware then configures your hardware, and then the hard drive itself takes over.
However, if you have a failure of the BIOS chip or firmware, this “handover” to your hard drive cannot take place!
There are two primary ways to perform a BIOS recovery. Let’s review them both.
Built-in BIOS Recovery
Many ASUS laptop models have a built-in key shortcut that triggers the BIOS recovery process automatically.
To test if you model has this capability, turn the device off and hold power button for about 10 seconds. Then separately try each of following key combinations:
- “F2” (press F2 key 5 to 10 times after the power on button is pressed or restart the system and press F2 when the ASUS logo is displayed)
- Windows key (or Function ‘fn’ key) + “B”
- Window key (or Function ‘fn’ key) + “R”
It is important to press each of these key combinations simultaneously before and during your attempts to turn the laptop on. Furthermore, after each attempt, hold down the power button for 10 seconds prior to trying a new combination.
If you’ve attempted all 3 of these key combos and nothing happens, your specific model does not have a built-in BIOS recovery option. You will need to use the alternative USB recovery method instead.
USB BIOS Recovery
First, get an old thumb drive laying around and insert it into a different PC then the one your are troubleshooting.
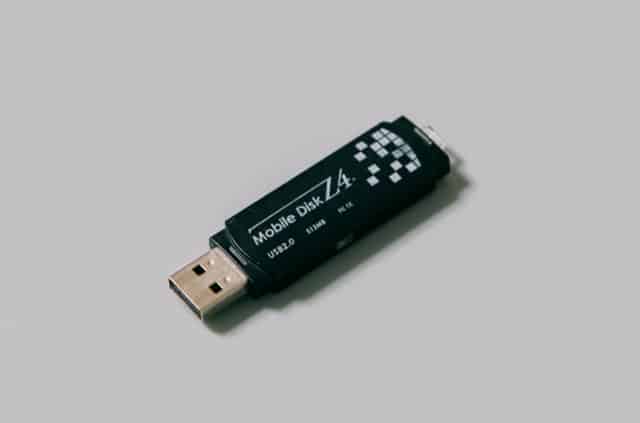
We are now going to reformat the flash drive to “FAT32“. It is important to be aware that once you complete this process, any information stored on your USB will be deleted!
To proceed, open up your Folders file, navigate to and right click on USB Drive (D:) and select Format.
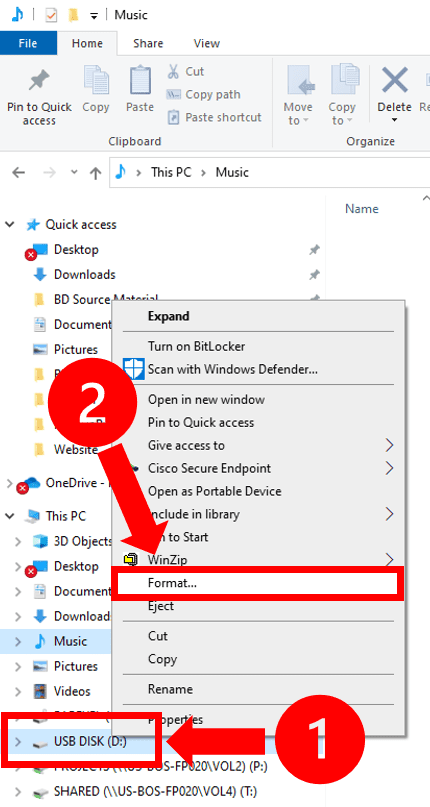
Under File system, click FAT32 from the drop down menu. Lastly, select Start, OK and Yes to finalize the formatting process.
With your flash drive now reformatted, head over to the ASUS Download Center.
Now locate your device’s model number. Typically you can find these numbers on the bottom side of the laptop. If you don’t immediately see it, unclip the battery and look under there.
Enter your model number into the search menu on the Download Center home page and hit Enter.
Then, select Drivers & Utility from the menu on the right side of the screen. Next, select your corresponding Operating System (OS) and then scroll down and Download the latest available BIOS version.
Once the file is downloaded, go to the downloads folder and open it. The file will ask you to make changes to your device. Select Yes. Then follow the steps by continuing to select Next and accepting the licensee agreement terms when prompted.
At the ASUS BIOS Update and Recovery window select Create Recovery USB flash drive and select Next.
On the next screen your newly formatted USB drive should pop up. Select it from the options and click Next. The BIOS recovery files you need will now be copied onto your USB drive.
When it is done loading the files, select Finish and then Cancel.
You can check to make sure the process worked by going back to your Files folder and checking the USB Drive (D:). You should see the newly downloaded files on there.
Now go ahead and eject the USB drive.
Turn OFF the ASUS laptop you are attempting to fix and insert the flash drive.
While attempting each of the recovery key combinations detailed in the above section, turn the computer back on. Continue holding the recovery key combinations during startup for at least 10 seconds.
The ASUS BIOS Update window will appear and the BIOS recovery will be initiated.
Once BIOS has been recovered, your laptop will restart. DO NOT INTERRUPT THE LAPTOP AT THIS TIME.
A screen will appear that states “A System BIOS Recovery has occurred. Press Enter to continue.” Go ahead and hit Enter.
That’s it! Your laptop should be fixed!
ASUS Laptop Warranty
Unfortunately, a small percentage of users will complete all 7 of these steps and their laptop will remain dead. If this is the case, I recommend you try contacting ASUS customer support at 1-888-678-3688.
In the event you need to purchase a new laptop, look up the specifics of your warranty first! You may be able to trade it in for a new one at no additional cost.
Conclusion
If your ASUS laptop won’t turn on, follow the 7 troubleshooting steps in order:
- Power drain the laptop
- Test the charger
- Test the battery
- Inspect RAM sticks
- Reinsert CMOS battery
- Clean or replace the cooling fan
- Execute BIOS recovery process
Hopefully you found this troubleshooting guide helpful. If you have any additional fixes you think are worth adding, give me a shout in the comment section below!

Chelsea Ashbrook is a Senior Manager of Corporate Digital Experience at Genentech. Chelsea received her B.A. from the University of Connecticut and has spent the last 11 years working in the technology field.
