Epson has a great lineup of printers. In fact, Epson is routinely among the top 3 best-selling printer brands in the US and globally! Having said that, they do come with a few challenges. One challenge repeatedly reported by users working from home is their printer printing blank pages.
If you encounter your Epson Printer printing blank pages, first power cycle the printer, enable ‘Skip Blank Pages’ and run Windows printer troubleshooter. Then, remove ink cartridge pull-tabs and check ink levels. Next, clean and align the printhead. Lastly, remove and reinstall the printer driver and update the firmware.
Let’s walk through each of these fixes in greater detail. I highly recommend you follow these steps in the exact order outlined below. We will start with the easier troubleshooting steps and then work our way to the more involved fixes.
Importantly, these steps will work for all Epson models (WorkForce Pro, EcoTank, Expression, etc).
Step 1: Power Cycle Printer
If your printer is working just fine one minute and the next it isn’t, the first thing you should always try is performing a power cycle. Power cycle is really just a fancy term for ‘unplug it and plug it back in’.
I know, I know – this fix sounds too simple. Humor me and give this a try first.
Electrical devices have both software and hardware components that can often become overloaded with information, causing all sorts of issue. Epson Printers are no exception.
By removing power to the device, it essentially refreshes the internal memory (RAM). This effectively allows the printer to function almost as if it were a “new” device.
How To Power Cycle An Epson Printer
- First, turn off the device and unplug the power cord from the back of the printer.
- Next, shut down the computer.
- Wait approximately 30 seconds.
- Now, turn the computer back on.
- Plug the power cord back into the printer and turn it on.
Go ahead and try printing a test page. If the issue persists, advance to step 2.
Step 2: Enable ‘Skip Blank Page’ Settings
Another easy troubleshooting step to quickly get out of the way is to closely inspect the document you are attempting to print.
Are there any blank pages within the document itself? Maybe even stretches of continuous blank pages?
Again, I appreciate that this may seem like an obvious step. You would be amazed how many users discover their issue is due to there being actual blank pages in the document they are printing!
An effective way to eliminate this possibility is to enable the Skip Blank Page option within the printer settings.
How To Enable Skip Blank Page In Windows
- First, navigate to Start > Settings > Devices > Printers & Scanners.
- Then, click on your model and select Manage > Printing Settings.
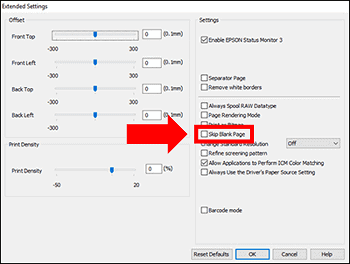
- Next, click the Maintenance tab and select Extended Settings.
- Finally, click the box next to Print Blank Page to enable it.
How To Enable Skip Blank Page On Mac
- First, navigate to Menu > System Preferences > Printers & Scanners.
- Then, click on your model and select Options & Supplies.
- Finally, under the Driver or Options tab, set Skip Blank Page to On.
Notably, some models may have slightly different steps involved. Furthermore, not every Epson Printer model offers the Skip Blank Page option.
If you are having trouble locating the Skip Blank Page option, or if you are unsure if your specific model supports it, you can use the Epson manual look up to confirm.
Step 3: Run Windows Printer Troubleshooter
When encountering any printer related issues, it is always a good idea to run the printer troubleshooting tool that’s built into Windows.
The Windows printer troubleshooter can identify all sorts of software related issues. It is easy to run and typically extremely helpful.
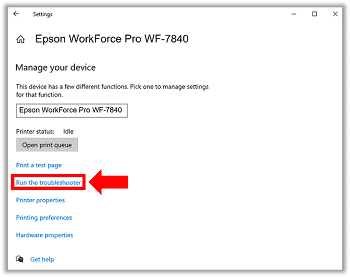
To run the troubleshooter, navigate to Start > Settings > Devices > Printers & Scanners then click on your model and select Manage followed by Run the troubleshooter.
Once initiated, Windows will search through your printer configuration and identify any settings conflicts that may exist.
If an issue is detected, Windows will ask you for permission to apply the relevant fix to get your printer back up and running.
Step 4: Inspect Ink Cartridges
In many cases, blank pages is being caused by one of two leading ink cartridge related issues. One of the most common issues users encounter is forgetting to remove the ink cartridge pull-tabs.
This is especially true if your printer is new or if you have just recently changed the ink.
The pull-tabs are positioned over small air holes in the cartridge that serve as ventilation mechanisms.
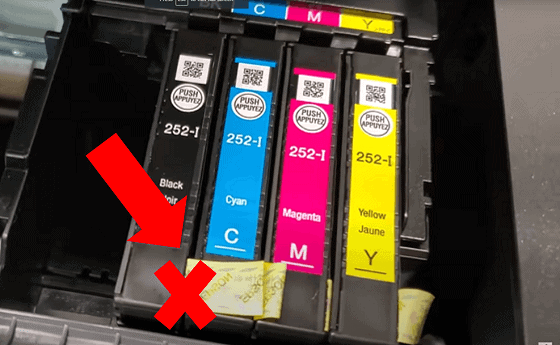
These pull-tabs are meant to be removed prior to installation! If they are left on, air cannot flow properly through the cartridge, leading to your Epson printing blank pages.
Use the side opening to insert your finger and lift up to open the top of the printer to access the ink cartridge holder. Once inside, inspect the ink cartridges and make sure no pull-tabs are present.
It is also not uncommon for blank pages to be caused by low or empty ink cartridges.
To inspect the ink levels, first make sure your device is turned on. Then navigate to Start > Settings > Devices > Printers & Scanners then click on your Epson Printer model and select Manage followed by Printing Preferences.
Within Printing Preferences, under the Main tab, select Ink Levels.
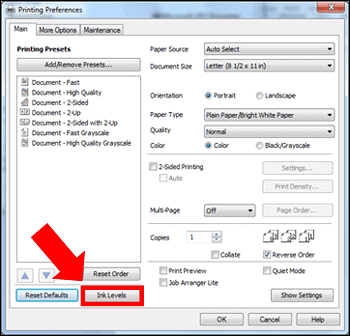
Here you will see information on each of the ink cartridges including their current ink levels. If any are low or empty, you will need to change the ink.
Step 5: Clean Printhead
The printhead is the component that receives an image and then transfers the correct amount of ink to a page.
Overtime it is common for the printhead to become clogged up with ink, causing print quality to decline.
To check if this is the case, once again navigate to Start > Settings > Devices > Printers & Scanners then click on your model and select Manage followed by Printing Preferences. This time, within Printing Preferences, select the Maintenance tab.
Here you will see a number of Epson Printer maintenance options to choose from. It is best to follow these in the order in which they appear.
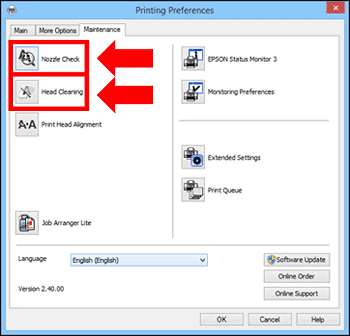
First, start with the Nozzle Check to determine if the printhead needs to be cleaned. Follow the onscreen instructions. A test page will be printed which you will need to compare to the expected output displayed.
If cleaning is indicated, proceed to Head Cleaning. Once cleaning is initiated, you will see a light blinking on your printer. When cleaning is complete, the light will transition from blinking to steady, at which point you can select Finish.
It is important to note that you may need to perform the Head Cleaning utility multiple times depending on how clogged the printhead is. Some users have even reported needing to run it over 10 times!
Additionally, depending on your model, an additional option called Power Ink Flushing may be available. For difficult cases, when the Head Cleaning utility is not sufficient, Power Ink Flushing will often do the trick.
In extreme cases, where the blockage cannot be fixed using via the utilities, you may need to perform a manual Epson printhead clean and nozzle flush.
As this process is a bit more involved, it is best to follow the instructions within the video below closely.
Step 6: Align Printhead
Epson print heads can also become misaligned over time. This is particularly true following a printhead cleaning.
In most cases, your device will still print but the output will appear slightly “off”. However, in more extreme cases, your printer may not print at all.
To align your Epson printhead, go to Start > Settings > Devices > Printers & Scanners then click on your model and select Manage followed by Printing Preferences.
Within Printing Preferences, select the Maintenance tab and this time click Print Head Alignment.
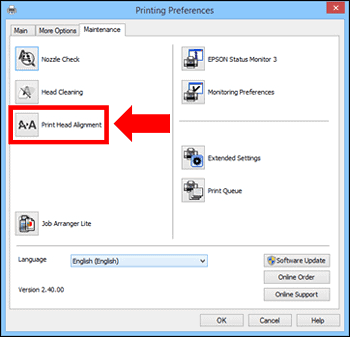
Run BOTH the horizontal and vertical alignment tests and follow the on-screen instructions.
Users have indicated that interpreting the alignment print tests can be confusing. If you are having any trouble, check out this Epson printhead alignment guide for additional information.
Step 7: Remove And Reinstall Printer Driver
If none of these fixes have solved the problem, it’s highly likely that your driver is corrupt and needs to be reinstalled.
Before attempting to reinstall a new driver, you will need to first fully remove and delete the old one.
How To Delete Epson Printer Driver
To delete your current driver, you will need to start by making sure the print queue is empty. If a print job is in the queue, you CANNOT fully remove the driver.
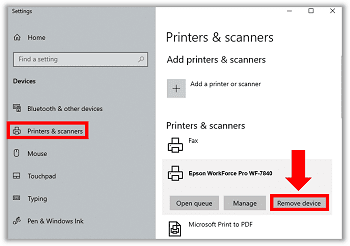
Go to Start > Settings > Devices > Printers & scanners then click on your model and select Open Queue. If there are any print jobs listed here, click on them and then push the Delete key.
Next, within the same Printers & scanners window click on your printer and this time select Remove Device.
Finally, once again within Printers & Scanners, scroll down beneath the printer names and select Print server properties.
Here under the Drivers tab, you need to select your device and click Remove.

A prompt will appear asking if you would like to remove the driver only or remove the driver and driver package. Select Remove the driver and driver package and click OK.
Leftover printer files can cause compatibility issues when you attempt to reinstall the new driver. It is therefore critical that you remove both the driver and driver package so that all of the associated files get deleted.
How To Reinstall The Latest Epson Printer Driver
- First, turn on and connect your printer to your PC
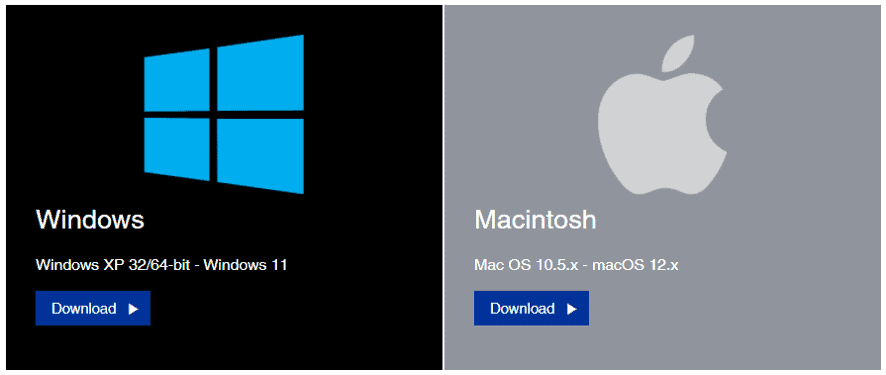
- Then, go to the Epson official website and select either the Mac or Windows version of Epson Connect Printer Setup Utility.
- Lastly, accept the terms and conditions and follow the step-by-step process in the window pop-up to install and register your printer.
- You will be asked to create a new account or you can sign-up with an existing account.
That’s it! Go ahead and try to print something.
Step 8: Update Printer Firmware
Firmware updates change how your printer accomplishes its tasks. By updating your firmware, you can fix all sorts of problems.
To update your firmware you must first download the Epson Software Updater if it is not already available on your PC.
Once downloaded, type ‘Epson Software Updater‘ in the search bar and select it from the menu. Then, within the Updater, click on your model, check the box next to Firmware Updater and Install Item(s).
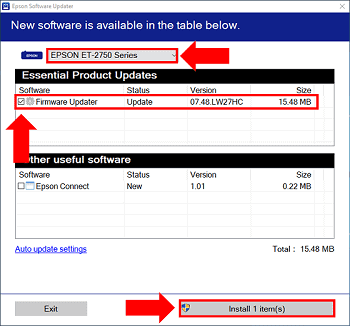
From here you can follow the on-screen instructions.
Important Note: DO NOT use your device while the firmware update is underway. You must wait until the firmware update has fully completed.
Final Word
Are you getting blank pages when you attempt to print? As it turns out, this is a fairly common problem with eight proven troubleshooting steps you can follow:
- Power cycle printer
- Enable ‘Skip Blank Pages’ settings
- Run Windows printer troubleshooter
- Inspect ink cartridges
- Clean printhead
- Align printhead
- Remove and reinstall printer driver
- Update printer firmware
If you are still having issues despite attempting each of these troubleshooting steps, you can contact Epson customer support by using your printer model number.
As a last resort, if you need to replace your printer, be sure to first verify your Epson Printer limited warranty and service plan.

Chelsea Ashbrook is a Senior Manager of Corporate Digital Experience at Genentech. Chelsea received her B.A. from the University of Connecticut and has spent the last 11 years working in the technology field.
