Over time it is common for the printhead to become clogged up with ink, causing print quality to rapidly decline. Occasionally cleaning your printhead can prevent all sorts of quality related issues and help keep your printer running smoothly.
To perform Epson printhead cleaning, start by running the self-cleaning Epson Printer Utilities. Conduct a ‘Nozzle Check’ followed by running the ‘Head Cleaning’ utility. If printhead quality issues persist, perform a manual clean by soaking the printhead for 2 minutes in a 50-50 mixture of distilled water and isopropyl alcohol.
The ‘printhead‘ is the component that receives an image and then transfers the correct amount of ink to a page. Depending on your printer model, the printheads will either be located directly on the bottom of the ink cartridges or on the bottom of the unit that houses the ink cartridges.
In either case, let’s review exactly how to clean and maintain your printhead. I highly recommend you start with method 1 below and only proceed to method 2 as needed.
We will start with the easier self-cleaning steps and then work our way to the more involved manual cleaning steps.
Method 1: Epson Self-Cleaning Printer Utilities
Epson utilities allow you to perform printer maintenance directly from your printer settings, without the need to physically handle the device yourself.
This is by far the easiest option and you should always start your cleaning process here.
How To Clean Printhead Using Epson Self-Cleaning Utilities
To access the Epson utilities, first navigate to Start > Settings > Devices > Printers & Scanners. Next, click on your model and select Manage followed by Printing Preferences.
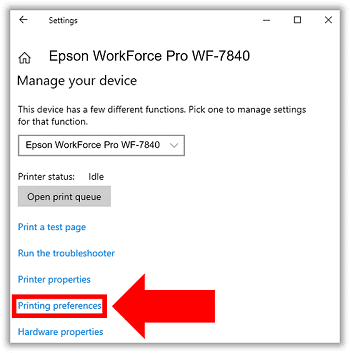
Finally, within Printing Preferences, select the Maintenance tab.
Here you will see a number of maintenance options to choose from. It is best to follow these in the order in which they appear.
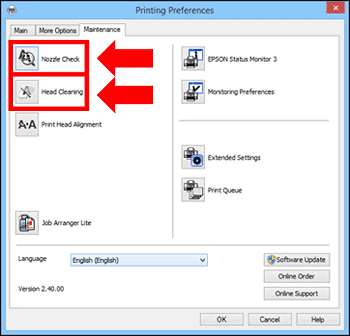
First, start with the Nozzle Check to determine if the printhead needs to be cleaned. Follow the onscreen instructions. A test page will be printed which you will need to compare to the expected output displayed.
If cleaning is indicated, proceed to Head Cleaning. Once cleaning is initiated, you will see a light blinking on your printer. Once complete, the light will transition from blinking to steady, at which point you can select Finish.
It is important to note that you may need to perform the Head Cleaning utility multiple times depending on how clogged the printhead is. Some users have even reported needing to run it over 10 times!
Additionally, depending on your model, an additional option called Power Ink Flushing may be available. For difficult cases, when the Head Cleaning utility is not sufficient, Power Ink Flushing will often do the trick.
While each of these self-cleaning methods unfortunately result in the loss of a fair amount of ink, they are often highly effective.
In the event both the Head Cleaning and Power Ink Flushing utilities don’t unclog the printer heads, try turning the printer off overnight. Often times this will allow the caked on ink to soften up a bit, at which point you can try running the self-cleaning utilities again.
How To Align Printhead
Printheads routinely become misaligned over time. In most cases, your printer will still print but the output will appear slightly “off”. However, in more extreme cases, your printer may not even print at all.
Printhead misalignment is extremely common following cleaning. For this reason it is critical to run the Print Head Alignment utility immediately after cleaning.
To align your printhead, go to Start > Settings > Devices > Printers & Scanners then click on your model and select Manage followed by Printing Preferences.
Within Printing Preferences, select the Maintenance tab and this time click Print Head Alignment.
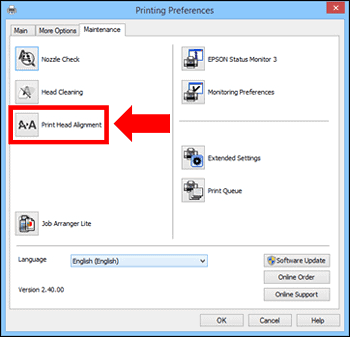
Run BOTH the horizontal and vertical alignment tests and follow the on-screen instructions.
Users have indicated that interpreting the alignment print tests can be confusing. If you are having any trouble, check out this Epson printhead alignment guide for additional information.
Method 2: Manual Printhead Cleaning
Many users will find that using the self-cleaning utilities is not enough. The ink build up is simply too great and the printhead blockages remain in place.
If you find yourself in this situation, you will need to manually clean the printheads.
There are a number of different techniques you can try. Let’s review each of these techniques, starting with the easier cleaning tips and ending with the more involved cleaning processes.
Preparing The Printhead For Cleaning
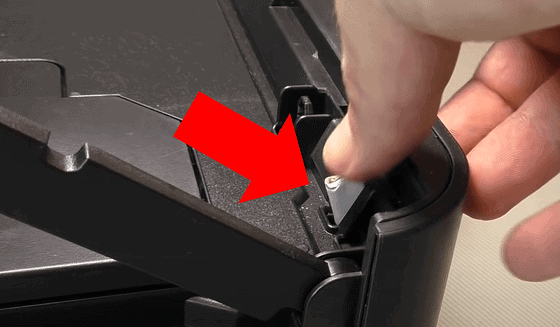
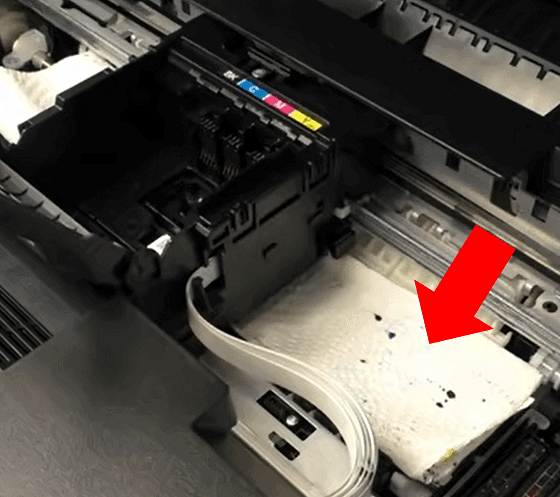
First, before we start, you will need to prepare the printer. To do so, use the side opening to insert your finger and lift up to open the top of the printer to access the ink cartridge holder.
With the top of the printer open, insert a piece of folded up paper into to the upper lid contact switch slot. This will trick the printer into thinking the top lid is closed.
Now, with the top of the printer open, initiate the Nozzle Check utility or simply print a document from your PC. As soon as the ink cartridges slide towards the middle of the printer, pull the power cord out from the back of the printer.
This will free up the printer compartment and allow you to easily move it from side to side for greater access.
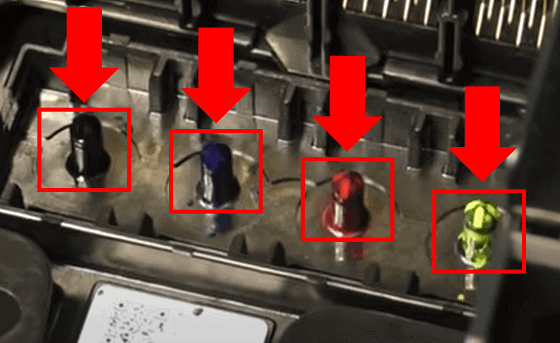
Next, unclip each of the printer cartridges and fully remove them from the printer. It’s a good idea to place the ink cartridges in a sealed plastic bag to prevent the ink from drying.
Even if you suspect there is only one printhead clogged, I highly recommend you clean all of the printheads at the same time.
Fold up a paper towel and carefully feed it underneath the ink cartridge housing unit . The towel will help absorb any excess ink, fluid, and debris during the process.
Lastly, mix a small amount of 50% distilled water with 50% isopropyl alcohol in a shallow bowl or plate. We only want enough liquid to just barley soak the printheads. Don’t over do it!
Importantly, you don’t want to use tap or mineralized drinking water, as those particles may have a negative effect on the heads after a few clean ups. Therefore, it is always good to use distilled water, which you should be easily able to find in any grocery store.
Locating The Printheads
At this stage is critical to determine where your printheads are located. Start by examining the bottom of the ink cartridges.
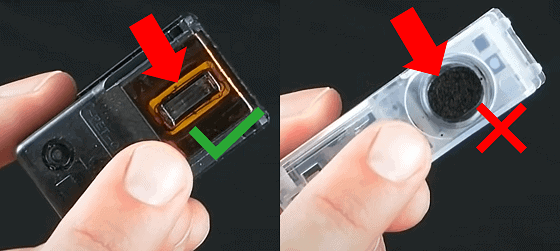
If you see a thin metal strip, your printheads are located on the ink cartridges.
If however, you see a small sponge this is not a printhead and these ink cartridges should not be cleaned!
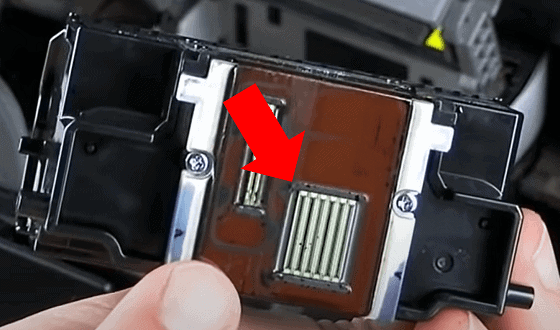
For folks that see this sponge component on the bottom of their ink cartridges, this means that the printhead is located on the bottom of the ink cartridge housing unit. Go ahead and remove it to confirm.
Depending on your specific Epson model you should be able to simply unclip it. For others, you may need to first remove a few screws.
Cleaning The Printheads
For this phase, I recommend you throw on a pair of latex gloves to avoid getting ink on your hands. Ink can be extremely challenging to clean off!
Depending on where your printheads are located, place either the ink cartridges or the ink cartridge housing unit into the shallow 50-50 liquid mixture. Be sure the printhead portion is facing down and is just barely submerged.
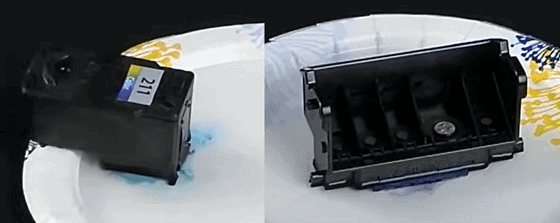
After a few minutes, remove the printhead from the liquid and pat it dry with a paper towel.
If you are dealing with a more stubborn blockage, consider soaking the printhead in the liquid overnight.
For many models, once you have removed the ink cartridges, you will also notice exposed ink nozzles underneath.
It is extremely common for the ink nozzles to also become backed up and clogged!
It is therefore a good idea to clean these as well while you have the access. Using the same 50-50 liquid mixture, slowly allow 5-10 drops to drip directly on top of each of the nozzles.
This is where that paper towel you previously set in place underneath the ink cartridge holder will come into play! With a Q-tip in hand, carefully clean and dry the outer nozzle surroundings.
For more extreme nozzle blockages, you will need to purchase a syringe and some custom tubing to more thoroughly flush them out.
Lastly, make sure all components are completely dry before reinstalling them it back into the printer.
Once you are all wrapped up, go ahead and re-run the Nozzle Check utility. The printheads should now be clean and the print quality issues should be solved!
Long-term Printhead Maintenance
Manual printhead cleaning can prove to be a bit time consuming.
It is therefore always a good idea to perform regular maintenance on your printer in an effort to prevent any future quality issues, such as smeared ink or printing blank pages.
Here are a few steps you can take to help prevent a future blockage:
- When your printer sits around without being used for a long period of time, it increases the chances of the ink drying. You should aim to print at least a page every week or so to keep the printheads clear.
- If there is ever a stretch of time where you are fairly certain you will not be using your printer, go ahead and remove the ink cartridges. This will prevent longer term ink leakage. You can keep the ink cartridges in a sealed plastic bag for long periods of time without issue.
- Additionally, when you are not actively using the printer, turn it off! When the printer is left on, it can warm up the ink cartridges causing the ink to leak out and later dry.
- Finally, remember that you can and should run the self-cleaning Epson Printer utilities BEFORE your run into a quality issue. By running the self-cleaning utilities regularly, you can help keep the printheads clear and clean.
Conclusion
Attempting to print, only to discover your Epson Printer either won’t print or has low print quality can be frustrating. Fortunately, cleaning the printhead is a relatively straight forward process.
To perform Epson printhead cleaning, start by running the self-cleaning Epson Printer Utilities. Conduct a ‘Nozzle Check’ followed by running the ‘Head Cleaning’ utility. If printhead quality issues persist, perform a manual clean by soaking the printhead for 2 minutes in a 50-50 mixture of distilled water and isopropyl alcohol.
If for any reason, your print quality does not improve, you can try entering your model number into the official Epson Printer manual lookup for additional information.
You can also call Customer Service at 1 (800) 463-7766 and verify your limited warranty and service plans.

Chelsea Ashbrook is a Senior Manager of Corporate Digital Experience at Genentech. Chelsea received her B.A. from the University of Connecticut and has spent the last 11 years working in the technology field.
