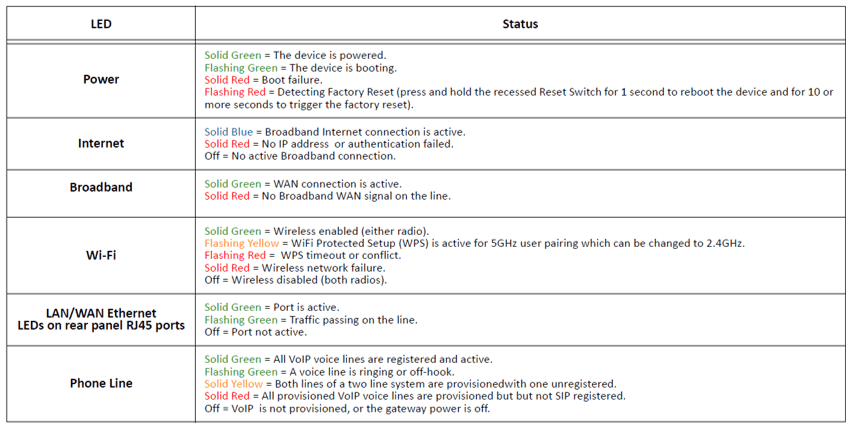
The primary Frontier routers include Arris NVG468MQ, NVG448BQ, NVG448B and NVG443B. Notably, each of these gateways have the same six Frontier router symbols – Power, Internet, Broadband 1, Broadband 2, WiFi and Phone Line. In addition, there are four Frontier router lights – blue, green, yellow and red.
Each symbol and light combination represents a different router status.
Frontier Internet users report that the Internet, Broadband and WiFi lights require troubleshooting most often. So for the purposes of this article, that’s what we’ll focus on.
As you can see, there is a lot you can learn about the status of your Frontier router based on the color of the light coming from each of the LED symbols.
Something to keep in mind is that it can often take up to 15 minutes for the Arris NVG448BQ, NVG448B and NVG443B Frontier routers to achieve service connectivity.
First make sure you give the device sufficient time to do its thing before troubleshooting!
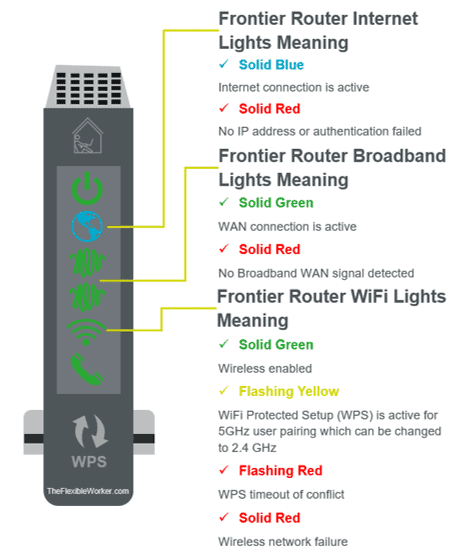
Frontier Router Blue Globe – Internet
The Frontier router blue globe signal indicates that the gateway is turned on and the internet connection is active. It is important to note that on initial setup, it can take up to 15 minutes to achieve service connectivity. Be sure to allow the router sufficient time to connect.
A solid blue light on the Internet globe symbol is what you are trying to achieve.
It means your internet is connected and everything is functioning properly!
Frontier Router Red Globe – Internet
The Frontier router red globe indicates no IP address or authentication failed. The router is not connected to the internet. To fix it, perform a standard reset by pressing the power button or unplugging the power cord. Turn it back on or plug it back in and wait 30 seconds.
Encountering the ‘red globe on Frontier router’ error can be incredibly frustrating.
If a standard restart doesn’t solve the issue, don’t worry, there are some additional proven troubleshooting steps you can try.
I strongly recommend you follow these steps in order.
Step 1: Perform A Standard Restart
As mentioned, the first thing to do if you encounter the Frontier router red globe is restart your gateway.
There are two different ways to restart an Arris router:
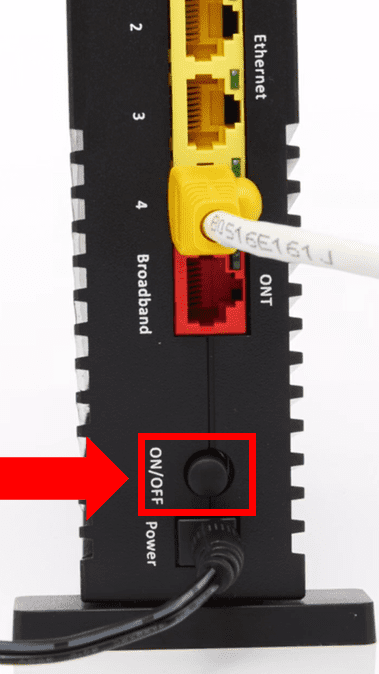
- Power Button Method: First, press the power button located on the back of the router to turn it off. Then, wait 30 seconds. Lastly, press the power button again to turn the router back on.
- Power Cycle Method: First, while the router is on, unplug the power cord to your router. Then, wait 15 seconds. Lastly, plug the router back into the electrical outlet.
Regardless of which restart method you choose, allow the gateway 15 minutes before checking the internet connection.
Step 2: Confirm Correct Cable Connections
The Frontier router red globe signal can also indicate there is an incorrect router cable connection.
Make sure that you are using the correct cables and that the cables are connected to the correct ports.
The router can be connected to the internet by a variety of different ways depending on your home Frontier Internet setup and installation.
Frontier Arris Router – DSL Internet Connection
- First, insert the DSL filter (also called a DSL splitter or microfilter) into the wall jack where your high-speed internet service is located.
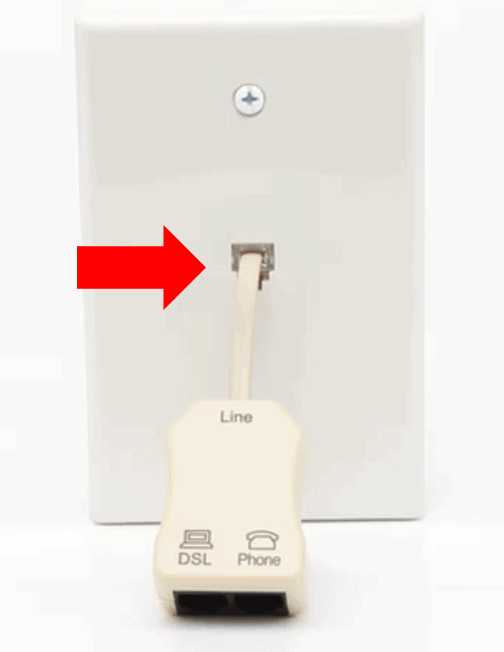
- Next, connect one end of the green DSL cable to the green DSL port in the back of the router. Then, connect the other end to the DSL cable to the port in the DSL filter.
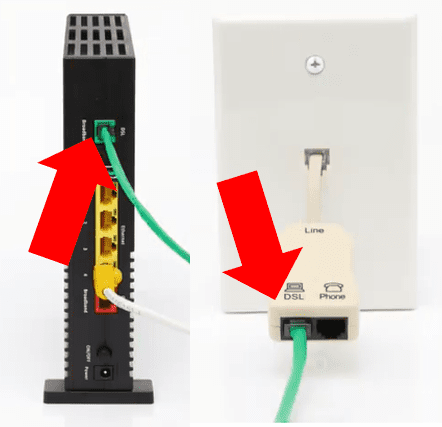
- Finally, plug one end of the power cable into a working wall outlet and the other end into the power port in the back of the router.
Frontier Arris Router – Ethernet Internet Connection
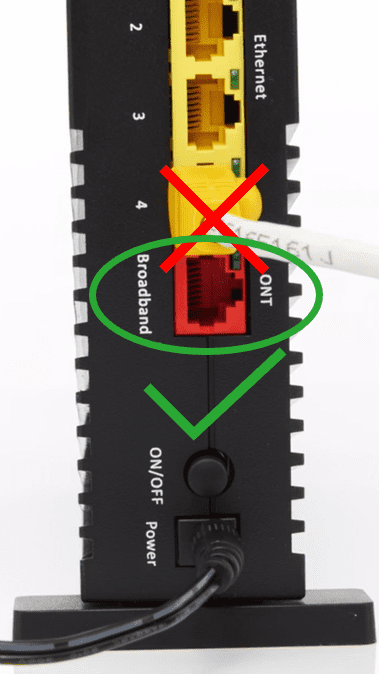
- First, connect one end of the white Ethernet cable to the red Ethernet port labeled “ONT” on the back of the router.
- Then, either connect the other end to the Ethernet port on your wall OR directly to the ONT box depending on the ONT location and installation setup in your home.
- Next, confirm the Coax connector on the ONT is securely connected to the home wiring used by the Router (or directly to the Router depending on your setup). Many ONTs require this connection for both Data and TV services.

- Lastly, plug one end of the power cable into a working wall outlet and the other end into the power port in the back of the router.
IMPORTANT NOTE: The number one mistake users make when attempting to use an Ethernet cable to connect the router to the internet, is using the wrong Ethernet port. Make sure the Ethernet cable is connected to the red ONT port and NOT one of the four yellow Ethernet ports on the back of the router.
The four yellow Ethernet ports on the back of the router can be used if you wish to established a wired internet connection with your computer.
If your home uses a DSL Internet connection, you can use the provided white Ethernet cable to establish a wired connection. However, if your home uses an Ethernet Internet connection, this white cable will already be in use and you will therefore need to buy a second cable.
Frontier Arris Router – MoCA Adapter
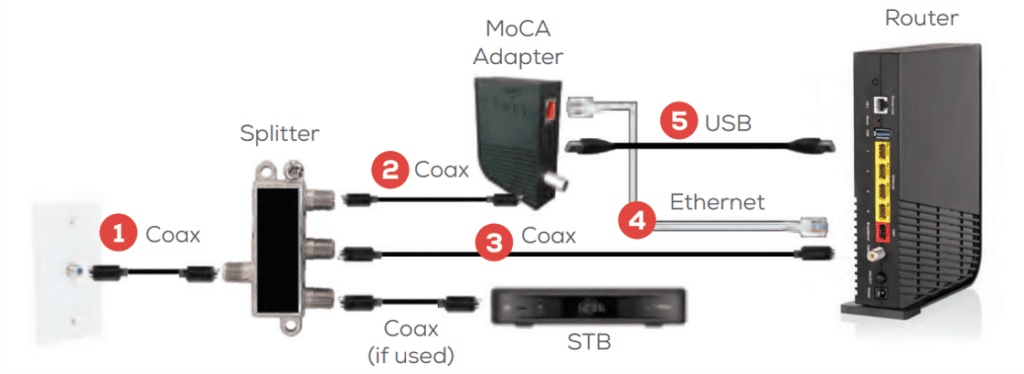
- First, connect a Coax cable from the wall jack to the side of the Splitter (Coax In) with a single port.
- Then, use a second Coax cable and connect one of the remaining ports on the Splitter (Coax Out) and then to the port on back of the MoCA Adapter labeled ONT Broadband.
- Next, connect the third Coax cable to a remaining port on the Splitter and then to the port on the back of the Router labeled Cable Line.
- Now, connect the Ethernet cable to the red port on the MoCA Adapter labeled RG Broadband and then to the red port on the Router labeled ONT Broadband.
- Lastly, connect the USB cable to the port on the MoCA Adapter labeled Power and then to the port on the Router labeled USB.
Once the cables are all sorted out, wait for a solid blue globe indicating the router is successfully connected to the Frontier network.
Step 3: Check For Local Internet Outage
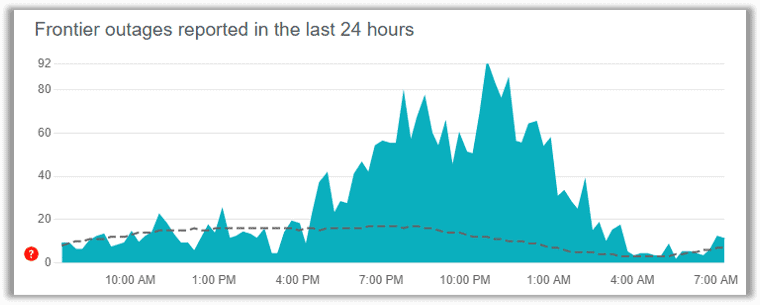
Your Frontier router can become disconnected from the internet as a result of a local internet outage.
Use your cellphone to visit the official Frontier service outage webpage to see if there are any service outages near you.
You can also try visiting the Frontier Down Detector page to see if other Frontier Internet users are reporting similar problems.
If there is a local outage, continue to monitor the situation and wait until Frontier has fixed the issue.
In the meantime, if your cellular data plan allows, consider using your cellphone as a WiFi hotspot.
Step 4: Perform A Factory Reset
Another fix you can try is performing a factory reset on your Frontier router.
Unlike a standard restart, a factory reset undoes any settings you may have changed. For example, if you have created a new router name and password, a factory reset will undo that change.
Keep this in mind before proceeding.
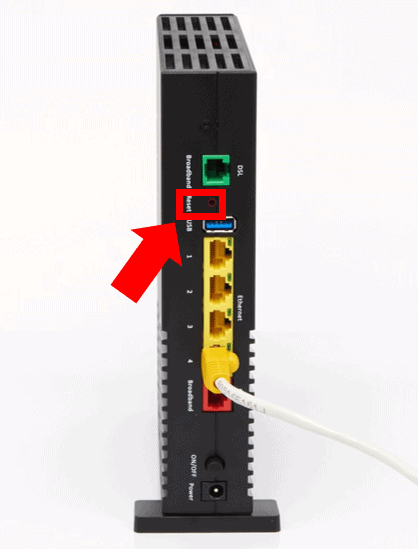
To factory reset the Frontier router, use a paperclip to press and hold the Reset button on the back of the router for 10 seconds. The reset process will start about 10 seconds after you release the button. When the globe/internet light glows, the router has completed its reset process.
It is normal during the reset process for the lights on the front panel to turn off and then start flashing.
When the reset process has completed, try to access the internet as you normally do.
Step 5: Check Your Frontier Account Status
A Frontier router red globe can also be caused by issues with your Frontier account.
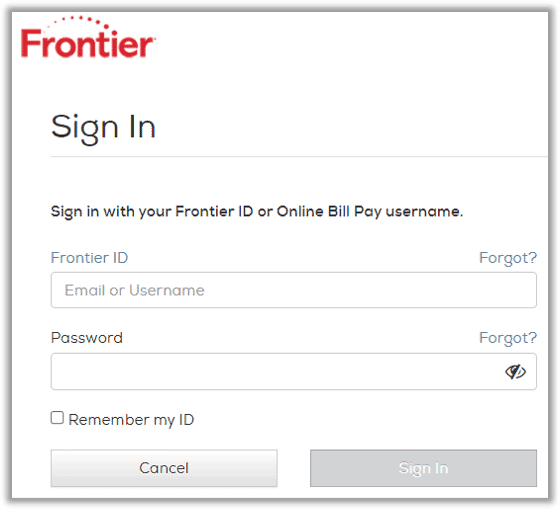
Check your account status by signing in with your Frontier ID.
Invalid payment methods or errors with your home address and other personal profile settings can result in inactive service.
Confirm your account is up to date and active.
Frontier Router Green Squiggly Line – Broadband
The Frontier router green squiggly line indicates that the WAN connection is active and the gateway is fully connected to your Frontier Internet service.
No action is required – a green broadband light is what you want to see!
Frontier Router Red Squiggly Line – Broadband
The Frontier router red squiggly line indicates that no Broadband WAN signal is detected. To fix it, turn off the power to BOTH the ONT box and router for 10 minutes. Then restart the ONT, followed by the router. If that doesn’t work, change the router ISP protocol to DHCP.
Encountering the Frontier router red squiggly line broadband error is another annoying problem Frontier Internet users frequently report.
I recommend you try the following troubleshooting steps in order.
Step 1: Restart The Router And ONT Box
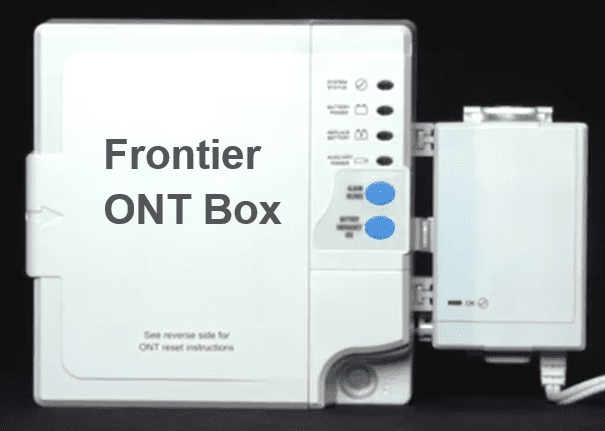
If you are encountering the Frontier router red squiggly line broadband error, your Frontier ONT box is usually to blame.
What is the ONT box and where is it located?
ONT stands for “Optical Network Terminal” (ONT).
The Optical Network Terminal (ONT) converts the signal coming through the fiber into separate signals for TV, voice, and internet.
Notably, the ONT can be installed on either the inside or outside of your home.
Most single-family units, also known as “SFU ONT”, can often be found in the garage, basement, or a closet.
In some apartment buildings, there is only one multi-dwelling unit, or “MDU ONT”.
If this is the case for you, you will not have direct access to the MDU ONT in your apartment. Instead, it will likely be in a demarcation room or utility closet within the complex.
Restart The Devices
Before attempting any other troubleshooting steps, the first thing you should do is turn off the power to BOTH the ONT box and router for 10 minutes. Then restart the ONT, followed by the router.
If your router is directly connected to the ONT box, I also recommend disconnecting the Ethernet and/or Coax cables on both ends after powering the devices down. Then reconnect them prior to powering the devices back on.
Many Frontier Internet users have indicated that this is the primary fix that worked for them.
Step 2: Reconfigure The Router Connection Settings
Another leading causes of the Frontier router red squiggly line signal is having incorrect ISP protocol router connection settings.
In order to prevent broadband connection issues, you must sign into your router and change the ISP protocol to DHCP.
How Change The ISP Protocol To DHCP:
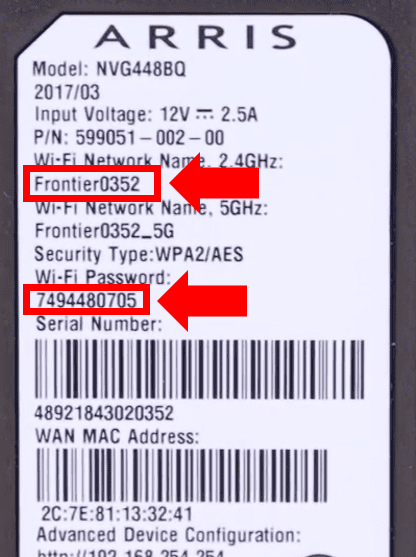
- First, set your computer’s WiFi to the 2.4Ghz WiFi Network Name listed on sticker located on the bottom of the router.
- Then, navigate to your router’s login page by typing the IP address “192.168.254.254” into your web browser.
- Next, enter “admin” into the username field (all Frontier routers have the same username) and use the password listed on the bottom of your router.
- Once you are logged into the router, click Connection Settings from the menu on the left side of the window.
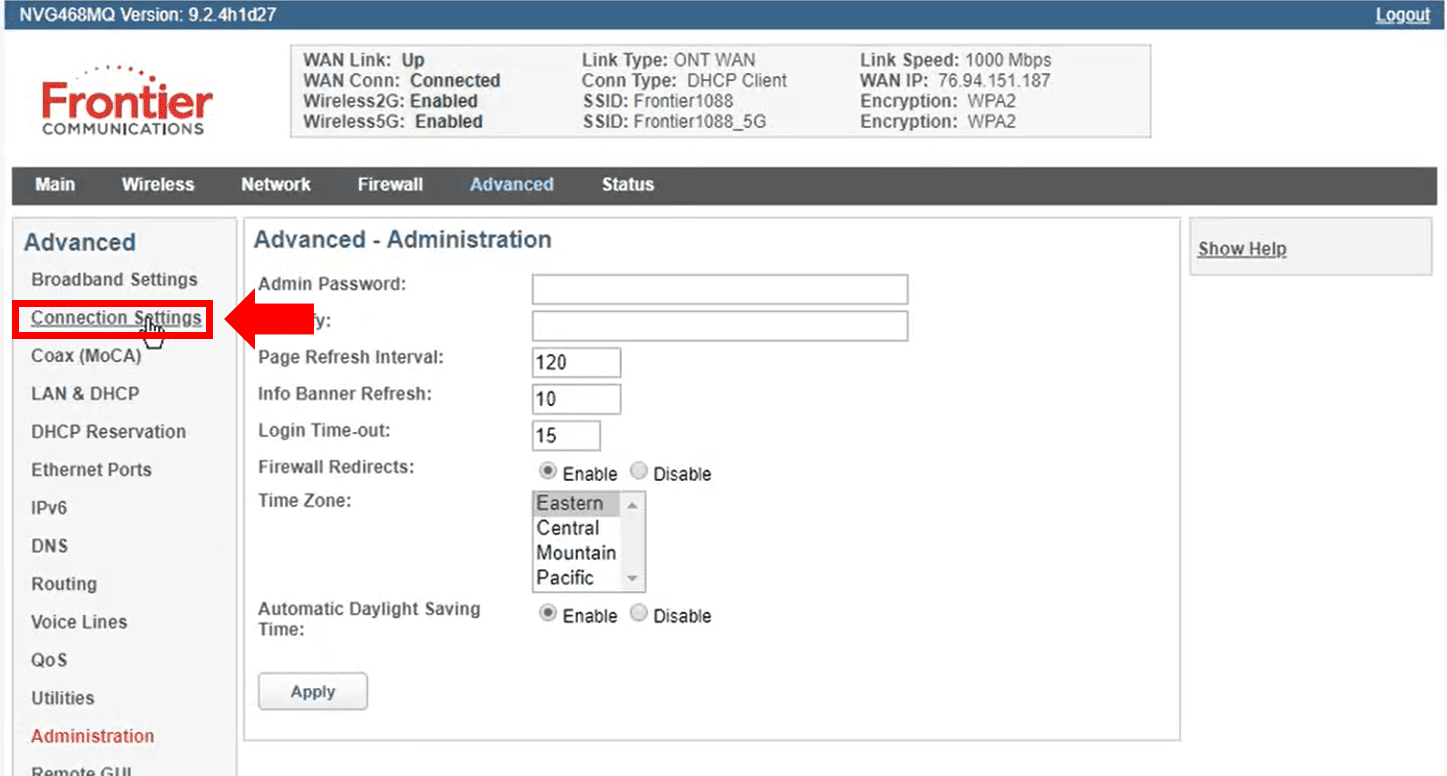
- Finally, under Advanced – Connection Settings, change the ISP Protocol to DCHP. Then, change the DNS Type to Static DNS and enter “8.8.8.8” into the Primary DNS Address field, followed by “8.8.4.4” in the Secondary DNS Address field. Lastly, click Apply to save the changes.

Nicely done! Your router connection settings are now up to date.
Allow the router approximately 15 minutes to establish a connection. The broadband light should now turn green.
If the router does not connect, try turning it off for 30 seconds using the power button and then turn the router back on again.
Step 3: Use The Frontier Internet Automated Troubleshooting Tool
In some cases the Frontier router red squiggly line may be due to faulty OS settings.
To test this, you will need to use the Frontier Network Troubleshooter.
Simply sign in with your Frontier ID and password and follow the automatic troubleshooting steps in order.
Step 4: Factory Reset
As a final measure, try resetting the router back to the factory settings.
As previously mentioned, performing a factory reset will erase any custom router settings you have applied, including your username and password.
To factory reset the Frontier router, use a paperclip to press and hold the Reset button on the back of the router for 10 seconds. The reset process will start about 10 seconds after you release the button. When the globe/internet light glows, the router has completed its reset process.
Frontier Router Green Light – WiFi
The Frontier router WiFi solid green light indicates that wireless internet is enabled and functioning.
Again, no action required! Your WiFi is functioning properly.
Frontier Router Yellow Light – WiFi
The Frontier router yellow WiFi light blinking indicates that the WiFi Protected Setup (WPS) is active for 5GHz user pairing. To pair a device, push the WPS button on the bottom of the router for at least 5 seconds and then push the corresponding WPS button on the device.
The WPS button on your Arris router enables you to establish a WiFi connection with a push of a button, instead of having to use a WiFi password.
If you wish to turn WPS pairing off, you will need to sign into your router and disable it.
Frontier Router Red Light – WiFi
The WiFi Frontier router red light blinking indicates a WPS timeout, while a solid red WiFi light indicates a wireless network failure. The WiFi is not functioning properly. To fix it, power cycle the router. If that doesn’t work, try disabling and then re-enabling the WiFi Protected Setup (WPS).
Step 1: Power Cycle The Router
While the router is on, unplug the power cord to your router.
Then, wait 15 seconds.
Plug the router back into the electrical outlet and allow the router 15 minutes to establish a WiFi connection.
Step 2: Disable and Re-enable WPS
Other than power cycling the device, the simplest and most effective fix when your Frontier router WiFi light is red is to disable and then re-enable the WiFi Protected Setup (WPS).
- First, go to your router’s login page by typing the IP address “192.168.254.254” into your web browser.
- Next, enter “admin” into the username field (all Frontier routers have the same username) and use the WiFi password listed on the bottom of your router.
- Once you are logged into the router, click Wireless from the menu at the top of the window and then click WPS from the left side menu.
- Finally, under Radio Selection first select 2.4 GHz Radio from the drop down menu and then under WiFi Protected Setup select Disable and then Apply. Then, do the same for 5 GHz Radio. Lastly, select the Radio Selection you wish to use (typically 2.4 GHz Radio) and select Enable and then Apply.
- That’s it! Wait a few minutes and see if your WiFi connection is fixed.
For a full breakdown of the above process, jump to the 2:52 minute mark in the video below.
Step 3: Change The 2.4GHz and 5GHz SSID Names
Frontier routers, like most routers, are dual frequency.
For this reason, your gateway has two different frequency channels – 2.4 GHz and 5 GHz.
You need to make sure that the SSID names for the 2.4 GHz and 5 GHz frequency channels are different by at least one character.
If the SSID names are the same for both channels, all sorts of WiFi issues can arise.
To check if this is the case, log into your router using the process described in the step above.
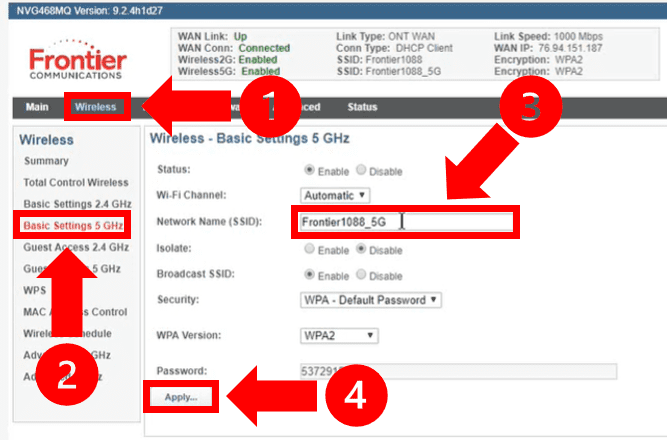
Once you are logged in, select Wireless from the top menu and then Basic Settings 5 GHz from the menu on the left. Next, take note of the Network Name (SSID) given to the 5 GHz frequency.
Then, select Basic Settings 2.4 GHz from the menu on the left and make note of it’s SSID name.
If these two names are the same, you need to change one of them!
Step 4: Disable Proxy Server For Local Area Network (LAN)
Your WiFi troubles may also be due to a proxy server.
For the next troubleshooting step, try disabling the proxy server for your local area network (LAN).
Ultimately, a proxy is a sort of filter or gateway between your device and the broader internet.
The problem is, your proxy can sometimes act as a firewall, blocking your WiFi connection!
To determine whether or not the proxy server is causing the problem, disable it.
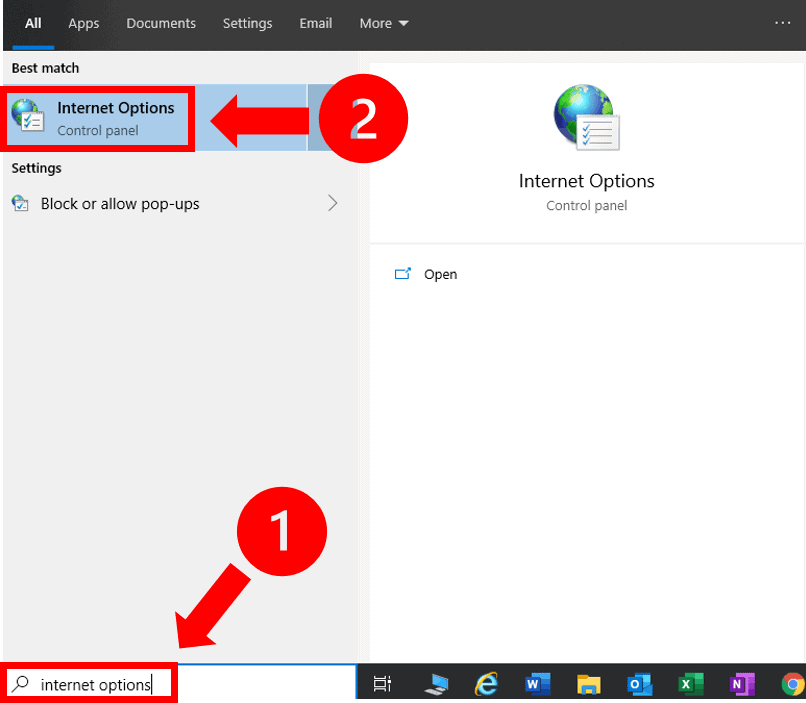
- First, type “Internet Options” into the Windows search field and click Internet Options in the search results.
- Next, click on the Connections tab and select LAN settings.
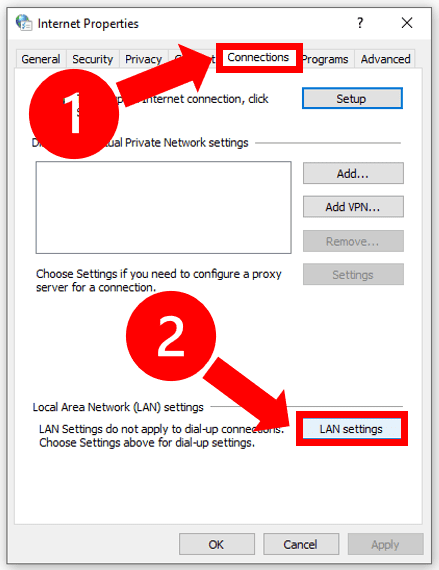
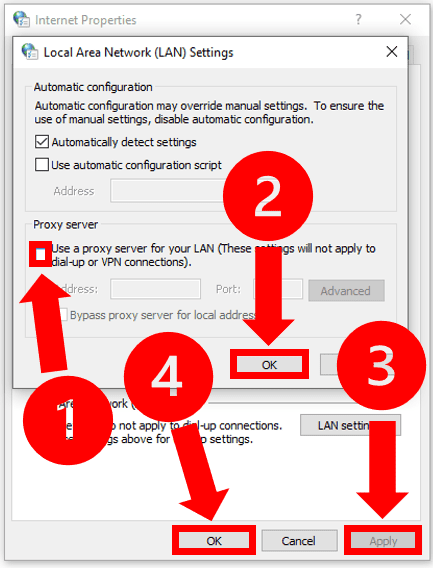
- Within the Local Area Network (LAN) Settings, uncheck the Use a proxy server for your LAN option. Then, click OK, Apply and OK again to save the changes.
- Finally, restart the computer.
Once your computer fully reboots, try accessing the WiFi again.
Step 5: Relocate The Router
The location of your router can have a significant impact on your internet connection.
For ideal placement, relocate the router to a central, high-up location away from other devices.
Because the Frontier gateway sends signals in every direction, placing it low to the ground or tight against a wall can interfere with the signal. This results in decreased coverage!
Router Location Recommendations:
- Place the router in a central, open area
- Make sure the router raised up off the ground
- Try to avoid enclosed areas like cabinets or wall corners
- Do not place the router behind a TV
- Move other devices as far away from the router as possible
For best performance, the Frontier router is designed to stand in a vertical, upright position.
By optimizing the router’s location in your home, you dramatically improve your internet connection.
Step 6: Factory Reset
You guessed it! As a final measure, try resetting the router back to the factory settings.
To do so, use a paperclip to press and hold the Reset button on the back of the router for 10 seconds. The reset process will start about 10 seconds after you release the button.
When the globe on the front of the router glows, the gateway has completed its reset process.
Conclusion
In total, there are six different Frontier router symbols and four different Frontier router lights. Each symbol and light combination represents a different router status.
Frontier Internet users report that the Internet, Broadband and WiFi lights require troubleshooting most often.
Internet Lights Meaning:
- Solid Blue Globe – Internet connection is active
- Solid Red Globe – No IP address or authentication failed
- Off – No active connection detected
Broadband Lights Meaning:
- Solid Green Squiggly Line – WAN connection is active
- Solid Red Squiggly Line – No Broadband WAN singal on the line
WiFi Lights Meaning:
- Solid Green – Wireless enabled
- Flashing Yellow – WiFi Protected Setup (WPS) is active for 5GHz user pairing which can be changed to 2.4 GHz
- Flashing Red – WPS timeout of conflict
- Solid Red – Wireless network failure
- Off – Wireless disabled
If you couldn’t find exactly what you were looking for in this article, check out the official Frontier Internet Troubleshooting page. You can also try calling the Frontier helpdesk at 1 (800) 921-8101.

Chelsea Ashbrook is a Senior Manager of Corporate Digital Experience at Genentech. Chelsea received her B.A. from the University of Connecticut and has spent the last 11 years working in the technology field.
