Like many businesses, my company decided to deploy Microsoft (MS) Teams back in early 2020. Teams is a great platform that I use daily, but it is not without it’s annoyances.
One issue I have come across is my Teams status automatically changing to “Away” after 5 minutes. So, I did some digging. Here’s how to keep Teams active and keep your status always available:
- Delay or disable sleep mode
- Manually change “Presence” status state and duration
- Start a Teams meeting with yourself and change status to “Available”
- Run select applications in the background to keep your status active
- Run a script that prevents your PC from entering sleep-mode
There are plenty of legitimate reasons why you may want to keep your Teams presence active. And to be clear – we don’t support nefarious reasons for wishing to alter your Teams status.
Perhaps you are working in the background but you want your coworkers to know that you are available. Maybe you need to step away from your PC but you are available via Teams mobile. You may even like to routinely block off time dedicated to productivity and wish to appear as “Busy” during this period.
Read on for a detailed step-by-step breakdown of each of these methods.
Microsoft Teams Presence Status
First, some important Microsoft Teams background information.
Within Teams, presence is used to indicate a user’s current availability and status to other users. This functionality allows anyone in your organization to check the availability of other users in nearly real time.
There are user configured status states and app configured status states.
User configured status states are manually selected by the user. The 6 user configured status states include Available, Busy, Do not disturb, Be right back, Appear away and Appear offline.
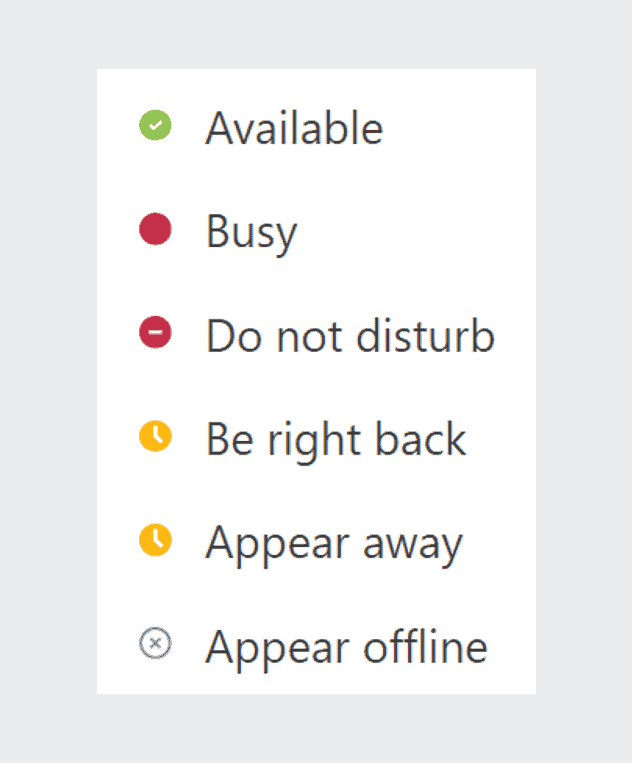
App configured status states are automatically adjusted based on activity, calendar states, or Teams app states. For example, if you have a calendar meeting scheduled your status state will automatically change to In a meeting.
It is the App configured status state that is responsible for automatically changing your status to Away.
Teams makes this status adjustment when it does not detect use of your keyboard or movement from your mouse. This is because lack of keyboard or mouse use over a certain period of time causes your computer to idle or enter sleep mode.
Ok. You now know the intent behind presence states in Teams and the various presence states options.
Now let’s explore how to keep Teams active with five proven methods.
Delay Or Disable Sleep Mode
Right out of the gate it is important to understand that if your PC or Mac is entering sleep mode, your Teams’ status will always automatically adjust to declare your status as “Away”.
So, before you implement any of the strategies below, adjust your operating system settings to significantly delay sleep mode or disable it all together.
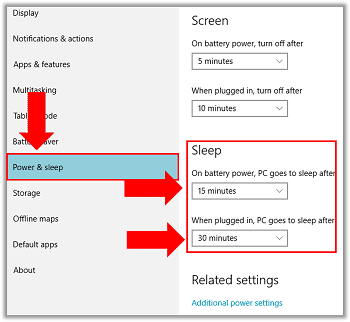
To adjust sleep mode settings on Windows, navigate to Settings > System > Power & sleep. Within the Sleep drop-down menu, select up to 5 hours or Never. Be sure to adjust this setting for both “on battery mode” and “when plugged in”.
To adjust sleep mode settings on Mac, navigate to System Preferences > Battery. Next, select Power Adapter and click the box next to “Prevent your Mac from automatically sleeping when the display is off.” Finally, under “Turn the display off after” section, adjust the the slider to 3 hours or Never.
Manually Change Your Presence Status State In Teams
There are two ways to manually change your presence status in Teams.
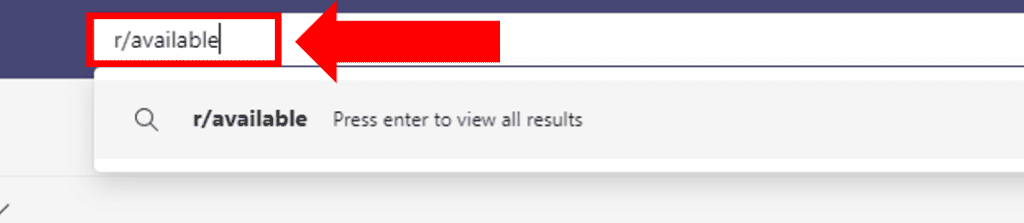
The first way is to use the command bar located in the Search field to change your status. To use this method first type forward slash (“/”) followed by your desired status. Then press Enter.
For example “/available” followed by Enter will set your presence state to available.
The second way is to select your profile near the top right corner of the Teams window. Next, click on your current status and choose your desired status from the drop down menu.
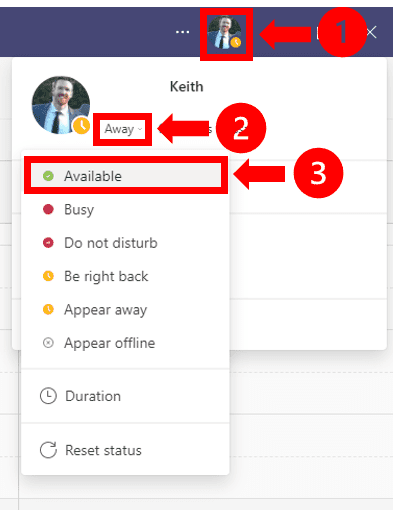
As you can see, this second approach also offers you greater functionality. Within the profile drop down menu you can manually set the duration of your presence status.
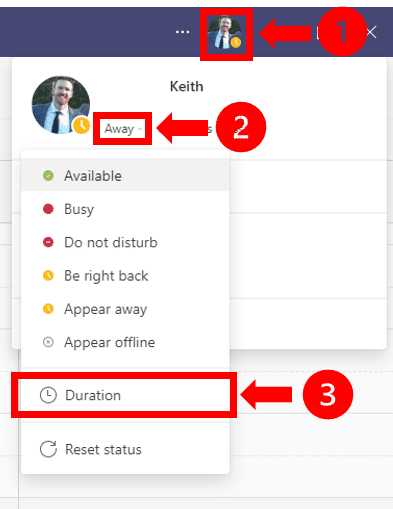
Once you have clicked Duration, select your desired Status from the drop down menu. Indicate how long you would like that status to appear by selecting an option from the Reset status after drop down menu.
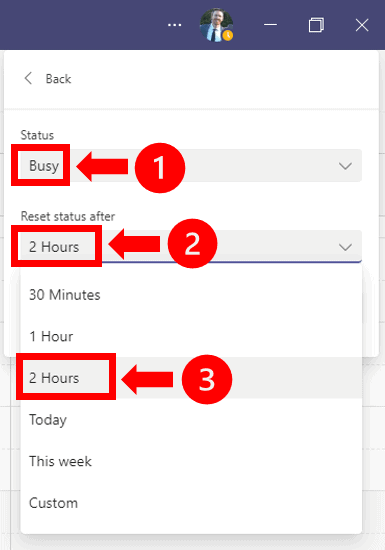
In the above example your status will now be set to Busy for the next 2 hours regardless of your activity!
Unfortunately, depending on your company settings, some status options (including Available) may not be available within Duration.
Start A Teams Meeting With Yourself
Another option that will give you greater control over your status is to enter a Teams meeting with yourself. Once the meeting starts, you can change the default state of In a meeting to any state you desire.
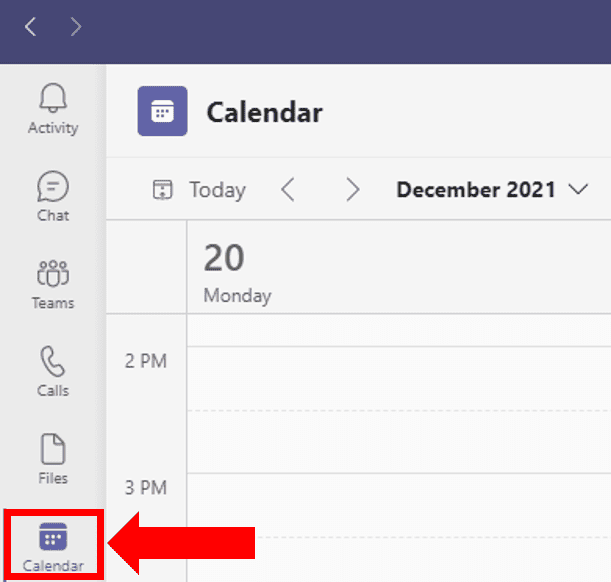
To start a Teams meeting with yourself, start by selecting the Calendar view from the navigation bar on the left hand side.
Then, click Meet now and Start meeting in the top right hand corner. Finally, manually change your status as previously described to your desired state.
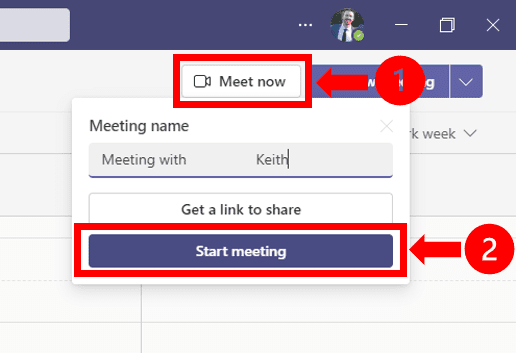
The benefit of this approach is your selected status state will remain active so long as you remain on the call. This is true regardless of mouse or keyboard use during this time.
Run Select Background Applications
Interestingly, there are a few computer applications that when running, will keep your selected Teams status state active.
Tested applications include:
- Running a Spotify playlist
- Using Presenter View in PowerPoint
- Playing a YouTube video
In some instances, your company may have restrictions on which websites and applications you can use. Even if this is the case, there is a high likelihood that you will have access to at least one of these three options.
Another downside to this approach to consider, is running these apps indefinitely can consume quite a bit of data – and this is in addition to your Teams data consumption, which is already significant!
Run A Script That Disables Sleep Mode
A final, slightly more involved option, includes running a script that prevents your computer from entering sleep mode.
As previously mentioned, not using your keyboard or mouse prompts your computer to idle and enter sleep mode. Your PC in turn speaks to Teams, which then automatically changes your status to Away.
There are a number of scripts that simulate mouse movement. This “movement” prevents your computer from idling, thereby keeping your selected Teams status active.
One of the most popular free apps for download is Move Mouse.
There are also a number of popular custom script options available. Check out the video below to try a really simple custom script code.
Notably, it is possible that your company has blocked scripts from being executed. In this case you will need to rely on one of the other previously detailed methods.
Conclusion
Is your Teams status automatically changing to Away after 5 minutes? No need to fret. Here’s how to keep Teams active and keep your status available.
- Delay or disable sleep mode
- Manually update “Presence” status
- Start a meeting with yourself and change status to “Available”
- Run select background applications
- Run a script that disables sleep mode
You now have full control over your Teams status!

Chelsea Ashbrook is a Senior Manager of Corporate Digital Experience at Genentech. Chelsea received her B.A. from the University of Connecticut and has spent the last 11 years working in the technology field.
