When I recently attempted to boot up my HP laptop, I noticed a light in the caps lock key start blinking and my laptop would not turn on.
After staring at a black screen following multiple failed attempts, I did some research to try and figure out what was causing the issue.
As it turns out, the number of times your HP laptop caps lock blinking occurs indicates the specific type of failure you are dealing with:
- 2 blinks: BIOS issue (perform BIOS recovery).
- 3 blinks: RAM not functional (reseat your RAM).
- 4 blinks: CPU or GPU overheating (clean or replace cooling fan).
- 5 blinks: System board failure (reset Embedded Controller and remove CMOS battery).
Let’s review each of these possible failures and their corresponding fixes in detail.
I recommend you first determine the number of times your caps lock is blinking. Then locate the corresponding troubleshooting section below.
Blinking 2 Times – BIOS Issue
The caps lock light blinking 2 times when you attempt to power up indicates there is a BIOS chip or BIOS firmware corruption issue.
You may also hear a beeping sound that will occur twice. Additionally, depending on your specific laptop model, your WiFi button may light up an amber color.
The Basic Input/Output System (BIOS) is essentially firmware located on your PC’s motherboard. When you turn your laptop on, the first thing your device does is start the BIOS which in turn sets up your hardware, allowing the hard drive to take over.
But for various reasons, your BIOS firmware can become buggy or fail altogether. When this happens, the handover to your hard drive is not able to take place!
When this occurs you need to perform a BIOS recovery which can be completed two different ways.
Built-in BIOS Recovery Function
Many HP laptop models have special key combinations that when used correctly, automatically perform a BIOS recovery. So before attempting a more involved process, let’s test if your model has a built-in recovery function.
Start by turning your computer off and holding the power button for about 10 seconds. You will know your laptop is off when the lights stop blinking and your laptop fan comes to a stop.
There are three different BIOS recovery key combinations you should attempt.
It is important to press and hold down each of these key combinations simultaneously both before and during your attempts to turn the laptop on. Additionally, prior to attempting a new key combination, be sure to turn off your laptop first.
HP BIOS recovery key combinations:
- Windows key + “B”
- Windows key + “V”
- “B”
If nothing happens despite trying all three of these recovery keys, don’t worry. There is manual process you can use instead.
BIOS Recovery Reinstall With USB
This manual process is definitely more involved but it is actually not that difficult.
For this recovery, you will need a USB “thumb drive” and a separate working computer.
We are going to reformat your USB which means any and all information contained on it will be lost. Save any information you wish to keep on your PC for now.
To reformat the flash drive to FAT32, start by plugging it in and then open up your Folders file. Next, navigate to and right click on USB Drive (D:) and select Format.
Within the File system section, select FAT32 from the drop down menu. Finally, select Start, OK and Yes to finalize the formatting process.
The next step requires you to head over to HP Customer Support – Software and Driver Downloads. Locate your HP laptop’s serial number. You can find the serial number on a sticker located on the backside of the laptop.
- Enter your serial number in the search field and click Submit.
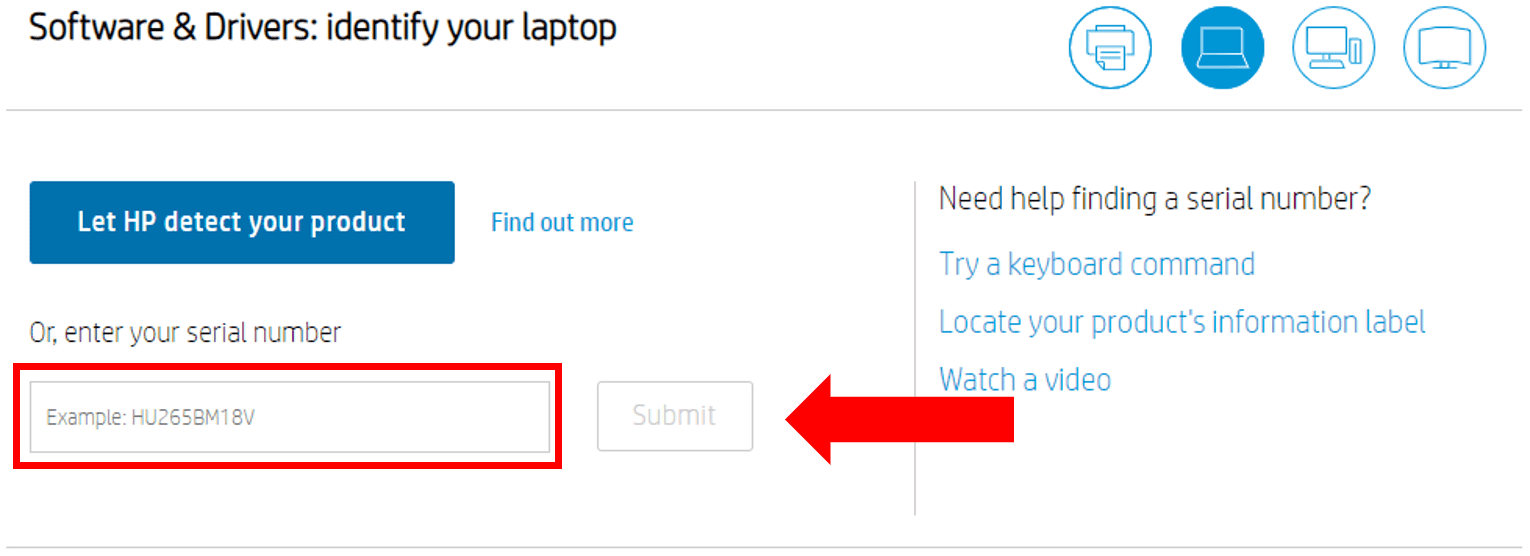
- On the next screen select BIOS and from the drop down items that appear, select Download (be sure to select the most recent BIOS update available based on the listed release date).

- Be sure to specifically select No thanks, I will download and install manually at the bottom of the download window.
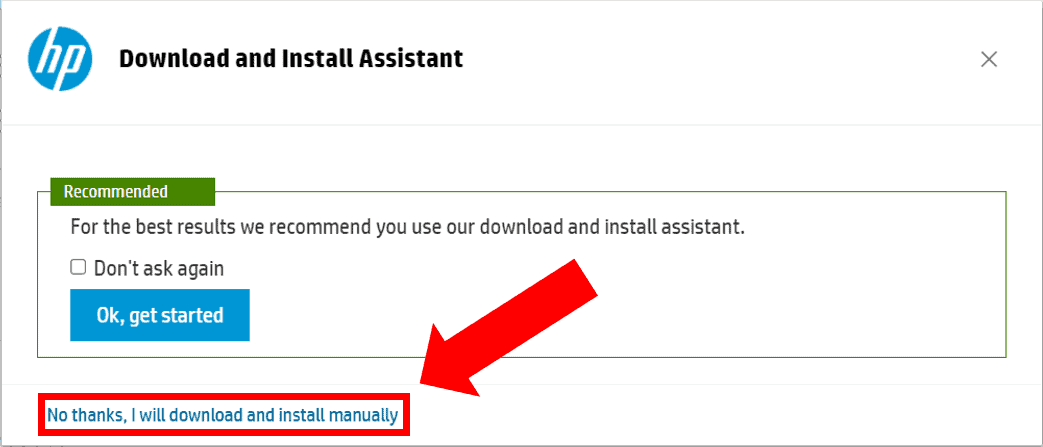
- Once the file is downloaded, go to the downloads folder and open it. The file will ask you to make changes to your device. Select Yes. Then follow the steps by continuing to select Next and accepting the licensee agreement terms when prompted.
- At the HP BIOS Update and Recovery window select Create Recovery USB flash drive and select Next.
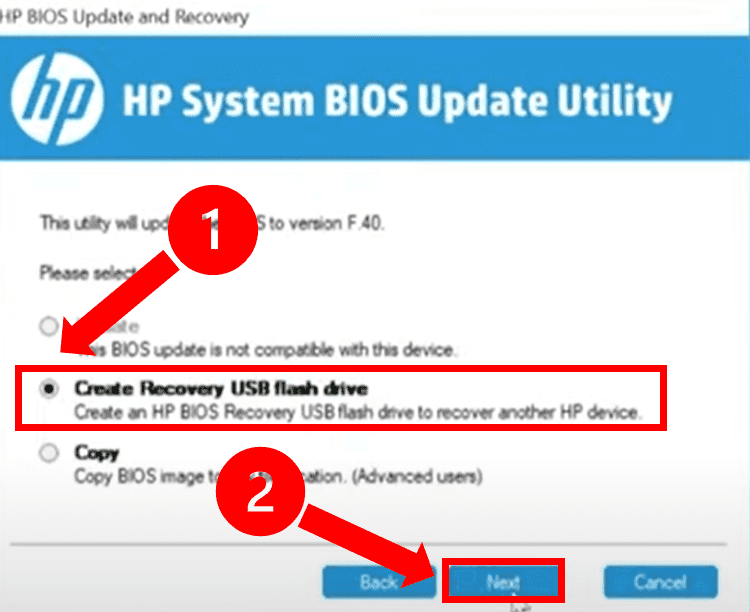
- On the next screen your newly formatted USB drive should pop up. Select it from the options and click Next. The BIOS recovery files you need will now be copied onto your USB drive.
- When it is down loading the files, select Finish and then Cancel.
You can check to make sure the process worked by going back to your Files folder and checking the USB Drive (D:). You should see the newly downloaded files on there.
You can now go ahead and eject the USB drive. Turn off the laptop you are attempting to fix and insert the flash drive.
While holding the Windows key and the “B” key simultaneously, turn the computer back on. Continue holding the Windows and B key during startup for at least 10 seconds.
The HP BIOS Update window will appear and the BIOS recovery will be initiated. Once BIOS has been recovered, your laptop will restart. DO NOT INTERRUPT THE LAPTOP AT THIS TIME.
A screen will appear that states “A System BIOS Recovery has occurred. Press Enter to continue.” Go ahead and hit Enter.
That’s it! Your computer should be fixed!
Blinking 3 Times – RAM Not Functional
If you notice the light is blinking 3 times during power up, that means the random access memory (RAM) is not functional.
RAM plays a huge role in the every day performance of your PC. If there is an issue with your RAM sticks, communication with the motherboard can breakdown resulting in your device not turning on.
Regardless of whether the communication breakdown is due to thermally damaged sticks, an improper connection, or extreme voltage, there are two reliable RAM fixes your can attempt.
Reseat RAM Sticks
The leading cause of this error is your RAM making an improper connection.
To fix this, start by turning off and unplugging the laptop and removing the battery. For many HP models, the RAM compartment is actually located underneath the battery (but not all).
Next, be sure to ground yourself so you do not accidentally fry the motherboard.
Depending on the location of your RAM compartment, remove the screws from the back and remove the case.
Finally, remove and then reinsert the RAM firmly into the RAM seat to ensure a proper connection.
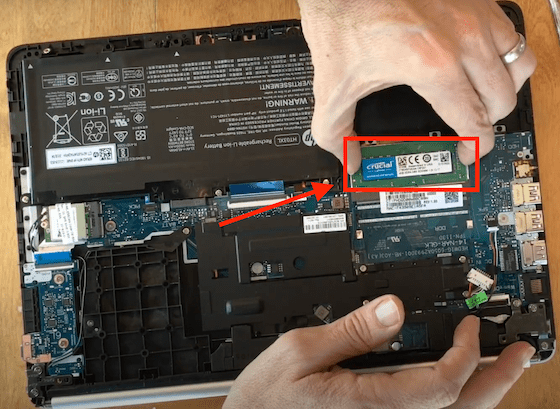
If your model has multiple sticks be sure to also reorder them. You should also try rebooting your PC after reinserting one RAM stick at a time.
Once you resemble your laptop it should power up and be fully functioning.
Run A Windows Memory Diagnostic Test
Even once the issue appears to be fixed, it is always a good idea to test the RAM itself for any faults.
Fortunately, Windows has a Memory Diagnostic Tool that allows you to inspect the working condition of your newly seated RAM sticks.
To run the test, type Windows Memory Diagnostic Tool into your search bar and click on it. Next, select Restart now and check for problems. Once your laptop has restarted, a RAM diagnostic report will appear.
If no issues are uncovered then you are all set and no further action is needed.
If however, there are issues discovered, your best route is to purchase a new RAM stick(s).
Blinking 4 Times – CPU or GPU Overheating
A total of 4 blinks on your caps lock key while you attempt to power up means there is an issue with your CPU or GPU due to overheating.
If you find your laptop to be particularly noisy, it is likely your fan is consistently running at maximum speed. This is a clear sign that your laptop is running too hot.
In most cases it is your central processing unit (CPU) or the graphics processing unit (GPU) that will overheat the MOST. This will cause your laptop to not turn on properly.
So, in order to fix this specific issue, we need to fix your laptop’s internal cooling system.
Remove The Dust From The Cooling Fan
Often times all you need to do is give the internal fan a good cleaning. Overtime a a surprising amount of debris and dust can build up on the fan blades and in the fan airway.
To fix this we will need to remove the case from the bottom of the laptop. First, turn off the laptop, unplug it and remove the battery. Make sure to ground yourself and then unscrew the bottom case and remove it to expose the fan.
Now take a cotton swab or a Q-tip and add a small amount of isopropyl alcohol. Begin to carefully clean the cooling fan.
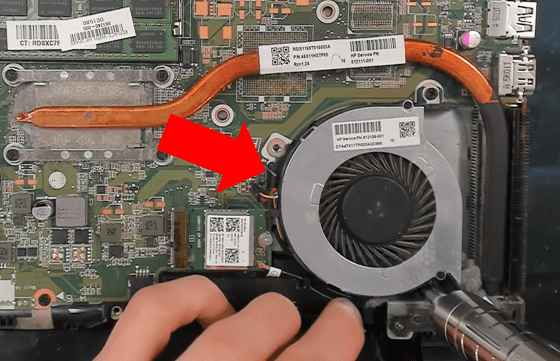
Make sure you thoroughly clean the exhaust port that allows air to flow in and out of the laptop. A clean fan without anywhere to expel the internal heat of your laptop doesn’t do any good!
Give the alcohol at least 30 minutes fully dry before resembling the laptop and attempting to turn it on.
If the fan remains noisy and your laptop is still hot to the touch, you may need to replace the cooling fan or purchase an external cooling unit for your laptop.
Blinking 5 Times – System Board Failure
Last but not least, if you encounter your HP laptop caps lock blinking 5 times, there is a system board failure on your PC.
This issue is specifically with your Embedded Controller which may be timing out waiting for the BIOS to return from system board initialization (“end of POST”).
In order to fix this issue you can try resetting the Embedded Controller or removing and reinserting the CMOS battery. Let’s dive into the steps required here.
Reset The Embedded Controller
The first and easiest solution to try is removing the power supply and booting up the PC with only the battery. By doing so you are effectively resetting the Embedded Controller.
- Unplug your PC
- Press and hold the power button for 15 seconds
- Release the power button and your PC should boot normally
That’s it! Re-connect the power cord to the computer and you should be back in business.
Remove And Reinsert The CMOS Battery
If resetting the embedded controller by turning on your laptop with only the battery does not work, try removing the CMOS battery from the motherboard.
By removing the battery, your BIOS will reset back to its previous configurations which can often fix a lot of different issues.
With the laptop turned off, unplugged, and the battery removed, begin to disassemble the back casing of your laptop and remove the CMOS battery from the motherboard.
Hold down the power button for 10 seconds to drain all excess remaining power.
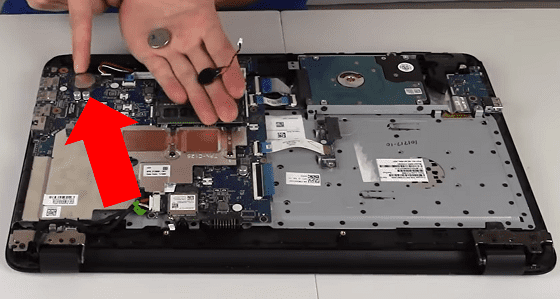
After about a minute, reinsert the CMOS battery back into your PC. Finally, Reboot your computer and check to see if your problem has been resolved.
Depending on your laptop model, accessing your CMOS battery can either be very easy for a bit more challenging. If you’re having trouble, you can use the HP manual lookup to find exactly where your CMOS battery is located.
In some cases, it may be best to head over to your local PC repair shop for support.
Final Thoughts
If you try to boot up and observe your HP laptop caps lock blinking, don’t panic. Depending on the number of blinks you see, there are proven corresponding fixes you can attempt.
- 2 blinks – BIOS issue. Perform BIOS recovery.
- 3 blinks – RAM not functional. Reseat Your RAM Sticks.
- 4 blinks – CPU or GPU overheating. Clean or replace cooling fan.
- 5 blinks – System board failure. Reset Embedded Controller and remove CMOS battery.
For some folks, unfortunately these fixes simply won’t work. If this is the case, you can look up your HP warranty policy.
Additionally, if you’ve tried each of these fixes, and you’re still having issues you can also contact HP customer support.

Chelsea Ashbrook is a Senior Manager of Corporate Digital Experience at Genentech. Chelsea received her B.A. from the University of Connecticut and has spent the last 11 years working in the technology field.


Thank you! Yours should be the first page shown on n a search for these blinking problems. Start simple with things noone else even mentions, great page, I love you! (well, you know what I mean)