The HP OfficeJet 3830 is a fairly highly rated printer, with a 4.4 out of 5 stars from over 30,000 global Amazon ratings. It is worth noting however, that two frequently reported issues users encounter is their HP OfficeJet 3830 not printing or just not printing color.
Here’s how to fix both of these errors.
HP OfficeJet 3830 Not Printing
To fix the HP OfficeJet 3830 not printing error, perform a soft reset. With the printer on, hold down the power button for 15 seconds, then use the power button to turn it back on. If the problem persists, perform a hard reset to return the printer to factory settings.
For the vast majority of users, performing a soft and/or hard reset is enough to get their OfficeJet printing again.
Let’s review the steps required to perform each of these resets, in addition to some other common fixes you can try if a soft and hard reset doesn’t solve the problem.
Step 1: Soft Reset
The very first thing you should do is perform a soft reset.
To soft reset the printer:
- First, with the printer on, hold down the power button for 15 seconds to turn it off.
- Next, manually press the power button to turn the printer back on.
I know, I know – this fix sounds too easy but for most users a soft reset is enough to get their OfficeJet 3830 printing again.
Step 2: Hard Reset
If a soft reset doesn’t work, you can also try to hard reset your printer back to the factory settings.
To hard reset the printer back to the factory settings:
- First, if the printer is not already on, use the power button to turn the printer on.
- Next, press the Setup button on the touch display panel.
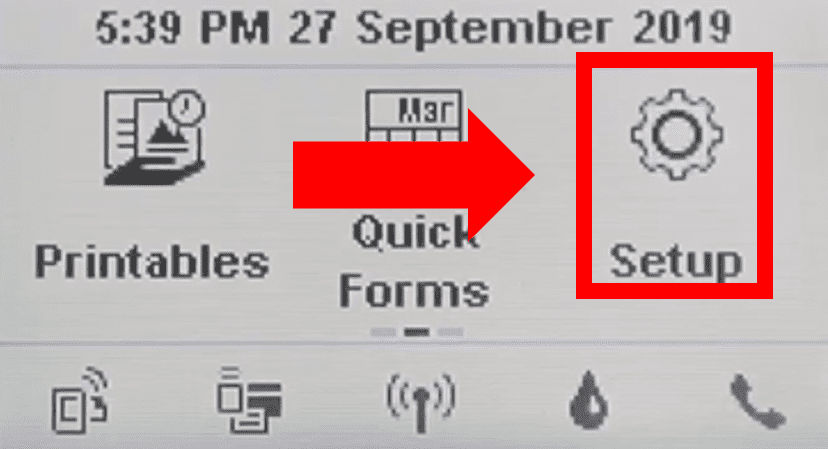
- Then, within Setup select Tools.
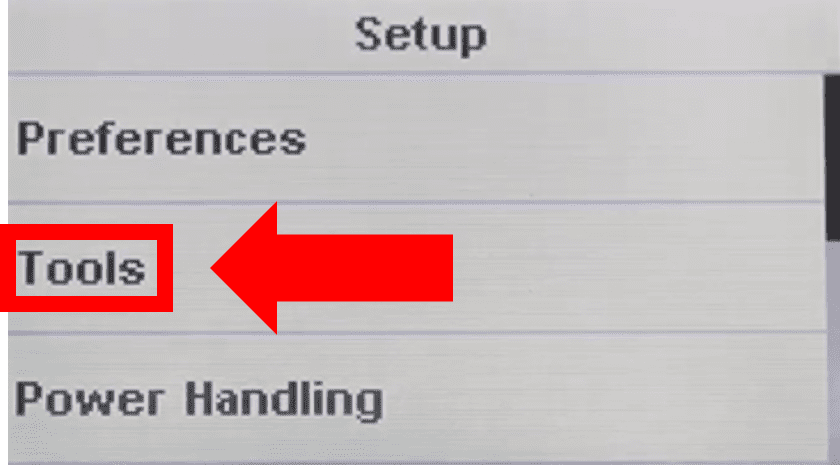
- Now, scroll to the bottom of the Tools section and select Restore Factory Defaults and press Yes.
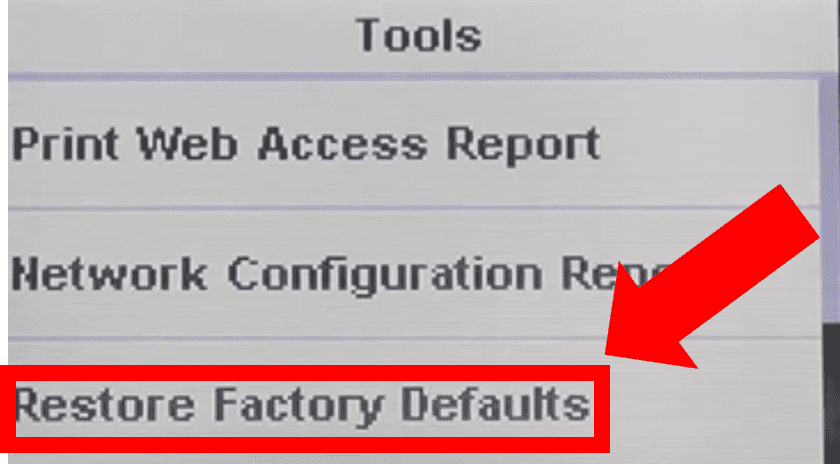
- The screen will now read ‘Restoring factory defaults…Printer will restart automatically‘. Do not disrupt the printer during this time.
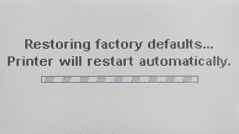
- Lastly, once the reset is complete the main display will reappear.
Following the reset, you may be asked some additional questions to setup your printer.
Once you complete these steps, try to print! The issue should be solved.
Step 3: Reset The Printer, Computer And Router
It is possible this issue is a result of broader printer WiFi connectivity issues.
Therefore, in addition to resetting the printer, sometimes it is necessary to also reset your computer and router.
Go ahead and fully power down the computer you are attempting to print from.
Then reset your WiFi router. Most routers have a reset button located on the back of the device. The button will either be a push button or a pinhole button. If it is a pinhole button, you will need to use the end of paperclip to access it.
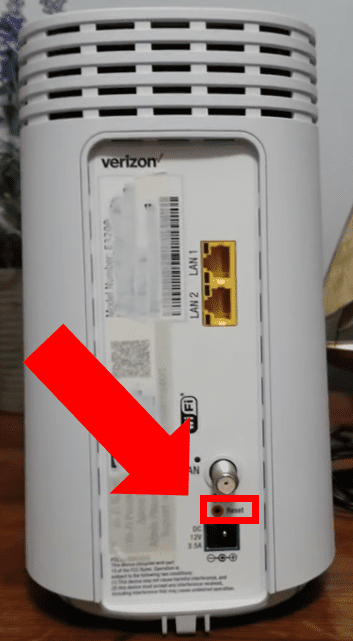
If you are having trouble figuring out how to reset the router, use the brand and model number to look up the user manual for additional guidance.
Step 4: Disconnect And Reconnect The USB Cable
If your computer is connected to the printer with a USB cable (and not a wireless connection as above), try disconnecting and reconnecting the USB cable.
Once you reconnect the cable, your PC should display a small alert window indicating that the computer has recognized the printer.
Step 5: Verify Printer Is Not Paused Or Offline
The error may also be due to the printer being unknowingly paused or offline.
To verify if the printer is accidentally paused or offline, you will need to do the following:
- First, in the Windows search bar type ‘Printers & scanners‘ and select it from the pop up menu. Notably, depending on your operating system, this app may be called View devices and printers, Devices and Printers, Printers and Faxes or just Printers.
- Next, either double-click the icon for your printer, or right-click the icon for your printer and select Open queue or See what’s printing to open the print queue.
- Then, on the Printer menu, make sure there are NO check marks next to Pause Printing or Use Printer offline. If there are, remove them.
If you did end up making any changes, try to print again.
Step 6: Confirm HP OfficeJet 3830 Is Set As Default Printer
Simply put, if your HP OfficeJet 3830 is not set as the default printer, your PC may be sending print commands to the wrong device!
To confirm the HP OfficeJet 3830 is set as the default printer:
- First, in the Windows search bar type ‘Printers & scanners‘ and select it from the pop up menu.
- Confirm that the correct printer is set as the default printer. Typically, the default printer will have a check mark or green circle next to it. Depending on your Windows version, there may be a box beneath the printer list that reads Let Windows manage my default printer. When this is box is checked, Windows will set your default printer to be the one you used most recently at your current location. It is best to uncheck this box and manually set the default.
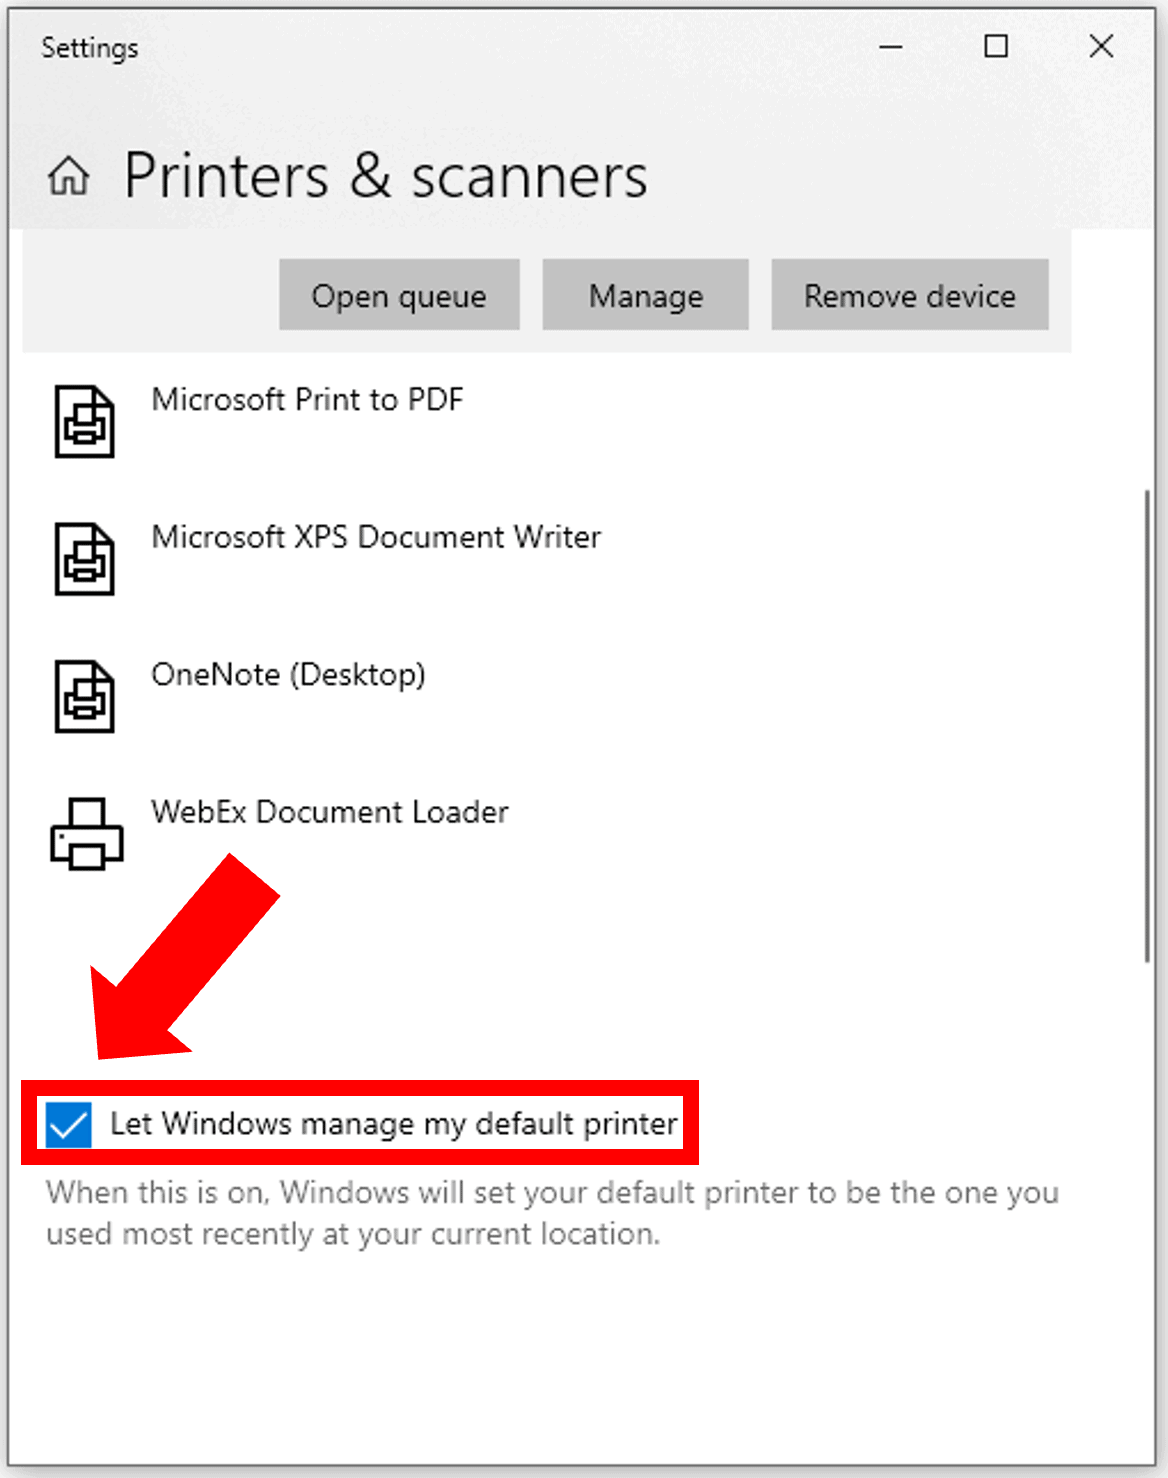
- In the event the wrong printer is set as the default printer, right-click the correct printer and select Set as Default Printer.
- Try to print.
Step 7: Restart The Print Spooler
The Windows printer spooler program enables you to delete a print job being processed or manage print jobs that are currently waiting to be printed.
If your computer is having trouble sending a print job to a printer, the problem may be the print spooler service.
To test if this is the case, restart the printer spooler:
- First, press Control, Alt and Delete simultaneously and select the Task Manager from the popup window.
- Then, within the Task Manager window, click the Services tab.
- Now, scroll down the Description column and locate the service named Spooler.
- Lastly, right click on Spooler and click Restart from the drop down menu.

Once the Print Spooler service is restarted, try printing again.
Step 8: Clear The Print Queue
Issues and corruptions within the print queue are common and therefore you will also need to clear the print queue entirely.
To clear the printer queue:
- First, in the Windows search bar type ‘Printers & scanners‘ and select it from the pop up menu.
- Next, either double-click the icon for your printer, or right-click the icon for your printer and select Open queue or See what’s printing to open the print queue.
- Then, on the Printer menu list, click Cancel all documents or Purge Print Document, and then click Yes to confirm.
- If, after canceling the printer queue, there are still documents visible in the queue, try restarting the computer.
- Try to print!
HP OfficeJet 3830 Not Printing Color
The HP OfficeJet 3830 not printing color error is commonly due to an outdated printer driver. To fix it, first go to ‘Printers & scanners’, select your printer, and click ‘Remove device’. Then, select ‘Add a printer or scanner’ and click ‘Add device’ to reinstall the new printer driver.
Simply removing the driver from your PC and then reinstalling it typically does the trick.
Let’s review the specific steps you can take to remove and reinstall the printer driver, in addition to other common fixes you can try.
Step 1: Remove And Reinstall Printer Driver
Many times you will find your HP OfficeJet 3830 does not print color following a Windows update.
This is because following the update, your printer driver can become outdated and/or corrupted.
To test if this is the case, remove and reinstall the printer driver:
- First, click the Windows Start button on the bottom left corner of the screen and select Settings.
- Then, in the Settings window, click on Devices.
- Next, select Printers & scanners from the menu on the left.
- Now, click on the HP OfficeJet 3830 from the printer list, select Remove device and then Yes.
- Lastly, select Add a printer or scanner at the top of the window. Your PC will now automatically discover your HP OfficeJet 3830 printer. Once it does, select Add device.
Your printer will now connect and install the latest drivers. When the install completes, try to print. Color printing should be restored!
Step 2: Check Color Ink Levels And Replace Empty Cartridge
If reinstalling the printer driver doesn’t fix the issue, double check and make sure the color ink cartridge has sufficient ink remaining.
To do so, use the printer touch display control panel and select the Ink icon to view the estimated ink levels.
If the color ink levels are critically low, you will need to replace it.
Step 3: Clean The Color Ink Cartridge
It is also possible a dirty, obstructed ink cartridge is to blame.
To clean the ink cartridge, you have two options.
Clean Ink Cartridge – Printer Control Panel
- First, load plain paper into the printer tray.
- Then, on the touch display menu, swipe left and select Setup.
- Next, select Tools, and then Clean Cartridges.
- The printer will no perform the automated cleaning process. When it is complete a Print Quality Diagnostic page will be automatically printed.
If that diagnostics page doesn’t show color, if the color print is hard to see, try using the control panel cleaning process again.
If the problem persist proceed to the manually clean the HP printhead:
- First, turn on the printer, open the exterior door, and then grasp the handle and lower the ink cartridge access door to open it. The carriage will automatically move to the center of the printer.
- Once the carriage has fully stopped moving, lightly press down on the color ink cartridge to release it, and pull the ink cartridge toward you out of its slot.
- Next, holding the ink cartridge by its sides, inspect the contacts for any ink or build up. Important Note: Do not touch the copper-colored contacts or the ink nozzles and do not leave the cartridge outside the printer for more than 30 minutes.
- Now moisten a cotton swab or lint-free cloth with distilled water. Squeeze it to remove any excess water.
- Clean the face and edges around the ink nozzle with the swab.
- Lastly, use a new swab to dry the cartridge
That’s it! All that is left to do is reinsert the color ink cartridge and try to print.
Conclusion
Is your OfficeJet not printing at all or just not printing color? Don’t panic! As it turns out, these are two extremely common problems with a handful of proven solutions.
HP OfficeJet 3830 Not Printing – Top 8 Fixes
- Perform soft reset
- Hard reset printer back to factory settings
- Reset printer, computer and router
- Disconnect and reconnect USB cable
- Verify printer is not paused or offline
- Check default printer
- Restart the print spooler
- Clear the print queue
HP OfficeJet 3830 Not Printing Color – Top 3 Fixes
- Remove and reinstall printer driver
- Check color ink levels and replace empty cartridge
- Clean the color ink cartridge
Unfortunately, these common fixes may not solve the issue for everyone. If this is the case, you can take a look through the HP OfficeJet 3830 user manual for further guidance.
Additionally, if you are still having issues despite attempting each of these troubleshooting steps, you can contact HP customer support by using your printer model number.
Finally, if all else fails you may need to consider getting a new printer. If this is the case for you, start by verifying your HP warranty.

Chelsea Ashbrook is a Senior Manager of Corporate Digital Experience at Genentech. Chelsea received her B.A. from the University of Connecticut and has spent the last 11 years working in the technology field.

