My husband and I have owned an HP Printer for over 8 years and for the most part it has been incredibly reliable. It’s no wonder they are consistently among the top selling printers globally!
Having said that, we have encountered a few issues over the years while working from home. One such issue is a strange error that results in our device getting stuck in what is known as “MFG Mode”.
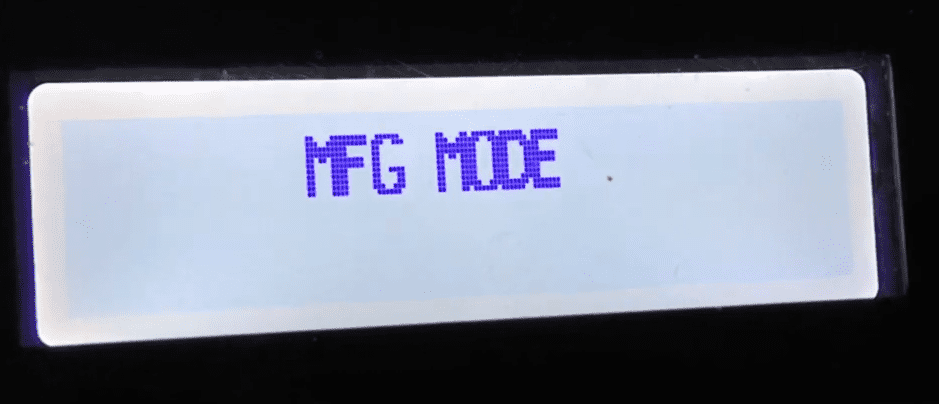
MFG Mode is short for Manufacturing Mode. Many of the HP Printer models have a well know malfunction where the printer will either boot directly into this mode or switch from User Mode to Manufacturing Mode.
This happens involuntary without user interaction and results in the control panel becoming unresponsive or unavailable.
If you are stuck in HP Printer MFG Mode, first turn the printer on and wait until it is idle and silent before continuing. With the printer turned on, disconnect the power cord. Wait 60 seconds. Plug the power cord back in. Turn the printer on. It should be fixed!
Read on for further step-by-step instructions and additional troubleshooting steps you can take to get your printer unstuck today!
Step 1: Perform Hard Reset
In most cases, performing a “hard reset” will be sufficient to solve the problem.
To perform a hard reset, first disconnect the power cord from BOTH the printer and the power source while the printer is ON.
Allow 60 seconds to pass. Then, reconnect the power cord to the back of the printer and the power outlet. Your printer should reset and turn back on automatically.
If your printer does not power up automatically following the hard reset, manually turn the printer back on. It’s really that simple! This should solve the issue for most users.
Step 2: Power Drain Printer
Sometimes performing a power drain is required. First, unplug any USB or cable from the printer. Then, pull the power cord out of the printer and wait 60 seconds or so.
Next, hold down the power button for 10 seconds to drain any remaining power from the system.
Finally, plug the power cord back in and attempt to restart the printer. Do not put any USB or other cables into the printer at this time.
Step 3: Perform Cold Reset
If the hard reset and power drain processes do not work, you can also attempt to “cold reset” your printer.
A cold reset forces the printer to return to its factory default settings. Often times if the printer’s configuration has been corrupted, a cold reset will do the trick.
The cold reset procedure differs depending on the printer model.
Older HP Printer models (including HP4000, 4100, 8000, 8100, 8150):
- Turn off the printer.
- While holding down the Go or Online button, turn the printer on.
- Release the buttons when the printer displays “Cold Reset” or “Resetting”.
Newer HP Printer models (including HP3800DN, 4200, 4250, 4300, 4350, 9000, 4600, 5500, 4700):
- Turn on the printer.
- On the control panel the memory will start counting. When it does, press and hold the Select button.
- Continue holding the Select button until all three Control Panel LED’s are illuminated and on solid, then release Select button.
- The control panel should now say “Select Language”.
- Use the down arrow on the control panel display to locate “Cold Reset” and press Select.
- The printer should now perform a cold reset and then continue its power-on sequence.
HP LaserJet (including 2200, 2200dn, and 2200dtn):
- Press and hold down the Go button.
- While holding down the Go button, turn the printer on. Continue holding Go.
- When the Attention light turns on, release the Go button.
If your model does not have a display panel, the cold reset procedure typically requires using a combination of the Go and Power buttons. Use your model number to look up your printer manual for the exact procedure.
Step 4: Set Printer To “User Mode”
Ok, so the hard reset, power drain and cold reset didn’t do the trick.
Another troubleshooting step to consider is setting your printer to User Mode.
To clear the MFG message and return to User mode, do the following:
- Turn the printer off and wait 10 seconds before turning the printer back on. Allow the the printer to boot up and display MFG Mode.
- Tap the power button. The display should now say Ready. If Ready does not appear, keep pressing the power button until you see the home screen.
- Navigate to the Engineering Menu / Underware Menu. Hit the OK button.
- The Boot code menu should now appear. Hit OK again.
- Use the Right Arrow button to locate the Set to user mode option. Hit OK again.
- Now use the Power button to shut the printer off an wait 10 seconds before turning the printer back on.
- When the printer reboots, the display should say Ready which means you are now in user mode.
If you are having trouble finding the User Mode on your printer, this may be due to your model following a slightly different procedure. Once again, use your model number to look up your device’s manual for the exact procedure.
Step 5: Update Firmware
To get the most out of your printer, you need to update your firmware regularly. HP frequently releases new firmware versions for printer enhancements that often include issue fixes.
Notably, updating your firmware may help prevent this MFG issue, Initializing errors, and others from happening in the future.
Update Firmware Directly From Printer
- First, connect the printer via a Wi-Fi or Ethernet connection.
- Use the control panel to open the Setup, Service, or Settings menu.
- Then, select Preferences, Printer Maintenance, or Tools.
- From there select Web Services, Printer Update, or LaserJet Update.
- If prompted, use the instructions that are displayed to turn on Web Services.
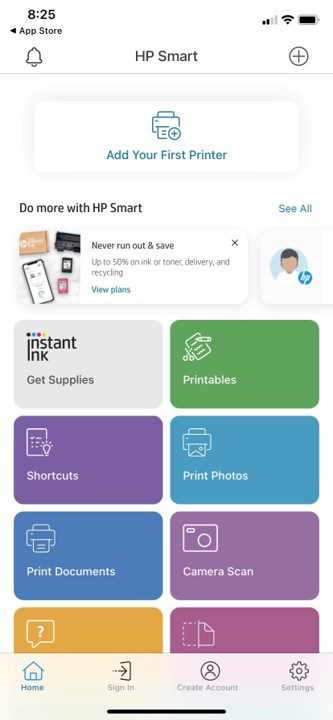
Update Firmware Through HP Smart App
- First, create an HP Smart App account or sign in if you already have an existing account.
- Then, on the home screen of the application, select your printer model.
- Next, navigate to Advanced, and select Advanced Settings or Printer Home Page (EWS).
- Select Tools or Web Services.
- Finally, select Printer Updates or Product Update, and click Check Now. Any available firmware updates will be automatically downloaded and installed onto your printer.
ATTENTION: Do not turn off the printer during the firmware update as this can cause permanent damage to your printer, and lead to your device not printing at all.
Final Word
If you encounter your HP Printer stuck in MFG Mode, follow these five troubleshooting steps in order:
- Perform a hard reset
- Power drain the printer
- Cold reset to factory default settings
- Set printer to User Mode
- Update firmware
As a final measure, you can try contacting HP customer support by using your printer model number. Once you’ve exhausted all of your options, be sure to check your warranty terms and conditions before making any purchases.

Chelsea Ashbrook is a Senior Manager of Corporate Digital Experience at Genentech. Chelsea received her B.A. from the University of Connecticut and has spent the last 11 years working in the technology field.
