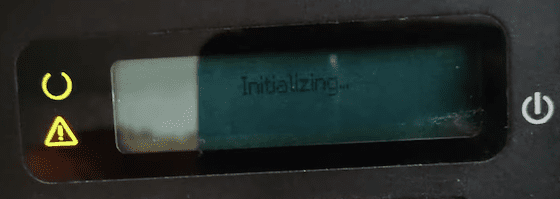
About a week ago I went to use my HP Printer and started it up as I normally do. For some reason when the device turned on, the display screen showed an “Initializing…” message.
Despite trying to turn it off and back on again, the message remained. My printer was essentially frozen and none of the control buttons functioned properly. Ultimately, after doing some research and attempting a number of different troubleshooting steps, I was able to get it fixed.
If you encounter your HP Printer stuck on initializing, perform a hard reset, bypass the initializing phase, and power drain the printer motherboard. If the issue persists, cold reset the printer to restore factory default settings and update the firmware. As a final measure, try reflowing the motherboard.
You can check out a more detailed deep dive of each of these six common fixes below.
Step 1: Hard Reset The Printer
Executing what is known as a hard reset is usually the easiest way to fix a whole host of HP printer issues.
To hard reset your printer, start by unplugging the power cord from both the printer and the power source while the printer is On and running.
Allow about a minute to pass and then plug the power cord back into the printer and the outlet. The device should now automatically reset and turn back On without having to do anything.
In the event the printer does not power back up automatically, manually turn it back on.
You should be all set! The vast majority of users will find that this simple process will get their printer unstuck and functioning properly again.
Step 2: Bypass The Initializing Phase
For some HP models, you can bypass the initializing phase all together.
To bypass the initializing phase, perform the following steps:
- Turn off the printer and unplug ALL cables including the USB, network and power cable. unplugging network cable. Wait 30 seconds.
- Plug the power cable back in and turn the printer back on.
- With the printer on, hit Copy And X (Cancel button above the copy button) until it says Permanent storage initialize. If this does not work, try hitting Right arrow And X.
Depending on your specific model this procedure may or may not work.
Still dealing with the issue? No need to worry just yet! Continue on to the next troubleshooting step.
Step 3: Power Drain The Motherboard
There is also a possibility that a static charge has built up your printer’s motherboard. Sometimes this charge can hang around even after you shut the printer down and unplug it.
As it turns out, lingering excess power on your device can cause all sorts of issues. To fix this, a simple power drain is required.
Disconnect the USB cable from the printer first. Next, pull the power cable out of the device and allow at least a minute to pass.
Now, press and hold down the power button for about 10 seconds to drain any remaining power from the system.
Finally, plug only the power cable back in and attempt to turn the printer back on. It is important that you do not put any USB or other cables into the printer at this time.
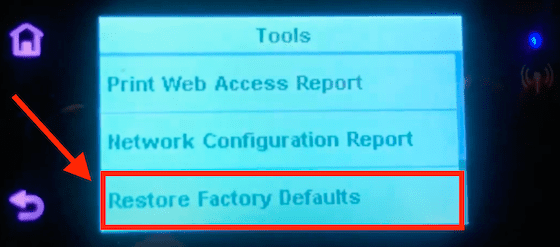
Step 4: Factory Reset The Printer
Performing a factory reset will return the printer to its default settings. If the initializing issue is being caused due to your printer’s configuration becoming corrupted, this is usually the best solution.
The exact factory reset process differs depending on your specific printer model. Notably, this process can be completed regardless of whether or not your device has a display panel.
Search your model number in the HP manual lookup for the exact procedure.
Step 5: Update HP Printer Firmware
Updated firmware versions that include printer enhancements are routinely released by HP.
By updating your printer’s firmware, you can fix and prevent all sorts of HP issues like MFG mode errors, initializing errors, and many other well known problems.
Update Directly From Printer
- First, establish an internet connection by either using Wi-Fi or connecting an Ethernet cable.
- Now navigate to Setup, Service, or Settings menu via the control panel.
- Then, select Preferences, Printer Maintenance, or Tools.
- From there select Web Services, Printer Update, or LaserJet Update.
- If prompted, use the instructions that are displayed to turn on Web Services.
Update Using HP Smart App
- You’ll need to first create an HP Smart App account or sign in if you already have an existing account.
- Next, from the home screen of the application, select your exact printer model.
- Now, navigate to Advanced, and select Advanced Settings or Printer Home Page (EWS).
- Select Tools or Web Services.
- Finally, select Printer Updates or Product Update, and click Check Now. Any available firmware updates will be automatically downloaded and installed onto your printer.
WARNING: DO NOT turn off the printer during the firmware update. Doing so can cause permanent damage to your printer, and lead to your device not printing at all.
Step 6: Reflow The Motherboard
Ok, so you’ve tried all of these fixes without any luck? You may need to consider reflowing the motherboard.
For some background, HP used a more environmentally friendly soldering process in some of the older models. This process unfortunately led to a higher incidence of bad solder joints.
Reflow or “convection reflow” is a fancy name for the simple process of using a convection oven to heat and melt solder to make a solder joint.
While the following reflow steps are fairly involved, they are absolutely doable for a motivated do-it-yourselfer.
Having said that, there is a risk of permanent damaging your printer if for example you overheat the motherboard. Please proceed with this risk in mind.
How To Reflow Your HP Printer Motherboard
- First, set your oven to 350 degrees Fahrenheit.
- Next, remove the motherboard by first removing the back protective printer cover. Then undo all the motherboard connectors and screws.
- Then, unsolder the battery from the motherboard.
- Prop the removed motherboard up using aluminum makeshift feet in all four corners.
- Now place the motherboard (without the battery!) on a baking sheet.
- With the motherboard components facing up, bake it for 8 minutes.
- Remove the motherboard and allow it too cool for about 30 minutes
- Lastly, resolder the battery and reattached the motherboard to the printer.
That’s it! Your HP Printer should now function properly.
For a nice step-by-step video guide of exactly how to reflow your motherboard, check out the video below.
Final Thoughts
If you encounter your HP printer stuck on initializing, attempt these six troubleshooting steps in order:
- Perform a hard reset
- Bypass the initializing phase
- Power drain the printer motherboard
- Perform a factory reset to restore default settings
- Update firmware
- Reflow the motherboard
You can also try contacting HP customer support by using your printer model number and following the provided instructions. If it seems like you’ll need to purchase a new device, be sure to check your HP Printer warranty terms and conditions first.
I hope you found these troubleshooting steps helpful. Drop me a comment below to let me and others know what worked and what didn’t!

Chelsea Ashbrook is a Senior Manager of Corporate Digital Experience at Genentech. Chelsea received her B.A. from the University of Connecticut and has spent the last 11 years working in the technology field.
