I recently bought a brand new mechanical keyboard and immediately had to deal with the keyboard double typing problem. I quickly learned that this fairly common issue is either due to a fault with the hardware or software.
As a first step, before trying any fixes, use the Keyboard Tester to help diagnose the cause of the problem.
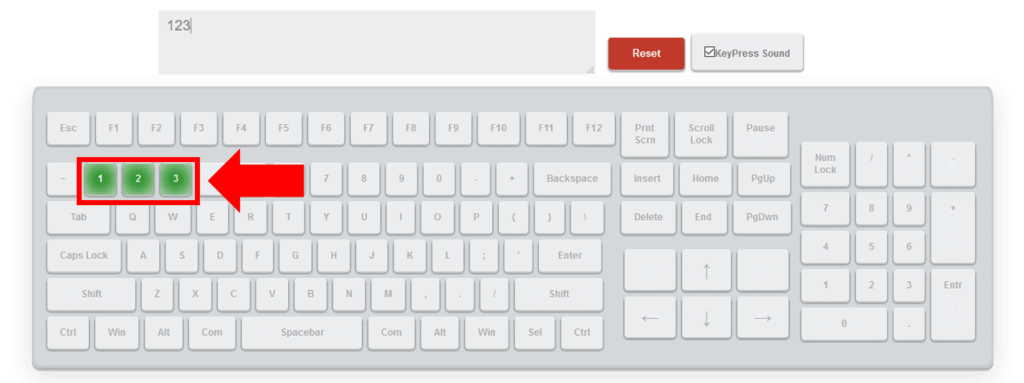
Once you are in the Keyboard Tester, press every key on your keyboard.
If you get a green light on every key this typically means you’re dealing with a software issue. Keyboard software issues are often due to an issue with a recent Windows Update, faulty Keyboard Settings or an issue with your Keyboard Driver.
If however, you observe a red light or you cannot get a key to register you may be dealing with a hardware issue. If this is the case, the most likely culprit is a sticky key due to dust and dirt.
To fix keyboard double typing, run the Windows Troubleshooter, reset settings to default, modify filter keys and turn off sticky keys. Next, update and reinstall the driver. Finally, try a different USB port and clean the keyboard with compressed air and 99% isopropyl alcohol.
That’s it! Your keyboard should start functioning properly again.
Read on for a detailed breakdown of each of these troubleshooting steps. I highly recommend you follow these steps in the exact order detailed below.
Keyboard Troubleshooter In Windows 10
Running the Windows Troubleshooter can often fix a wide range of keyboard problems including keyboard connectivity issues, double typing, and many others, automatically.
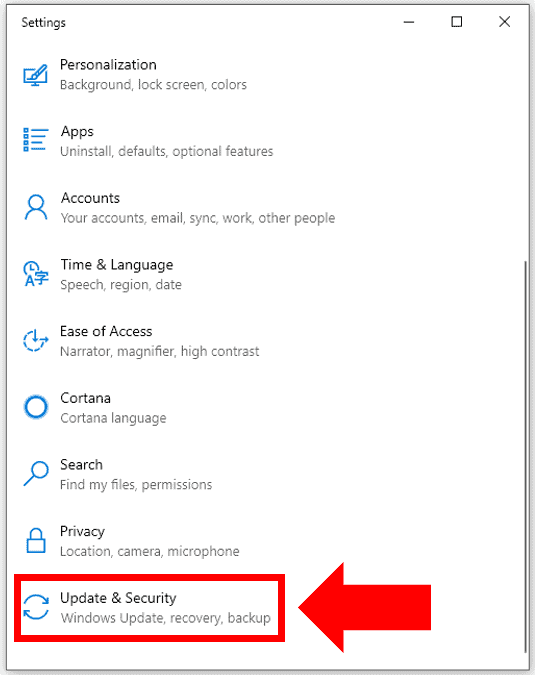
To run the Keyboard Troubleshooter in Windows 10, use your desktop search bar to locate and open Settings. In Settings, select Update and Security
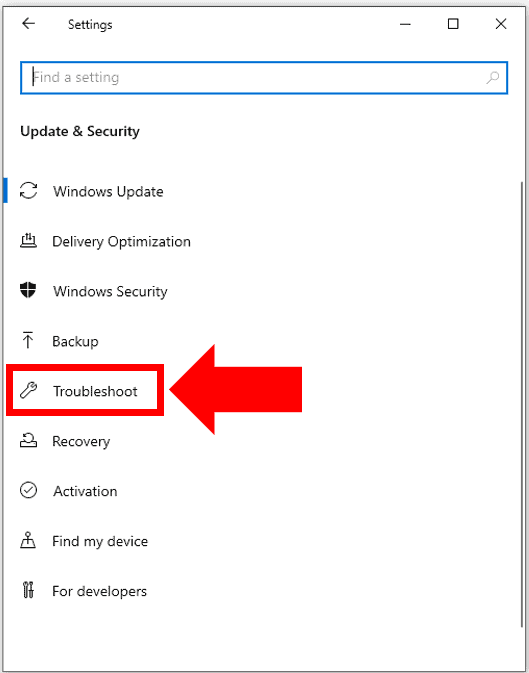
Next, click Troubleshoot.
Finally, locate Keyboard and run the Keyboard Troubleshooter.
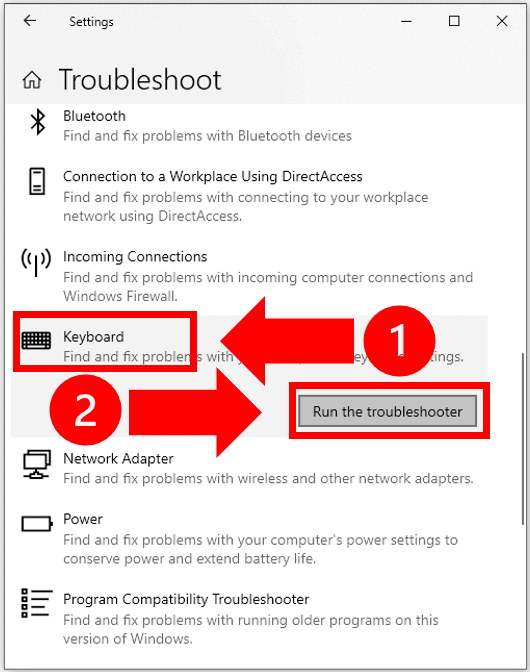
From here the Troubleshooter will go to work scanning your keyboard settings. The Keyboard Troubleshoot will examine your Text Services Framework and all Text services.
At the end of the scan a summary of findings will be provided to you. You will need to click View detailed information to obtain a more granular breakdown of each of the findings. Here you will also be notified if any problems have been fixed.
Once you have read the report select Next and then Close. It is always a good idea to then Restart your PC prior to trying your keyboard again.
Reset Keyboard Settings To Default
In some cases, new software updates can impact your keyboard settings.
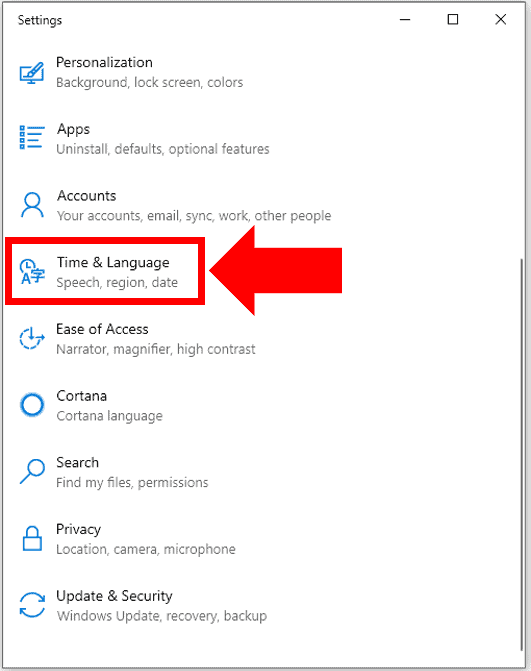
To manually reset your keyboard back to its default settings use the search bar to locate and open Settings. In Settings, select Time & Language.
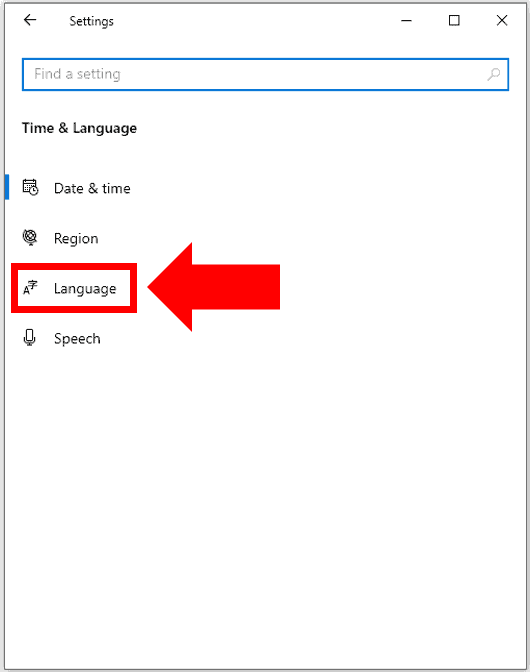
Next select, Language.
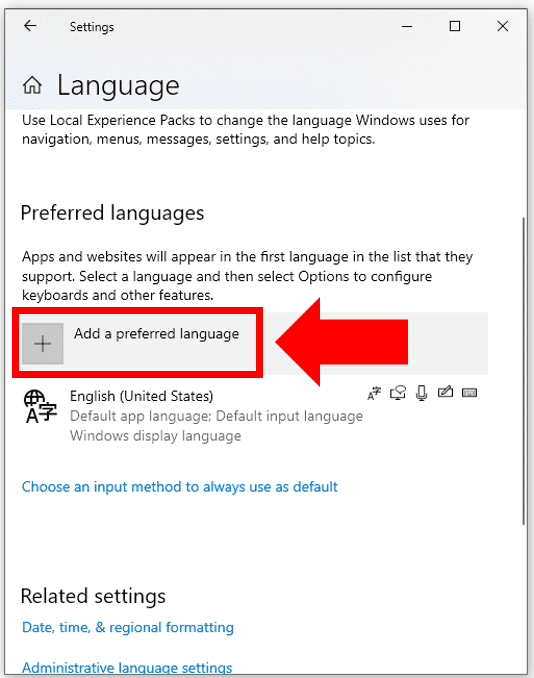
Then, locate the Preferred Languages section and click Add a preferred language.
For our purposes, it doesn’t matter what language you select. Once added, click on the new language and use the UP arrow to move it to the top. Then use the DOWN arrow to move it back to the bottom.
That’s all you need to do. Swapping between the two languages and back again causes your PC to automatically reset your keyboard setting.
You can now delete the language that you just added.
Modify Your Filter Keys Settings
Windows 10 Filter Keys settings allow you to control the keyboard repeat rate and ignore repeated keys.
Once enabled Filter Keys will allow you to adjust additional Bounce Keys, Slow Keys, and Repeat Keys settings.
- Bounce Keys – When enabled, Bounce Keys will help ignore unintended keystrokes.
- Slow Keys – Keyboard sensitivity is a fairly common reason for double typing. When enabled, Slow Keys works by disregarding keys that are not held down for a certain period of time.
- Repeat Keys – Typically if you hold down a key, it will repeat that key command until the key is released. Sometimes if you are accidentally pressing a key too long this can result in unintended repeat characters. Repeat Keys works by allowing you to adjust the repeat rate or disable it entirely.
To access Filter Keys, use the search bar to locate Ease of Access keyboard settings. Then, find the Filter Keys section.
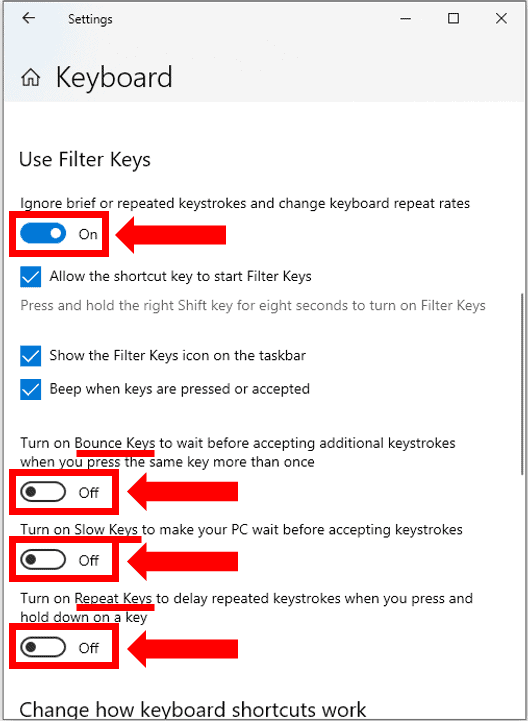
The strategy here is trial and error. If you are experiencing the issue with Filter Keys ON, try disabling. If on the other hand the issue is happening with Filter Keys OFF, try enabling it.
Once enabled, try adjusting the Bounce Keys, Slow Keys, and Repeat Keys settings and testing your keyboard a try after each adjustment.
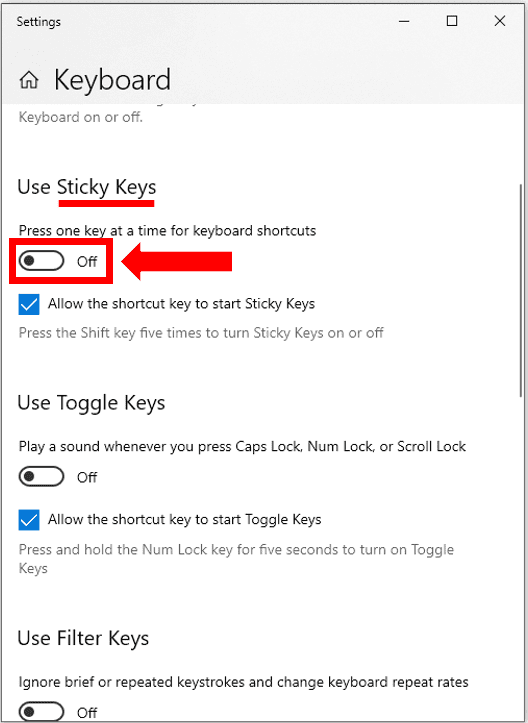
Turn OFF Sticky Keys Settings
Sticky Keys is a setting created to help people who struggle to hold down two or more keys at a time.
When it is accidentally turned on it can cause a variety of unintentional character strokes.
You can also check your your Sticky Keys settings in the Ease of Access keyboard settings. Locate the Sticky Keys section and make sure the toggle is in the OFF position.
Update And Reinstall Keyboard Driver
If none of these proposed fixes have solved the problem you will need to update OR uninstall and then reinstall your keyboard driver.
The easiest thing to try when it comes to your device drivers is to check for software updates.
Software updates are the best ways to fix bugs. If you do not frequently update Windows you can run into display driver compatibility issues. If this is the case there is a good chance this is causing the problem!
Check for any pending software updates by going to Settings and selecting Windows Update.
Its also possible the keyboard driver itself may be to blame. To test this, first try to update the keyboard driver directly.
Once again head over to the search box and this time enter Device Manager. Right-click on the keyboard driver, and select Update Driver.
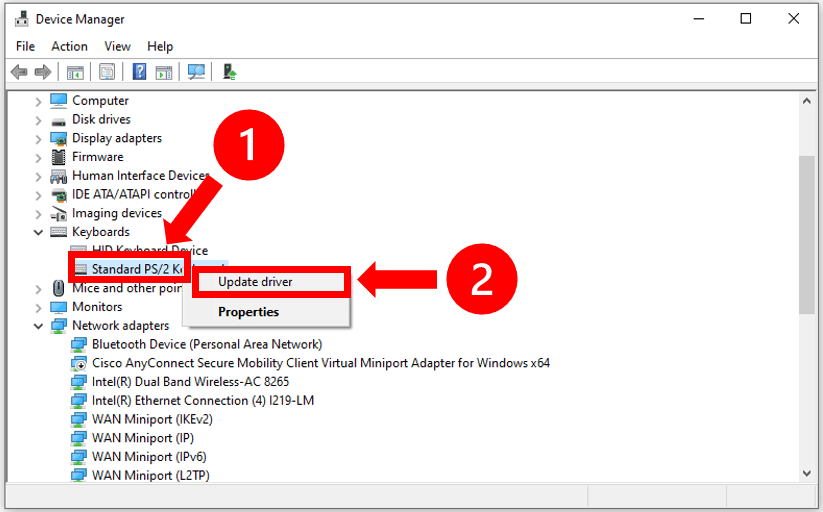
If this does not fix the problem try uninstalling the keyboard driver by right-clicking and selecting Uninstall.
Then Restart your computer – Windows will automatically attempt to reinstall the keyboard driver during startup.
Check Wire Connection And Try A Different USB Port
Firstly, if you are using a wired keyboard, make sure you check for any visible damage to the wire or USB head.
Similarly, be sure to check the USB port in your PC for damage or obstructions.
You need a firm connection between the keyboard USB and your PC. Even a slightly loose connection can cause unexpected issues.
Finally, try changing the PC USB port that you are connecting to.
Use Compressed Air to Clean Your Keyboard
Often times, when you are dealing with a hardware issue, a dirty keyboard is to blame.
A simple and inexpensive way to remove any dust and dirt from your keyboard is with a can of compressed air. Pick one up at your local convenience store and use it to thoroughly clean each and every key.
While the air is blowing on the keys, position the keyboard upside down. This will encourage any loose particles to fall out as opposed to being pushed deeper inside.
Clean Your Keyboard With 99% Isopropyl Alcohol
The MOST effective way to clean your keyboard is with 99% isopropyl alcohol.
First, Unplug your keyboard and remove the keycaps from the malfunctioning switches. Then pour some 99% isopropyl alcohol directly into the switch.
Put the removed keycaps back on and quickly tap each of the affected key for 60 seconds. Lastly, after allowing it to dry for about 30 minutes, plug your keyboard back in. It should be fixed!
How to Open On-Screen Keyboard
If you cannot fix your keyboard despite all of your troubleshooting efforts, you may need to consider purchasing a new one.
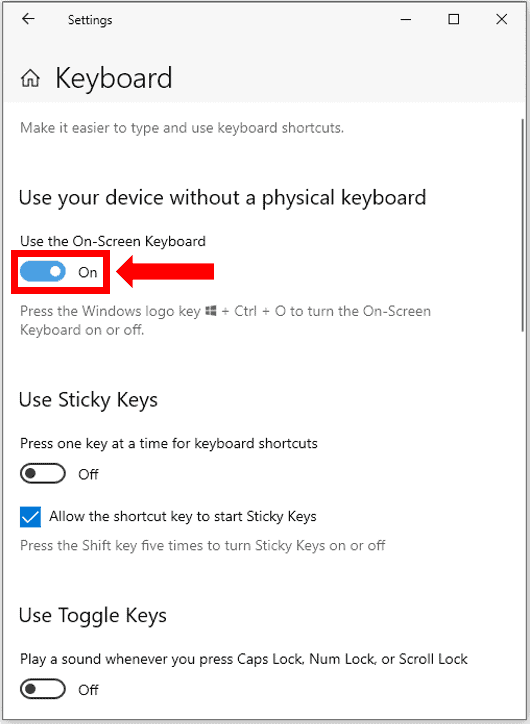
While you wait for your new keyboard to arrive, you can activate the On-Screen Keyboard. While not exactly efficient to use, the On-Screen Keyboard at least provides you with a short term alternative.
To activate it, use the search bar to locate Ease of Access keyboard settings. Then, under the Use the On-Screen Keyboard section, toggle the button to ON.
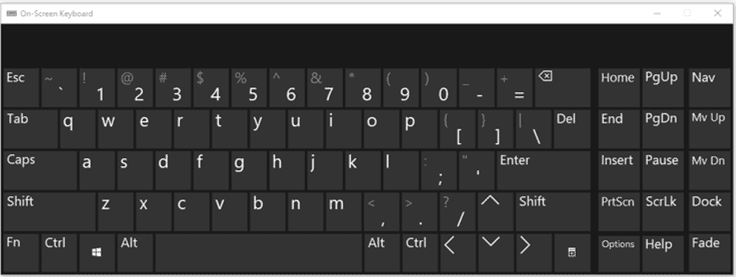
This will activate the keyboard display. Simply click the keys you which to use with your mouse.
Conclusion
Dealing with the keyboard double typing problem can very frustrating. Fortunately, this is an extremely common problem with eight proven troubleshooting steps:
- Run Keyboard Troubleshooter
- Reset Keyboard Settings To Default
- Modify Filter Keys Settings
- Turn Off Sticky Keys Settings
- Update and Reinstall Keyboard Driver
- Check Wire Connection And Try A Different USB Port
- Use Compressed Air To Clean Keyboard
- Clean Your Keyboard With 99% Isopropyl Alcohol
I hope this guide was was helpful! If this post helped you solve your issue, or if you solved your issue some other way, be sure to leave me a comment below so that we can include it!

Chelsea Ashbrook is a Senior Manager of Corporate Digital Experience at Genentech. Chelsea received her B.A. from the University of Connecticut and has spent the last 11 years working in the technology field.
