I couldn’t be happier with my new Keychron mechanical keyboard I purchased this past year, but early on I ran into a few annoying issues. One issue I encountered was my keyboard constantly connecting and disconnecting from my laptop. Annoyingly, this connection issue occurred regardless of whether I was using wireless Bluetooth or a USB cable.
Here are the troubleshooting steps I took to fix it.
If your keyboard keeps disconnecting, change USB ports and enable “wake the computer”. If the issue persists, disable USB controller and Bluetooth Radio power saving modes, uninstall USB hubs, and disable USB selective suspend setting. As a final measure, run Windows Troubleshooter and update and reinstall the keyboard driver.
That’s it! Your keyboard should now maintain a stable connection with your PC. Read on for a detailed breakdown of each of these troubleshooting steps.
I highly recommend you follow these steps in the exact order detailed below. We will start with the quick and low effort troubleshooting steps, followed by the slightly more time consuming and involved fixes.
Step 1: Change USB Ports
First and foremost, if your keyboard uses a USB cable connection, try inserting the cable into a different USB port.
It is possible there is hardware damage or a software bug within the USB port itself. Believe it or not, in some cases making this simple switch is enough to fix the issue.
In the process of changing USB ports, you should also make sure that the cable is firmly inserted and the connection is secure.
Additionally, if you don’t immediately observe a stable keyboard connection, try restarting your computer before advancing to the next step.
Step 2: Allow Keyboard To Wake The Computer
The Windows Operating System is designed to periodically enter a low power state called Sleep mode in an effort to save energy and resources. Under normal conditions, all a user needs to do is move the mouse or press any key on the keyboard to resume normal Windows operations.
However, routine Windows updates that can often occur without your awareness, occasionally activate settings that prevent the keyboard from waking the PC.
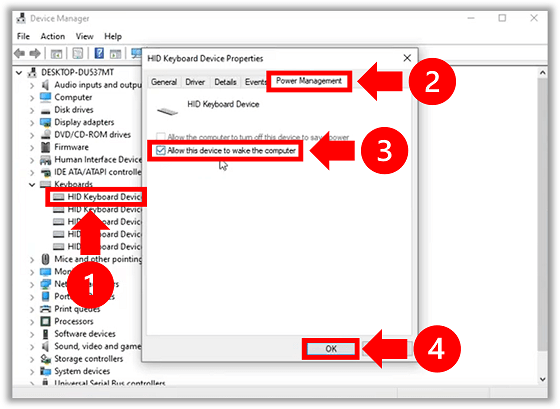
Within the Windows Device Manager, you can choose to allow or prevent a device to “wake the computer”. Let’s make sure your keyboard is set to the proper settings.
- First, type Device Manager in the Window search bar and select it from the list.
- Next, click Keyboards and double click on the name of your specific keyboard device.
- Finally, under the Power Management tab, make sure that Allow this device to wake the computer is enabled and click OK. If you DO NOT see the Power Management tab, go to the General tab and click Change settings. The Power Management tab should appear.
Once again restart your PC and see if the issue has resolved.
Step 3: Disable Universal Serial Bus Controllers Power Saving Mode
For USB connected keyboards, it is typically not enough to adjust the Power Management settings only at keyboard level.
In many cases, when a users keyboard keeps disconnecting, it is because the computer is automatically turning off all connected devices at the USB level to save power.
Therefore, you will need to adjust your Power Management settings at the Universal Serial Bus (USB) controller level as well.
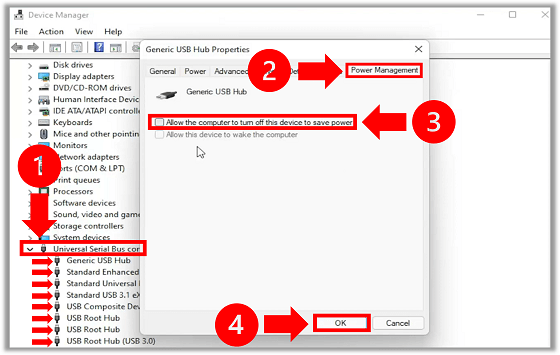
- Once again, type Device Manager in the Window search bar and select it from the list.
- Then, click Universal Serial Bus controllers and double click on the first option from the drop down list.
- Under the Power Management tab, make sure that Allow the computer to turn off this device to save power is disabled by unchecking the box and then click OK. If you DO NOT see the Power Management tab, go to the General tab and click Change settings. The Power Management tab should appear.
- Finally, perform step 3 for every item listed within the Universal Serial Bus controllers drop down menu.
Step 4: Uninstall USB Generic And Root Hubs
If disallowing the computer to turn off the USB Controllers does not initially work, try uninstalling each of the Generic and Root USB Hubs.
To do so, simply right click on each of these items from the Universal Serial Bus controllers drop down list and select Uninstall.
Then go ahead and restart your PC. When your computer reboots, it will automatically reinstall each these USB hubs.
Step 5: Disable USB Selective Suspend Setting
We are not done with updating your PC’s USB power saving settings just yet!
Within Windows’ Power Options Advanced settings there is a feature called “USB selective suspend setting”. The USB selective suspend feature enables the PC to temporarily shutdown an individual USB port.
Selective suspension of USB devices can help conserve battery power, but it can also cause all sorts of connectivity issues with USB connected devices.
It’s a good idea to disable this setting and determine if USB selective suspend is the culprit.
- First type Control Panel in the Window search bar and select it from the list.
- Then, change the view to Category, select Hardware and Sound and click Power Options.
- Next, click Change plan settings followed by Change advanced power settings.
- Now, select USB settings followed by USB selective suspend setting.
- Finally, click on Setting and set it to Disabled. Click Apply and then OK to save the changes.

Step 6: Disable Bluetooth Radio Power Saving Mode
Similarly, if you are using Bluetooth, you’ll need to ensure that your PC does not have the ability to turn off your Bluetooth connection to save power.
- First, type Device Manager in the Window search bar and select it from the list.
- Next, click Bluetooth and double click on Bluetooth Radio.
- Finally, under the Power Management tab, make sure that Allow the computer to turn off this device to save power is disabled by unchecking the box and then click OK. If you DO NOT see the Power Management tab, go to the General tab and click Change settings. The Power Management tab should appear.

Step 7: Run Windows Keyboard Troubleshooter
Running the Windows Troubleshooter can often fix a wide range of keyboard issues including keyboard connectivity errors, keyboard double typing, and many others, automatically.
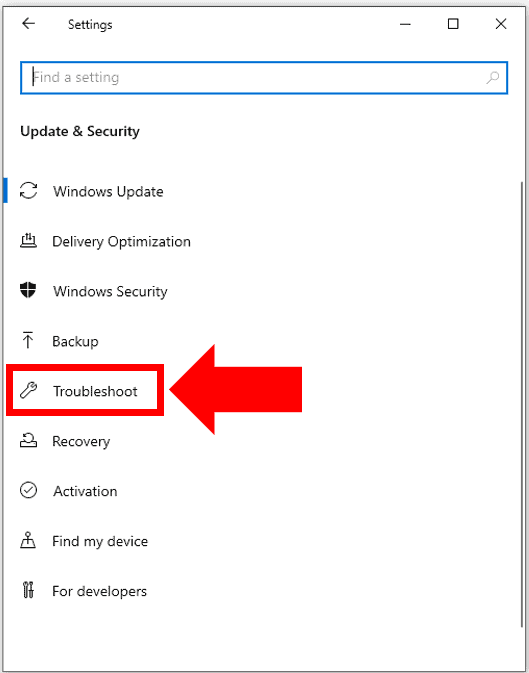
To run the Keyboard Troubleshooter in Windows, use your desktop search bar to locate and open Settings. In Settings, select Update and Security.

Next, click Troubleshoot.
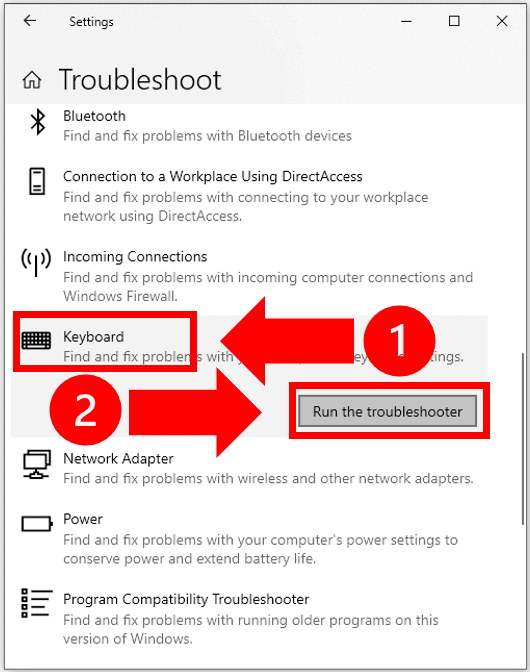
Finally, locate Keyboard and run the Keyboard Troubleshooter.
From here the Troubleshooter will go to work scanning your keyboard settings. The Keyboard Troubleshoot will examine your Text Services Framework and all Text services.
At the end of the scan a summary of findings will be provided to you. You will need to click View detailed information to obtain a more granular breakdown of each of the findings. Here you will also be notified if any problems have been fixed.
Once you have read the report select Next and then Close. It is always a good idea to then Restart your PC prior to trying your keyboard again.
Step 8: Update And Reinstall Keyboard Driver
If none of these proposed fixes have solved the problem you will need to update OR uninstall and then reinstall your keyboard driver.
The easiest thing to try when it comes to your device drivers is to check for software updates.
Software updates are the best ways to fix bugs. If you do not frequently update Windows you can run into display driver compatibility issues. If this is the case there is a good chance this is causing the problem!
Check for any pending software updates by going to Settings and selecting Windows Update.

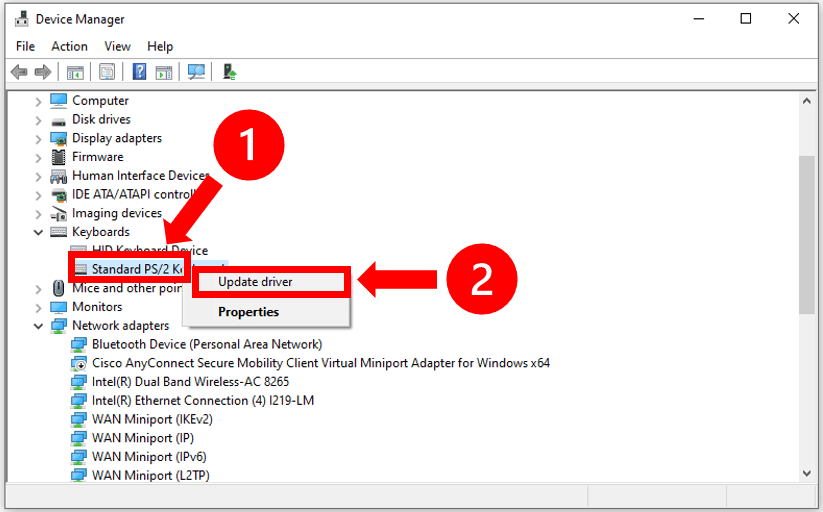
If still your keyboard is still disconnecting, the keyboard driver itself may be to blame. To test this, first try to update the keyboard driver directly.
Once again head over to the search box and this time enter Device Manager. Right-click on the keyboard driver, and select Update Driver.
If this does not fix the problem try uninstalling the keyboard driver by right-clicking and selecting Uninstall.
Then Restart your computer – Windows will automatically attempt to reinstall the keyboard driver during startup.
Conclusion
Are you getting frustrated and wondering “Why does my wireless keyboard keep disconnecting?” Here are 8 proven troubleshooting steps you can try:
- Change USB ports
- Allow keyboard to wake the computer
- Disable Universal Serial Bus controllers power saving mode
- Uninstall USB Generic and Root Hubs
- Disable USB Selective Suspend setting
- Disable Bluetooth Radio power saving mode
- Run Windows Keyboard Troubleshooter
- Update and reinstall keyboard driver
If this post helped you fix the issue, or if you solved your issue some other way, be sure to leave me a comment below so that we can include it!

Chelsea Ashbrook is a Senior Manager of Corporate Digital Experience at Genentech. Chelsea received her B.A. from the University of Connecticut and has spent the last 11 years working in the technology field.
