I have owned a home office LG monitor for many years and overall I have been extremely happy with it. Having said that, as with any electronic device that I have used long enough, there are a number of different troubleshooting issues I have run into.
One such problem that I have encountered a few times now, is despite multiple attempts to boot my device, my monitor won’t turn on at all. What’s strange, is that in all instances, this issue seemed to come out of nowhere.
After digging through numerous LG manuals and trying every fix I could find, I discovered a number of proven troubleshooting steps that seem to cover the vast majority of models.
If your LG monitor is not turning on, double check that the power button is set to ‘on’ and inspect the power and display cable connections. Also be sure to set the monitor to the correct input and lower the display resolution. If all else fails, perform a factory reset.
Besides potential issues with the monitor directly, your connected PC may be what’s causing the problem. By testing the monitor with a different device, you can confirm whether or not the issue is related to your computer.
If the monitor works with a different device, update the originally connected PC’s graphics driver and BIOS and ensure display cable is properly plugged into the graphic card. Finally, reinsert the RAM sticks and reset the CMOS/BIOS.
Let’s quickly review step-by-step instructions for each of these troubleshooting steps in detail.
Step 1: Confirm Power Button Is Set To ‘On’
Most users typically only turn their monitor on once and rarely need to again. For this reason, it is not uncommon to come across this issue simply because the power button is unknowingly set to off.
It seems too easy and like a very obvious fix – believe me, I get it. But before we start diving into more involved steps, humor me and quickly double check this.
You can find the On button on the front, bottom, or side panel of the monitor frame. More often than not it is on the right hand side.
Turn the monitor on and off for good measure and be sure to leave it set in the on position.
Step 2: Inspect Power Cable
Another quick fix to check off the list is to make sure that the power cable is securely connected on both ends.
Over time the power socket can get a little bit loose resulting in the power cord head not being securely inserted into the power port.
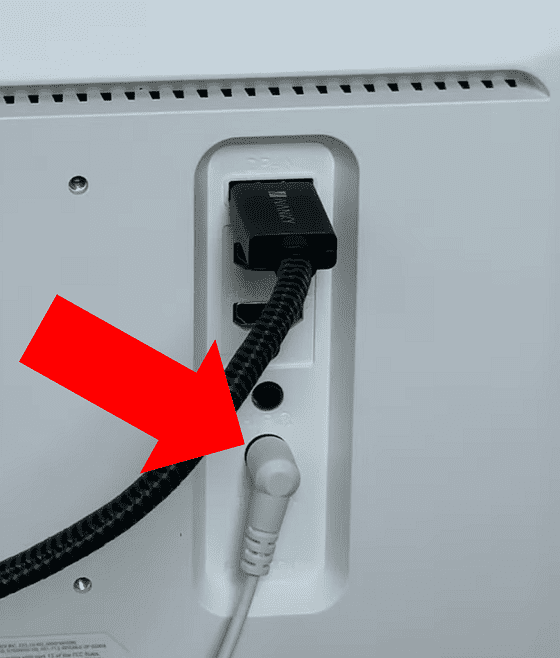
So take the time to check the connection on the back of your monitor and the power outlet on the wall. Be sure to also examine your power cord for any obvious damage.
Step 3: Inspect Display Cable
Ok. Now you are pretty positive the power is turned on and the power cable is secure. And yet, still no signs of life. Let’s keep going – we’ll stick on the cable theme.
It is equally important to ensure the display cable is properly connected.
The most common display cables include USB-C, HDMI, DisplayPort (DP), VGA and DVI. A bunch of different failures, including volume issues and the no signal errors, can be caused even if the connection is slightly broken on either end.
Try disconnecting and then reconnecting the cable. If you are using a VGA or DVI cable, tighten the screws all the way to prevent future issues. If nothing changes, you should also try using a different display cable than the one your are currently using.
Step 4: Adjust Video Input Source
Making sure the video cable is securely connected doesn’t matter if you have the monitor set to the wrong video input source! Adjust your display to confirm that the correct Input source is selected.
In order to do this, you need to first determine the type of video cable you are using.
Once you have identified the correct video cable, find the Input button on your monitor. The Input button can be found on the front, bottom, or side panel of your monitor frame.
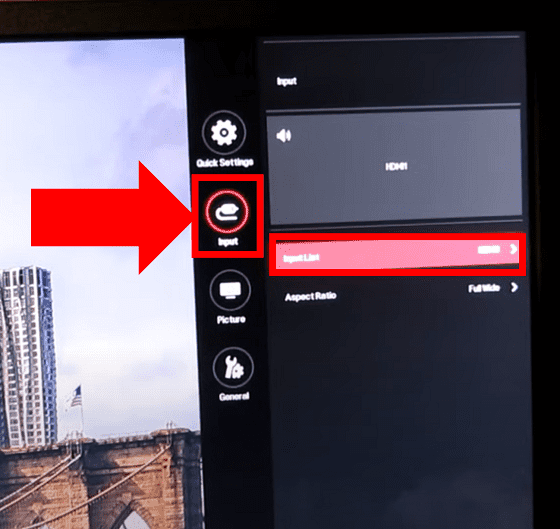
Adjust the input options until you identify the input that matches your display cable.
In the event your on screen display (OSD) is not working, be sure to unlock it and try again.
Step 5: Lower Display Resolution
LG monitors have a set range of possible display resolutions that it can relay back to your PC.
So it is important to check and see if your computer’s graphic card is set on a display resolution that is higher than what your monitor can handle.
This can sometimes even lead to an out of range error, or even to your monitor not displaying anything. To fix this, reboot your computer using Safe Mode.
While in Safe Mode, your PC will readjust to a lower display resolution than normal use on it’s own. This will give you a window of opportunity to go into your computer’s resolution settings and select a lower standard display resolution.
I recommend you start with the lowest resolution range and incrementally increase it. Allow for about 30 seconds between each update and see whether the monitor remains on. If it does, try the next highest range, and so on.
Step 6: Restore Factory Default Settings
Sometimes resetting your LG monitor to its factory settings is enough to get it back up and running.
To reset your monitor, you will need to open the OSD main menu and navigate to the Factory Reset option.
The navigation pathway can differ depending on the specific model you own. The easiest thing to do is to enter your model number into the LG manual look up and follow the provided instructions.
Step 7: Test Monitor With Another Device
These first six steps mainly involve troubleshooting your display. But at this point if none of these fixes have worked, there is a real possibility your connected device is causing the problem.
To confirm this, try using your monitor with another device. This can be another PC, a game console, laptop, etc.
If your monitor display works, then you know your monitor is working properly and your hardware is the culprit.
None of the following steps are overly complicated. But, as a heads up, a few of the fixes below require you to open up and manipulate your PC’s internals. Some folks are not comfortable with that level of troubleshooting and if that’s the case you can opt to bring your PC to a local repair shop instead!
Step 8: Update Graphics Driver And BIOS
If your PC is in fact the problem, the first thing to check is whether or not your graphics driver and/or your operating BIOS version are outdated.
To investigate this you will need to connect your desktop PC to a different, working display. In the event you are using a laptop, simply use the laptop screen for this step.
Step 9: Ensure Display Cable Is Plugged Into The Graphic Card
The vast majority of desktop PC’s have a separate graphic card unit with corresponding connections located on the back of the device.
It’s amazing how often users mistakenly plug their display cable into their motherboard instead of their graphic card port.

So if your connected device is a desktop computer, pay extra attention to this PC display connection point.
Step 10: Reinsert Your RAM Sticks
Another hardware related issue to consider is your RAM (Random Access Memory) sticks may not be establishing a proper connection.
Often times RAM related issues will result in not enough power getting delivered to your keyboard and/or mouse. So if either one of these devices is not functioning properly, that’s typically a good sign you are dealing with a RAM error.
With your PC off, unplugged and the battery removed (if you are using a laptop), remove the back case to access the RAM sticks. Fully remove each of the sticks and then firmly reinsert them in a different order than you found them.
When you go to boot back up, the issue should be resolved.
Step 11: Reset CMOS/BIOS
The Complementary Metal Oxide Semiconductor (CMOS) battery in your PC powers the Basic Input/Output System (BIOS) firmware which manages all the essential functions of your computer.
Taking out the CMOS battery will cause your BIOS to reset back to its previous configurations. Often times this reset is enough to solve the problem.
Once again, be sure to first shut off your PC, unplug it and remove the battery if you are using a laptop. Then ground yourself and open up the back of the device to access the CMOS battery on the motherboard.
Once the batter has been removed, hold down the power button to drain all excess remaining power. After about a minute, reinsert the CMOS battery back into your PC.
Finally, reboot your computer and check to see if your display is working.
Final Word
If you discover your LG monitor not turning on, follow these 11 troubleshooting steps in this exact order:
- Confirm monitor is ‘actually’ ON
- Inspect power cable
- Inspect display cable
- Adjust video input source
- Lower display resolution
- Restore factory default settings
- Test monitor with another device
- Update graphics driver and BIOS
- Ensure display cable is plugged into graphic card
- Reinsert RAM sticks
- Reset CMOS/BIOS
For users who are still having issues despite attempting each of these troubleshooting steps, you can try contacting LG customer support at 1 (800) 243-0000 for further assistance.
If it turns out the hardware issue is too severe to fix, look up the terms of your LG warranty policy before making any purchases.

Chelsea Ashbrook is a Senior Manager of Corporate Digital Experience at Genentech. Chelsea received her B.A. from the University of Connecticut and has spent the last 11 years working in the technology field.
