When the volume buttons on your MacBook won’t work, it can be extremely annoying. Fortunately, this is an extremely common issue with six tried and tested fixes.
If you encounter your MacBook volume buttons not working, make sure the standard function keys option is disabled within the Keyboard application. Then, try adjusting the output volume and plugging in headphones. If the issue persists, reset RVRAM and SMC. As a final measure, create a new administrator account.
That’s it! Let’s review each of these six troubleshooting steps in greater detail. Notably, these steps will work regardless of whether you have a MacBook Pro or Air.
I recommend you follow these steps in the exact order outlined below.
Step 1: Disable Standard Function Keys
The first thing to do is ensure standard function keys are disabled.
As a default, Macs give preference to media keys over function keys. Therefore, under normal default settings, the F10 button will mute volume, F11 will decrease volume, and F12 will increase volume.
However, in some cases you may find that the function keys have taken priority over the media keys.
When this happens, the F11 key may now hide your display instead of decreasing the volume. Similarly, when the F12 key is selected the inspector window opens instead of increasing the volume.
To fix this, hold down command and space to pull up the search bar. Type in “keyboard” and select it from the list.
In the Keyboard application under the Keyboard tab, uncheck the box next to Use F1, F2, etc. keys as standard function keys.
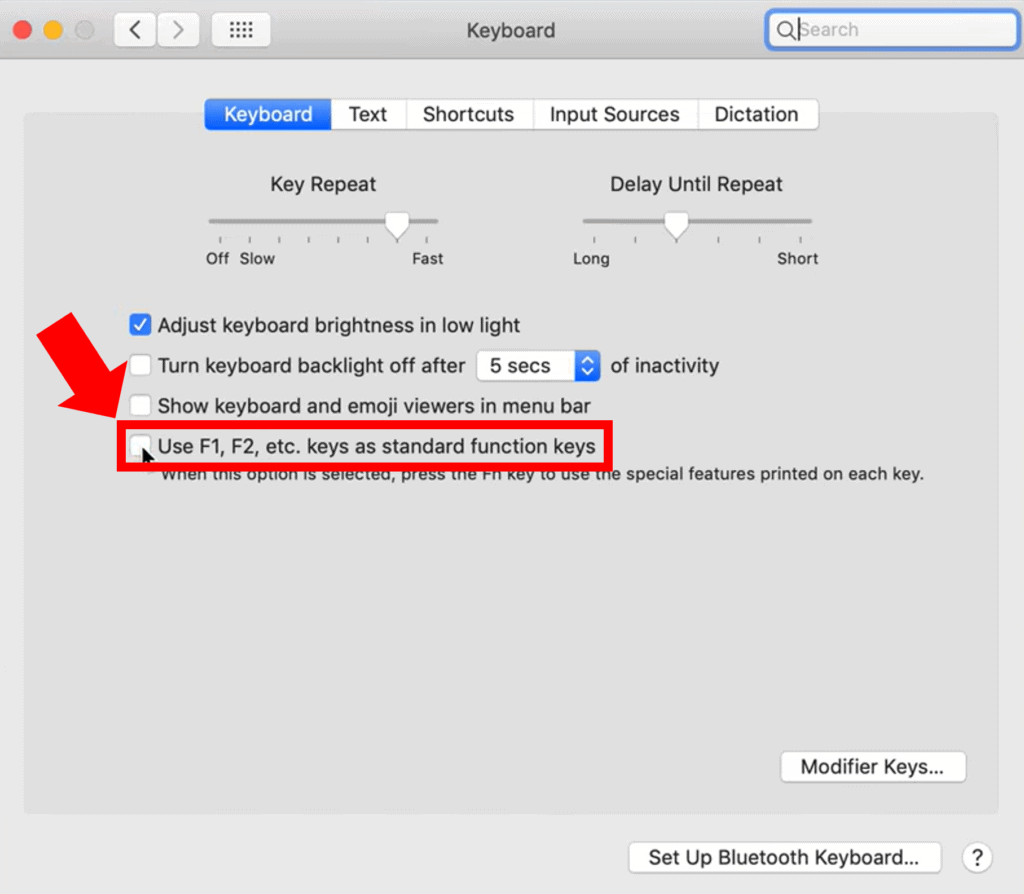
Once completed, simply close out of the application and attempt to use your volume buttons again.
They should be working normally now.
Step 2: Adjust Output Volume
In some cases when this issue arises, the volume symbol may appear on the screen with a line through it.
You may also discover your MacBook volume low and challenging to hear and the volume icon in the top right corner of your screen is a light gray color as if it has been disabled.
To fix this, first select the Apple icon from the top left corner and click System Preferences.
Next, within System Preferences, select Sound and then click the Output tab from the menu at the top.
Finally, at the bottom of the window, locate Output volume and simply click to adjust the volume up and down.

I know, I know. This fix sounds odd and far too simple, but countless users have indicated this solved their issue.
Just by adjusting the volume you should notice that the volume icon is no longer grayed out.
Additionally, the Mac volume buttons should now all be fully functioning.
Step 3: Plug In Headphones
Some folks will discover that when they navigate to the Output tab in System Preferences, Internal Speakers DO NOT appear as an option under the device for sound output list.
If this is the case for you, with the Output window open, simply try plugging in a pair of headphones into the MacBook audio jack.
By doing so, oftentimes both the headphones and the internal speakers will automatically populate within the device list, fixing the issue.
Step 4: Reset NVRAM and PRAM
If the headphones trick did not work, there are two types of resets you should try.
Nonvolatile random-access memory (NVRAM) is an area where a very small amount of memory is stored on the MacBook for quick access. Parameter RAM (PRAM) is very similar and stores similar types of information.
Resetting your MacBook’s NVRAM and PRAM will reset information that deals with start-up disks, device connections, and audio interfaces.
Fortunately, the process for resetting these are the same.
How To Reset NVRAM / PRAM
- First, power off your Mac.
- Then, power your Mac on and immediately hold down Command, Option, P and R all together for 20 seconds.
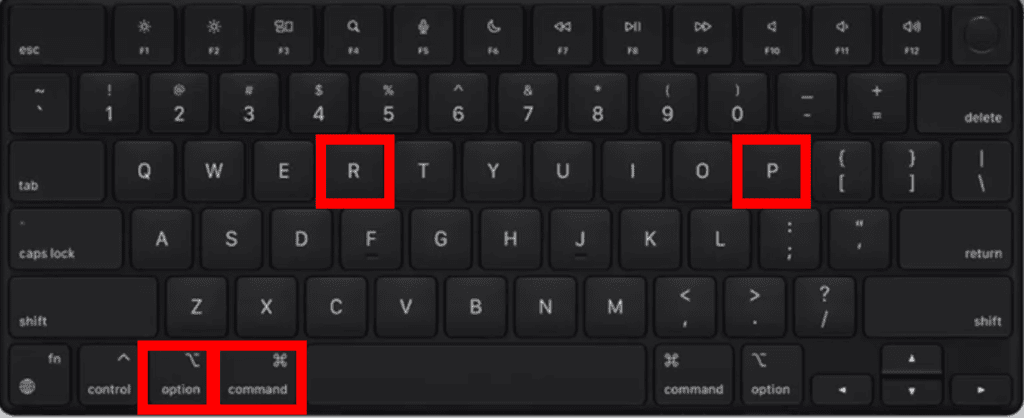
You can release the keys once you here the Mac startup sound or once the Apple logo appears and disappears for the second time.
Notably, if you have a firmware password set this reset process will not work.
You will need to first remove the password and then try again.
Step 5: Reset System Management Controller (SMC)
The other kind of reset you can try is a system management controller (SMC) reset.
Notably, the SMC dictates how your Mac manages power. By resetting it, you can solve all sorts of Mac issues.
Prior to attempting to reset your SMC, follow the steps below.
- First, shut down the MacBook.
- Next, press and hold down the power button for 10 seconds and then release it.
- After a few seconds, press the power button to turn your Mac on.
If the issue persists, you can move forward with the SMC reset procedure.
The process for how you reset the SMC on your device varies depending on whether or not you have a T2 chip and the battery location.
How To Reset SMC – MacBooks With T2 Chip
- First, power off your device.
- Then, press and hold the Control, Option and Shift keys at the same time for 7 seconds.
- Next, while still holding these three keys, press and hold the power button as well for an additional 7 seconds. After the 7 seconds, release all four keys.
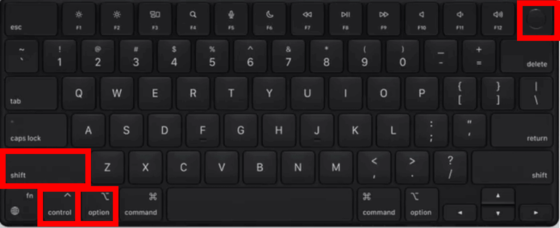
- Finally, wait 3 to 5 seconds and then press the power button once and release to turn on the MacBook.
How To Reset SMC – MacBooks Without T2 Chip & Non-removable Battery
- First, power off your MacBook.
- Then, press and hold the Control, Option and Shift keys at the same time.
- Next, while still holding these three keys, press and hold the power button as well. After 10 seconds, release all four keys.
- Finally, wait 3 to 5 seconds and then press the power button once and release to turn on the MacBook.
How To Reset SMC – MacBooks Without T2 Chip & Removable Battery
- First, power off your device.
- Next, fully remove the battery.
- Then, press and hold down the power button for 5 seconds and then release it.
- Reinsert the battery.
- Finally, press the power button to turn on the MacBook.
Step 6: Create New Admin Account
If the issue persists, it is possible that there is a glitch associated with your user account.
To test if this is the case, attempt to create a new administration account to see if the issue gets resolved.
Before doing so, first power down your MacBook and reboot in Safe Mode by holding down the Shift key during startup until you see the login screen. Next, navigate to the Apple icon in the top left corner of the screen and select System Preferences.
Within System Preferences, select Users & Groups, click the Lock icon in the bottom left corner and enter your password.
Then select the “+” add button below the list of users to create a new account. Complete the pop up field, under “New Account” select Administrator, and click Create User.
Now, restart your device and login to the newly created Administrator account. Test to see if the volume buttons are now functioning properly!
If it is, switch back to your original user account and try the volume again. It should be working now.
Once you have confirmed the volume is fully operational, feel free to delete the newly created account.
Conclusion
If you discover your MacBook volume buttons not working, there is no need to worry! This is an extremely common issue with 6 proven troubleshooting steps:
- Disable standard function keys
- Adjust output volume
- Plug in headphones
- Reset NVRAM and PRAM
- Reset System Management Controller (SMC)
- Create New Admin Account
If you’ve completed each of these steps without success, check out the Apple MacBook Support page. You can also call the main Apple Customer Support line at 1-800-275-2273.
If all else fails, use your serial number to review your Apple warranty status.

Chelsea Ashbrook is a Senior Manager of Corporate Digital Experience at Genentech. Chelsea received her B.A. from the University of Connecticut and has spent the last 11 years working in the technology field.
