Apple has dominated the competition in terms of audio quality, essentially from the very beginning. While the MacBook in particular is known for its superior built-in speakers, they do come with some commonly reported issues. One such issue that users have reported is their MacBook sound volume suddenly being too low.
If you discover your MacBook volume low and challenging to hear, first check your macOS and in-app volume settings. Then, restart your MacBook and reset the core audio via the Terminal or the Activity Monitor. If the issue persists, reset NVRAM and PRAM and consider downloading a sound booster application.
Fortunately, following these six troubleshooting steps will solve the problem for most users. Notably, these steps will work regardless of whether you have a MacBook Pro or MacBook Air.
I recommend you follow these steps in the exact order outlined below.
Step 1: Check Your MacBook Volume Settings
Before diving into more involved troubleshooting steps, it is always a good idea to quickly confirm that your current MacBook volume settings are correct.
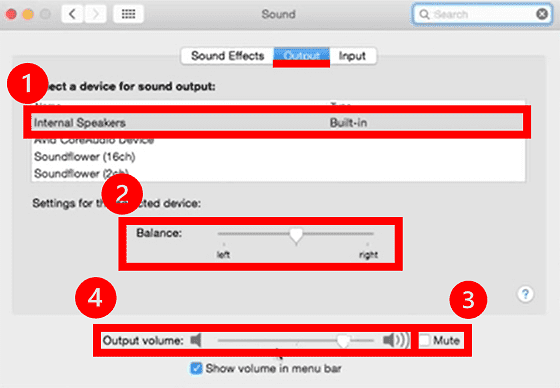
To do so, click the Apple menu > System Preferences > Sound > Output tab. Within the Sound Output window, confirm the following:
- Output is set to either ‘Internal Speakers’ or ‘MacBook Speakers’ with type ‘Built-in’.
- Balance is set to the middle.
- Mute is not selected.
- Output volume level is set to high.
Two fairly common reasons your audio is lower than desired, are the MacBook volume buttons are not working or the balance is skewed towards either the left or right speaker.
If your volume buttons are not registering, you make think you are increasing the volume when in fact you aren’t. Manually going into the volume settings directly helps you rule this possibility out.
Additionally, if the volume balance is unintentionally set more towards either speaker, you will experience inferior overall audio quality.
Many users have reported this was the exact cause of their issue. Once their sound balance was reset to the middle, the problem was fixed.
Step 2: Check In-App Volume Levels
Sometimes, this issue has nothing to do with your Mac volume, but instead the volume settings within the application you are using is to blame.
For this reason, it is also important to quickly check your in-app volume levels.
First, make sure your browser tab (whether Safari, Chrome, Firefox or otherwise) is not muted. Then, at the application level, be sure the volume levels are turned up to a reasonable level.
There are a whole bunch of examples where users are attempting to listen to music or a video in iTunes, YouTube, Spotify or elsewhere, and it turns out that the volume within the app itself was set to low.
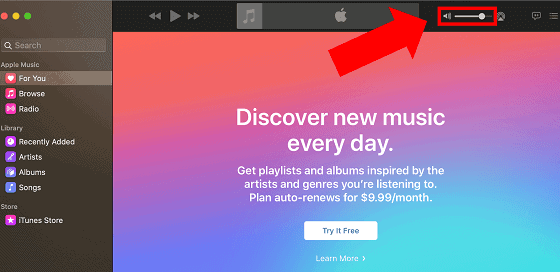
So make sure this isn’t the case before proceeding!
Step 3: Restart MacBook
When you restart your Mac, the computer’s logic is fully reset. Essentially this means your CPU, memory, etc. all return to their baseline operating states.
If a minor software bug is the culprit, performing a simple restart can sometimes solve the problem.
To restart the device, click the Apple menu > Restart.
Step 4: Reset Core Audio
Ok. At this stage we’ve complete the quickest and most common troubleshooting steps. Let’s take it up a notch.
There may be an issue with one of your Mac’s audio interfaces, which can result in various bugs leading to distorted and diminished sound quality.
Resetting the low level audio API often resolves these types of issues. Ultimately, there are two different ways to reset your Mac’s core audio.
Launch The Terminal
Launch the terminal by navigating to Finder > Applications > Utilities > Terminal. Then type “sudo killall coreaudiod” in the input window and press enter.
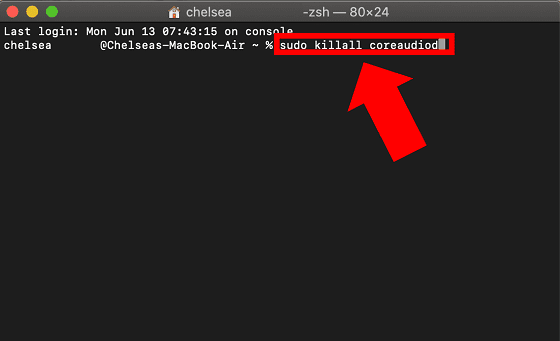
You may then be prompted to enter your password to continue. Once the API has been fully reset, check the sound levels again.
Launch The Activity Monitor
Alternatively you can delete the core audio D process within the activity monitor window.
To do so, navigate to Finder > Applications > Utilities > Activity Monitor. Here you will see a list of all the background processes that your Mac is running.
Next, locate the search bar in the top right corner of the activity monitor window. Then type “coreaudiod” into the search bar and select it so that it becomes highlighted. Lastly, click on the ‘X’ icon in the top left corner of the window, followed by Force Quit.
Once complete, your Mac core audio process will automatically restart.
Step 5: Reset NVRAM and PRAM
The nonvolatile random-access memory (NVRAM) is an area where a very small amount of memory is stored on the MacBook for quick and easy access. Parameter RAM (PRAM) is nearly identical and stores similar types of information.
Resetting your MacBook’s NVRAM and PRAM can solve many different types of audio issues.
Notably, the process for resetting these are the same.
How to reset NVRAM / PRAM:
- First, power off your Mac.
- Then, power your Mac on and immediately hold down Command, Option, P and R all together for 20 seconds.
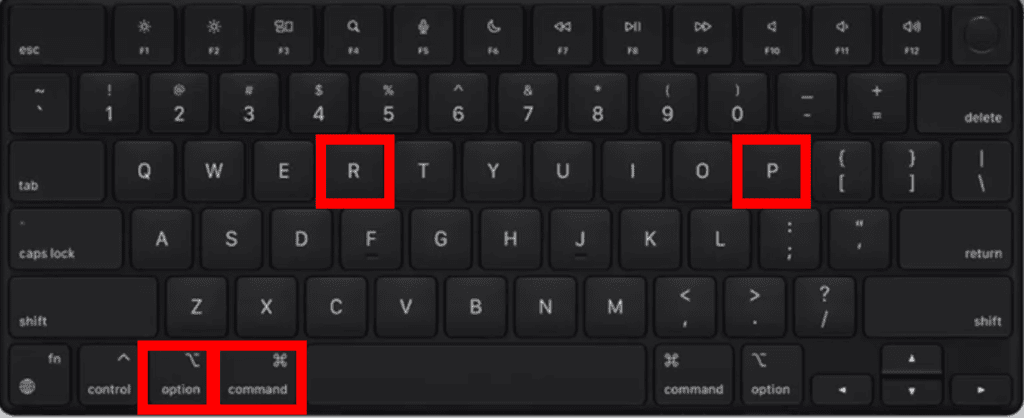
You can release the keys once you here the Mac startup sound or once the Apple logo appears and disappears for the second time.
If you have a firmware password set this reset process will not work. You will need to first remove the password and then try again.
Step 6: Download Sound Booster App
If, after completing each of these steps, you are still not happy with your MacBook’s audio quality, consider downloading a volume booster application.
Many of these simple apps enhance the audio experience on your Mac by seamlessly running in the background.
Leading Mac sound boosting applications include:
- Boom 3D – Boom 3D for Mac has a system-wide volume booster that safely increases the volume. The software will cost you about $15 but they have a free 30 day trial offering so you can test it out first.
- Audio Hijack – For a much pricier option at $64, Rouge Amoeba’s Audio Hijack application has a Magic Boost functionality that will noticeably increase your Mac volume. You can also give this app a try with their 30 day trial to be sure its worth the investment.
Conclusion
If you discover your MacBook volume suddenly low and challenging to hear, there is no need to worry! This is an extremely common issue. Simply follow these six steps to get your audio functioning properly again:
- Check your MacBook volume settings
- Check in-App volume levels
- Restart MacBook
- Reset Core Audio
- Reset NVRAM and PRAM
- Download sound booster app
If you’ve completed each of these steps, and yet you still encounter this issue, check out the Apple MacBook Support page. You can also call the main Apple Customer Support line at 1-800-275-2273.
If all else fails, use your serial number to review your Apple warranty status.

Chelsea Ashbrook is a Senior Manager of Corporate Digital Experience at Genentech. Chelsea received her B.A. from the University of Connecticut and has spent the last 11 years working in the technology field.
