If you go to power up and your MSI laptop won’t boot don’t worry. I have personally come across this issue and as it turns out, this is an extremely common problem.
Here’s how to fix it.
If your MSI laptop won’t turn on, it is likely due to static build up. To fix it, perform a power drain. Turn off and unplug it. Open the back case and remove the battery. Press and hold the power button for 60 seconds. Lastly, reassemble and reboot the laptop.
Ultimately there are 7 common troubleshooting steps you should try in total.
I strongly recommend you follow these steps in order.
We will start with the most common fixes and then work our way towards less common, more involved troubleshooting steps.
Notably, regardless of your specific MSI model, the same basic procedure outlined here will work for most laptops.
Step 1: Power Drain The Laptop
Ground Yourself
Prior to starting, you will need to learn how to properly ground yourself to avoid destroying your laptop with an electrostatic charge.
Remove The Bottom Base Of The Laptop Case
Ok, we are ready to open up your laptop. To do so, flip your laptop over and remove all of the screws.
The number of screws and their location will vary depending on your laptop model. Some screws are even hidden behind stickers!
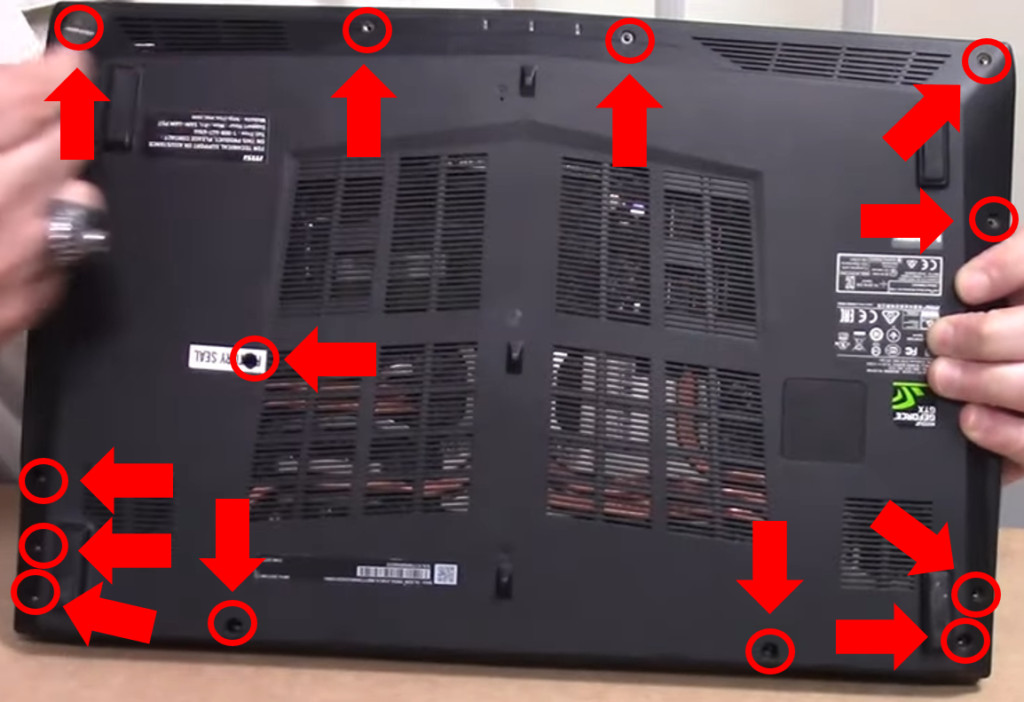
Once all the screws are removed, separate the top and bottom parts of the case.
The easiest way to do this is to wedge a credit card or a guitar pick in between the top and bottom base. Run it along all four sides until it pops open.
DO NOT use a metal object as your wedge. Use something thin and plastic.
When you remove the cover, remove the side with the connections LAST. You can lift up on the side without the connections, but you will need to slide it off of the connections side. If you attempt to just pull it off, you risk cracking the case.
Unscrew, Tilt And Lift The Battery To Remove It
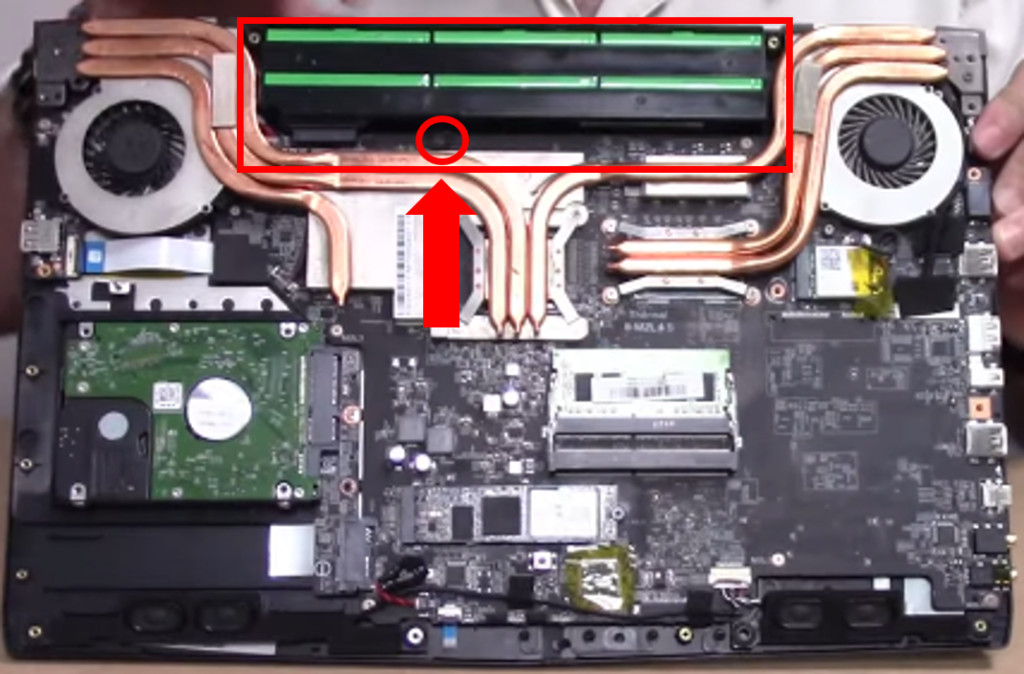
With the case now open, there is just one pesky screw left between you and removing the battery.
Once the screw is removed, tilt and lift the battery out.
Flush Excess Power From The Laptop
Finally, with the battery removed, turn the laptop over and open up the screen.
Press and hold the power button for 60 seconds.
Nothing is going to happen during these 60 seconds. We are simply flushing out any excess power from the laptop.
Reassemble the laptop and reboot it
That’s it! Perform all of the above steps in reverse order to put your laptop back together. Plug it in and turn it on. This process will force restart your laptop and it should be back up and running!
NOTE: If you find that this is a recurring issue, you likely need to replace your power adapter, your battery, or both.
Step 2: Troubleshoot The Charger
If your device still won’t power on, the culprit is likely your battery or your charger.
Once again, turn off the laptop, unplug the power adapter and remove the battery.
Hold the power button down for 60 seconds and then reinsert the battery.
Now try turning on your laptop with JUST the battery.
If your laptop turns on, it means that both the laptop and battery are in working condition.
That’s the good news!
The bad news is your charger is probably going bad.
Amazingly, the laptop can sense a bad battery. It will automatically prevent itself from turning on as to not let the bad battery permanently damage motherboard.
Try using a different charger if you happen to have an extra one lying around. Otherwise, you will need to purchase one.
Step 3: Troubleshoot The Battery
So, you’ve tried all the steps above and still, you discover your MSI laptop not turning on?
Remove the battery again, and hold the power button down for 60 seconds.
This time, without reinserting the battery, plug the charger back in.
Try turning the laptop on.
If the laptop works, it is a bad battery that is causing the problem!
You’ll need to purchase a new battery to get your laptop back up and running.
Step 4: Inspect RAM Sticks
Computer random access memory (RAM) plays a significant role in your PC’s overall performance and speed.
Actively used information is stored on RAM on a short-term basis for quick access. In essence, RAM is what allows your PC to perform its every day tasks.
Faulty RAM can prevent the motherboard from properly communicating with the RAM. This in turn prevents your laptop from turning on.
There are a number of common reasons RAM fails:
- Thermal damage/overheating
- Faulty connection
- Voltage too high or too low
- Damage due to improper handling
Fortunately, there are two reliable ways to fix and test your RAM sticks.
Remove, Reorder and Reinsert RAM Sticks
It is possible your MSI laptop won’t turn on because your RAM (Random Access Memory) sticks are not making a proper connection.
To fix this, first make sure your computer is powered OFF and the power cord is removed from the outlet.
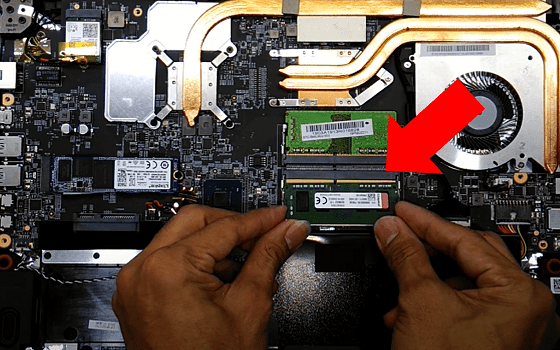
Remove the screws from the back of the laptop and remove the case to expose the RAM compartment. Then fully remove the RAM stick.
Finally, reinsert the RAM firmly into the RAM seat to ensure a proper connection.
Resemble your laptop and try starting it up. You should be back up and running!
If your MSI laptop has multiple RAM sticks be sure to also reorder them. You should also try rebooting your laptop after reinserting one RAM stick at a time.
Run A Windows Memory Diagnostic Test
Despite the issue seeming to be resolved, it is always a good idea to check the RAM itself for any faults.
In order to check the health of your newly reseated RAM sticks we will run a Windows Memory Diagnostic Tool.
To run the test, type Windows Memory Diagnostic Tool into your search bar and click on it. Next, select Restart now and check for problems.
Once your laptop has restarted, a RAM diagnostic report will appear.
If no issues are uncovered then you are all set and no further action is needed.
If however, there are faults discovered you may need to purchase a new RAM stick.
Step 5: Remove And Reinsert The CMOS Battery
A system board failure is another possible reason that your MSI laptop won’t turn.
The issue here is specifically with your Embedded Controller, which may be timing out waiting for the BIOS to return from system board initialization (“end of POST”).
To fix this, try removing the CMOS battery from the motherboard.
CMOS stands for Complementary Metal Oxide Semiconductor. The CMOS battery in your laptop or computer powers the BIOS firmware.
BIOS stands for “Basic Input/Output System” and it manages the essential functions of your computer.
Resetting your BIOS sets it back to its previous configurations and can often fix a lot of different issues.
Once again make sure your MSI laptop is powered OFF, the power cord is removed, and you are properly grounded.
Next, disassemble the back casing of your laptop and remove the main battery. Then locate the CMOS battery, unclip it, and remove it from the motherboard. Hold down the power button to drain all excess remaining power.
After about 15 to 20 minutes, reinsert the CMOS battery back into your laptop. Finally, reboot your computer and check to see if your problem has been resolved.
Depending on your MSI laptop model, accessing your CMOS battery can prove very challenging. You can use the MSI laptop manual lookup to find exactly where your CMOS battery is located.
In some cases, it may be best to head over to your local PC repair shop for support.
Step 6: Clean Or Replace Cooling Fan
There may also be an issue with your CPU or GPU due to overheating.
If you have historically heard your fan constantly running at maximum speed than you know your laptop has been running too hot.
In most cases it is your central processing unit (CPU) or the graphics processing unit (GPU) that will overheat the MOST. This will cause your laptop to not turn on properly.
To fix an overheating issue, you need to fix your laptop’s internal cooling.
The very first step is too clean the internal fan. Overtime a significant amount of dust can accumulate onto your laptop fan, causing it to underperform.
To fix this you will need to once again remove the case from the bottom of the laptop.
As previously mentioned, first, turn off the laptop, unplug it and remove the battery. Make sure to ground yourself and then unscrew the bottom case and remove it to expose the fan.
With a cotton swab and some isopropyl alcohol, carefully clean the cooling fan. Be sure to also clean the exhaust port on the case that allows air to flow in and out of the laptop.

Wait approximately 30 minutes to allow the isoporpyl alcohol to fully dry.
Once dry, resemble the laptop and attempt to turn your laptop on.
If the issue persists, you may need to replace the cooling fan or purchase an external cooling unit for your laptop.
Step 7: Perform BIOS Recovery
Lastly, if all else fails, the issue is likely due to a BIOS chip or BIOS firmware corruption issue.
As previously noted, BIOS, or “Basic Input/Output System”, is a type of firmware that is located on your PC’s motherboard.
At startup, the very first thing your computer does is boot the BIOS. The BIOS firmware then configures your hardware at which point your hard drive takes over.
At least that’s what’s supposed to happen.
Sometimes your BIOS firmware can become corrupted. There are various reasons for why this can happen.
Leading causes of BIOS firmware corruption:
- Your PC’s flash memory is failing
- Interruption of a BIOS update
- A computer virus
In other cases, your BIOS chip itself can fail.
Leading causes of BIOS chip failure include:
- Over heating
- Over voltage
- Random cosmic rays interactions (sounds cool huh?)
In either case, a failure of the BIOS chip or firmware means that this “handover” to your hard drive cannot take place. Hence the reason you are staring at a black screen!
Fortunately, there are two reliable ways to fix MSI BIOS issues.
Built In BIOS Recovery Function
First, let’s determine whether or not your specific MSI laptop model has a built in function for BIOS recovery.
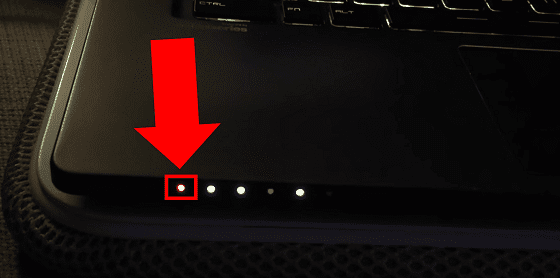
To test this, start by turning OFF your computer by holding the power button for about 10 seconds. You will know your laptop is off when the lights stop blinking and your laptop fan comes to a stop.
While repeatedly pressing and releasing the Delete button, turn the laptop back in. You can stop pressing the delete button once the BIOS screen appears.
For some MSI laptop models, the BIOS recovery key may be either F2 or F11 instead of Delete. If Delete does not bring you to the BIOS screen, attempt these two keys as well.
BIOS Recovery Reinstall With USB
So, the recovery keys did not work?
MSI laptops without the built-in BIOS recovery function preinstalled or that are not turning on at all, require using a recovery USB with a different computer.
To start, grab an old thumb drive laying around and insert it into a different computer you are borrowing.
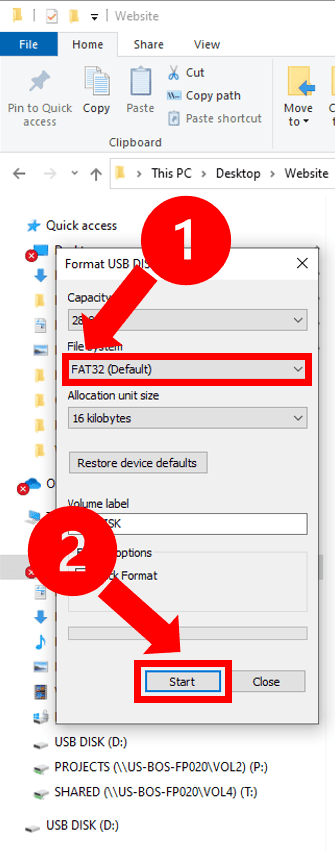
Next, with your USB flash drive is plugged in, you need to reformat it to “FAT32“.
IMPORTANT NOTICE. When you reformat your USB you will lose all of the information and files contained on it. Select your USB with this in mind.
To do this, open up your Folders file, navigate to and right click on USB Drive (D:) and select Format.
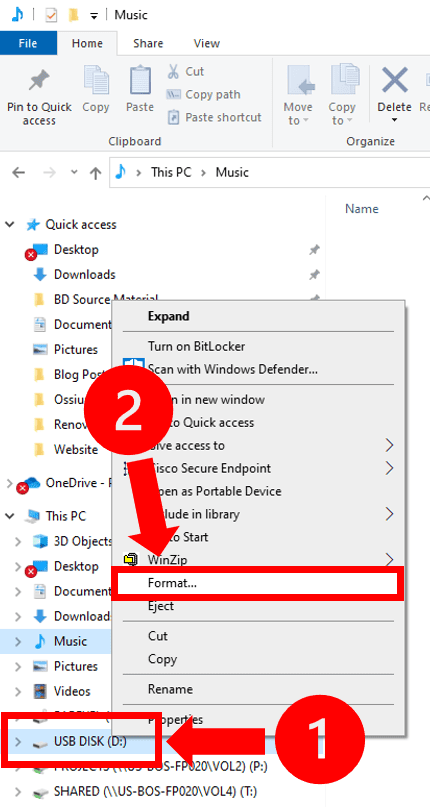
Under the File system section, select FAT32 from the drop down menu. Finally, select Start, OK and Yes to finalize the formatting process.
Nicely done. Your flash drive is now reformatted!
The next step requires you to head over to the MSI Support page.
Locate your MSI laptop’s type and model number. You can find these on a sticker located on the backside of the laptop.
Enter your MSI laptop’s information into the search field as prompted.
Then, on the next screen select Downloads from the menu. Now locate BIOS, click the down arrow to expand it, and click Download on the latest version available.
Once the file is downloaded, go to the downloads folder and open it. The file will ask you to make changes to your device. Select Yes. Then follow the steps by continuing to select Next and accepting the licensee agreement terms when prompted.
At the MSI BIOS Update and Recovery window select Create Recovery USB flash drive and select Next.
On the next screen your newly formatted USB drive should pop up. Select it from the options and click Next. The BIOS recovery files you need will now be copied onto your USB drive.
When it is done loading the files, select Finish and then Cancel.
You can check to make sure the process worked by going back to your Files folder and checking the USB Drive (D:). You should see the newly downloaded files on there.
Now go ahead and eject the USB drive.
Turn OFF the MSI laptop you are attempting to fix and insert the flash drive.
While separately attempting each of the recovery key combinations detailed in the above section (Delete, F2 and F3), turn the computer back on. Attempt pressing each recovery key repeatedly during startup for at least 10 seconds.
The MSI BIOS window will appear and the BIOS recovery will be initiated.
Once BIOS has been recovered, your laptop will restart. DO NOT INTERRUPT THE LAPTOP AT THIS TIME.
A screen will appear that states “A System BIOS Recovery has occurred. Press Enter to continue.” Go ahead and hit Enter.
That’s it! Your laptop should be fixed!
Other Common MSI Laptop Issues
MSI Laptop Battery Light Blinking Red
A blinking red battery light indicates that your battery is not charging.
To fix this you will need to run the Battery Calibration built-in battery software. This will help to reset the battery power settings.
Where you find the Battery Calibration software varies slightly depending on your laptop model and programs:
- MSI Center for Business and Productivity: Select the System Diagnosis in the Support tab, and click the Battery Calibration icon.
- UWP Dragon Center and Creator Center: Select the Tools tab and click the Battery Calibration icon.
- MSI Center: Select System Diagnosis in Features and click the Battery Calibration icon.
- MSI Center Pro: Select the Battery Optimizer in Optimization and click on the Battery Calibration icon.
If your laptop does not have any of these centers, you will need to install the Battery Calibration software yourself.
Go to the Start menu and search for Battery Calibration in the MSI folder.
In all cases make sure the power adapter is plugged in and connected BEFORE starting the calibration. DO NOT remove the adapter until the calibration is done and DO NOT run any other applications.
Once these requirements are fulfilled, the Start button will become available and you can start calibrating the battery.
It is recommended that you run the Battery Calibration software every 1 to 3 months to maintain and preserve your battery life.
MSI Laptop Black Screen
MSI laptop black screen, also known as MSI laptop black screen of death, is unfortunately another common issue.
To be sure this is truly the issue you are encountering, try using your laptop with an external monitor. If your laptop works with the monitor, but not when it is disconnected from the monitor you are dealing with the black screen issue.
IF you are encountering the black screen of death only AFTER you sign into Windows, the issue may be with your most recent Windows update. There are two fixes you can try:
- Run the explorer: Press CTRL+ALT+DELETE, select Task Manager from the menu and click File and then Run new task from the drop down menu. Type in explorer.exe and click OK.
- Roll back previous display driver: Press CTRL+ALT+DELETE, select Task Manager from the menu and click File and then Run new task from the drop down menu. Type in devmgmt.msc and click OK. This will open the Device Manager. Double click Display adapters and then double click the driver that appears. If there is more than one, roll back each driver listed one at a time. Do this by selecting the Driver tab and then clicking Roll back Driver. Once each driver roll back is complete, restart the system.
What if you are encountering a black screen from the jump and you cannot even sign in?
This fix for the black screen of death is typically fairly involved and often requires motherboard repair. In most cases you will want to pop over to your local computer repair shop.
For additional insight into the MSI laptop black screen of death, check out the video below.
MSI Laptop Camera Not Working
If your camera is not working, try typing camera into the search bar and opening the app from the menu. You may receive a message that the camera is not found or not installed.
If this is the case, hold down the Fn key and simultaneously press the MSI camera key. This is typically the F6 key. In all cases there will be a small image of a camera on the correct key.
By doing so, you are essentially giving your laptop permission to use your camera.
IF you still cannot get your camera to work head over to My Computer, select DriverCD and click CDSetup. This will activate the MSI Driver Install menu. Make sure each of these drivers is installed and updated.
Final Word
If you attempt to power up and your MSI laptop won’t turn on, follow these seven proven troubleshooting steps in order:
- Power drain the laptop
- Troubleshoot the charger
- Troubleshoot the battery
- Inspect the RAM sticks
- Remove and reinsert the CMOS battery
- Clean or replace the cooling fan
- Perform BIOS recovery
If you’ve tried all of these fixes, and you’re still having trouble you can contact MSI customer support at 1 (626) 271-1004.
In some instances the laptop’s hardware may be damaged beyond repair. If this is the case, be sure to double check your MSI warranty policy before making any purchases!

Chelsea Ashbrook is a Senior Manager of Corporate Digital Experience at Genentech. Chelsea received her B.A. from the University of Connecticut and has spent the last 11 years working in the technology field.

All valid stuff but I think you forgot the most obvious thing first, before you start taking things apart. It’s just not safe to assume that EVERYONE is going to try a hard reboot… good directions though if that doesn’t work first.
computer won’t turn on? just fire it up and run a memory diagnostic. if that doesn’t work, boot into the BIOS and reset it. seriously??
Hey there! The memory diagnostic step is specifically noted after attempting to power drain the laptop, troubleshooting both the charger and the battery, and removing and reinserting the RAM stick. The assumption (as stated in this post) is you have successfully booted your laptop following these 4 steps and the recommendation is to run the diagnostics to ensure faulty RAM doesn’t continue to cause the problem. The final step I included of performing a BIOS recovery has two methods – did you read them both? One of the includes a BIOS recovery using a different laptop and a USB drive for the very reason you are noting. If you’ve truly run through each of these steps and your laptop isn’t responding it is likely beyond a home repair…