Over the last few years, I have found the Microsoft Teams platform to be extremely useful in supporting the work from home environment. Having said that, Teams is not without its fair share of issues. One such issue I have encountered on numerous occasions is the ‘we ran into a problem reconnecting’ error message.
If you encounter the Teams we ran into a problem reconnecting issue, try fully quitting and relaunching the application. Next, clear cache, restart your computer, and check for software updates. Lastly, uninstall and reinstall Teams. If the issue persists, switch to web or mobile as a temporary workaround.
That’s it! Your MS Teams application should connect without issue. Read on for a detailed breakdown of each of these troubleshooting steps.
I highly recommend you follow these steps in the exact order detailed below. We will start with the quick and low effort troubleshooting steps, followed by the slightly more time consuming and involved fixes.
Step 1: Quit And Reopen Teams
When an application is closed completely, it needs to re-launch and reload all of its resources the next time you open the application. This simple act can fix a variety of application bugs.
Therefore, the first step when you encounter this issue, is to simply quit and then reopen Teams.
To fully quit Teams, locate the Teams icon in the application tray in the bottom right corner of your screen. Right click on the icon and click Quit.
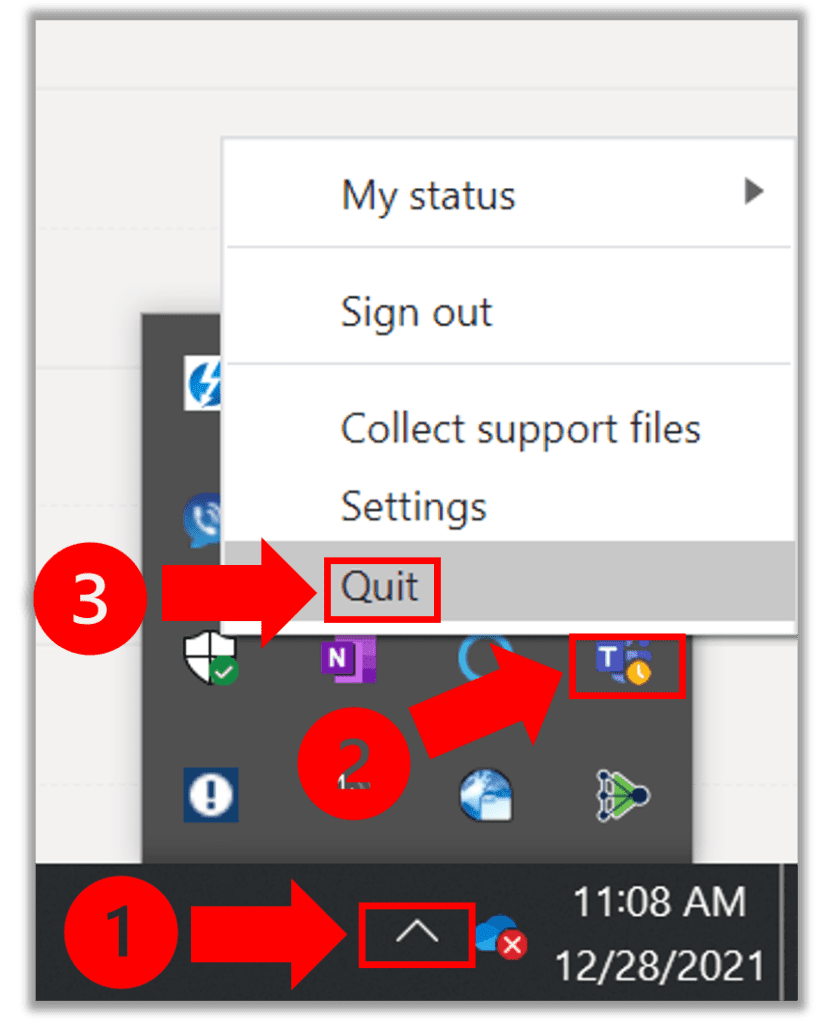
Now go ahead and re-launch the application and determine if you are able to connect.
Step 2: Hard Reset Teams
Notably, if you are having any difficulty fully quitting Teams, try hard resetting the application.
To do so, open the Task Manager by pressing CTRL, ALT, DEL.
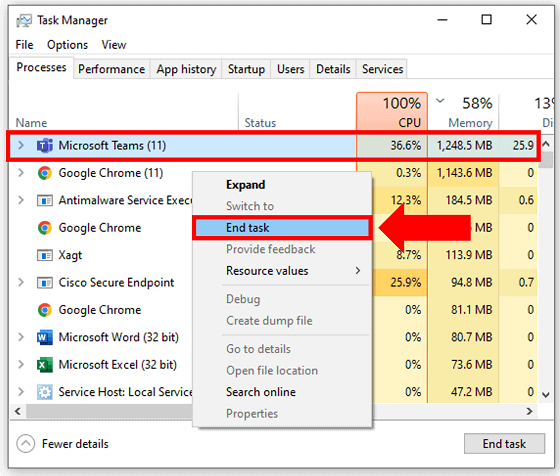
Right click on Microsoft Teams and click End task to fully close all MS Team windows.
Step 3: Clear Teams Cache
If you still are unable to connect even after quitting the application and logging back in, try clearing the cache next.
Clearing the MS Teams cache memory can improve network quality is a great way to address a variety of issues within the Teams application.
How To Clear Cache In Teams
- First, close out of Microsoft Teams and Quit the Teams application from the icon tray as previously described.
- Then, use the file explorer to enter and search for the following file path: %appdata%\Microsoft.

- Next, Delete the entire folder named “Teams”.
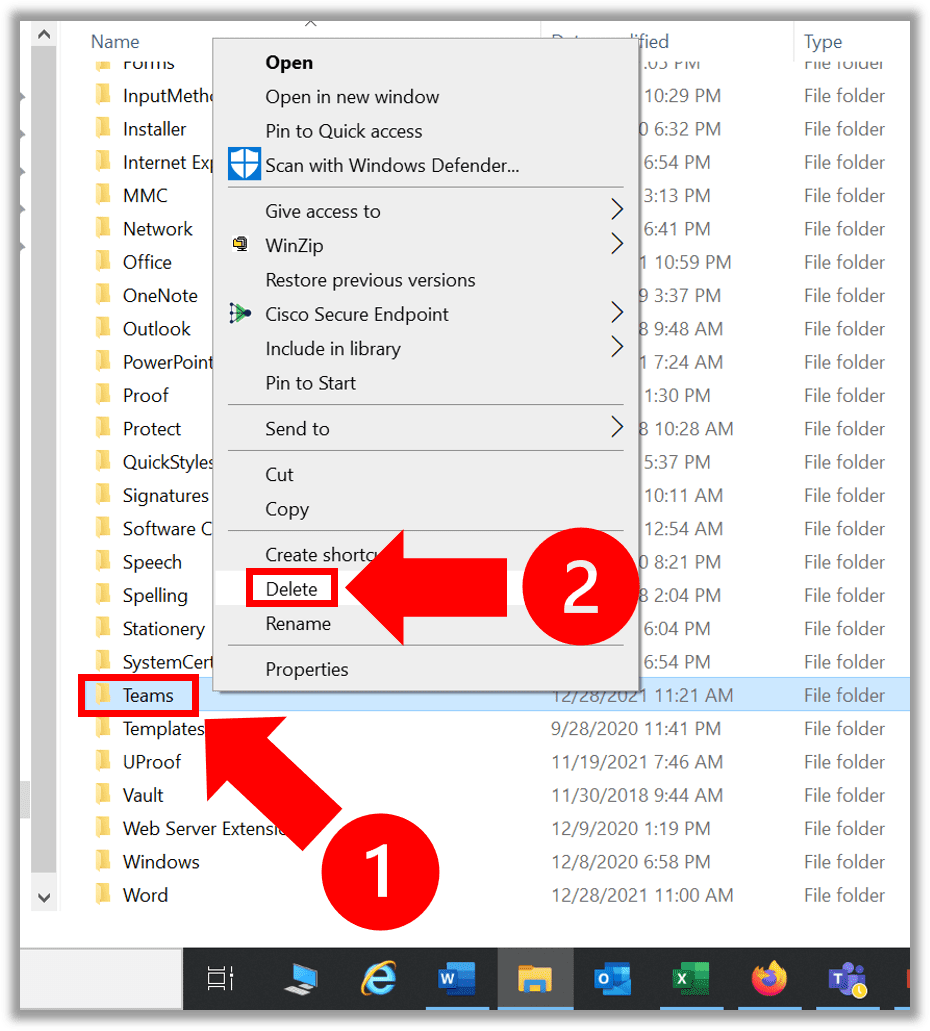
- Now open the Microsoft Teams Desktop app and sign-in.
Clearing cache and reopening MS Teams will solve this problem for the vast majority of users.
Step 4: Restart Your Computer
Some folks will encounter this error even after fully closing out of MS Teams, restarting the application, and clearing the cache.
In these instances, I recommend you also try restarting your computer before attempting any additional fixes.
Rebooting your PC flushes the RAM and clears up temporary files and processes which can sometimes do the trick.
Step 5: Check For Microsoft Teams Updates
Microsoft Teams frequently pushes out software updates to enhance application capabilities, performance, security and reliability.
For this reason, it is important to stay up-to-date with the latest Teams version. In most cases, Teams should update automatically.
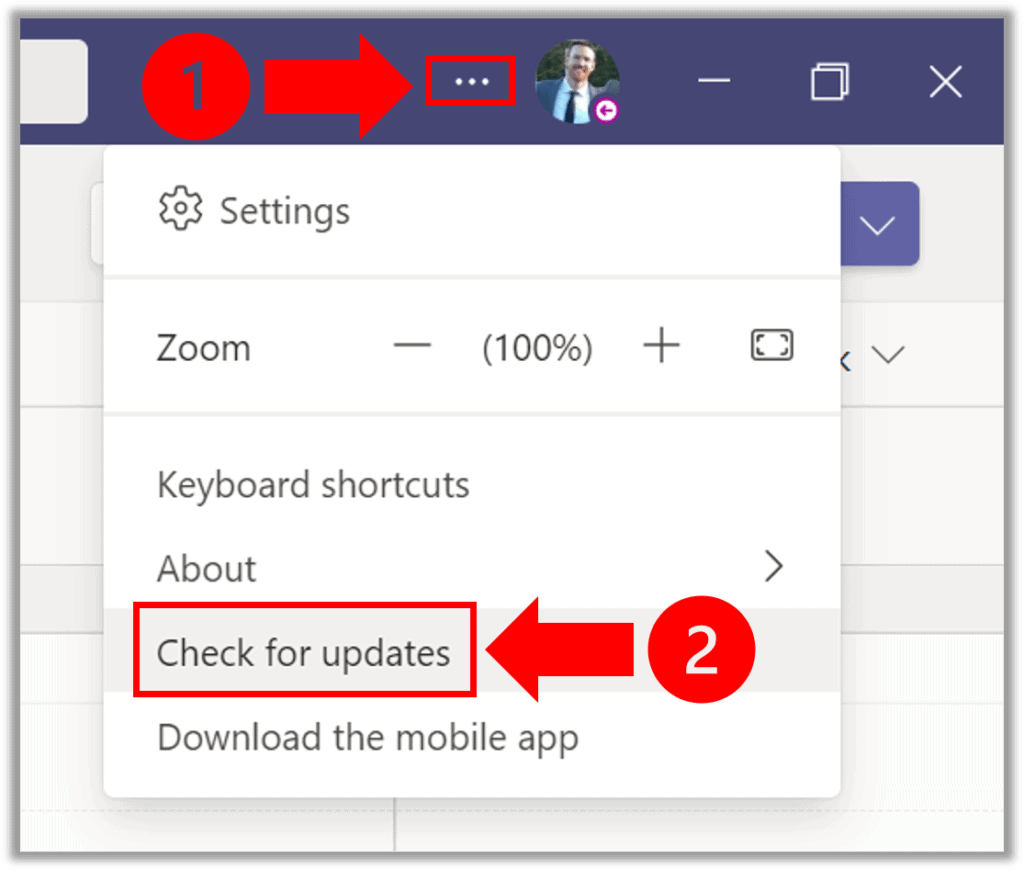
However, by clicking ‘Check for updates’, you force Microsoft Teams to identify the latest updates and push those updates directly into the app.
You can check for available updates by first selecting the Settings and more ellipses symbol (…) in the top, right hand corner of your Teams window and then clicking Check for updates.
Do not skip this step of checking for updates!
Many users find that once they clear the Teams cache, certain features revert back to older software versions.
Step 6: Uninstall And Reinstall Teams
So, you’ve completed all of the steps above and yet you’re still out of luck?
If this is the case, it is time to uninstall and reinstall your Microsoft Teams desktop application.
It is important to note, that in order to fully uninstall Teams, you must uninstall both the application and the installer. Therefore, it is important to follow each of the steps below in order.
How To Uninstall Microsoft Teams
- First, close out of Microsoft Teams and Quit the Teams application from the icon tray.
- Then, click on the Start button and select Settings and Apps.
- Next, click Apps & features, search for ‘Teams’, click on Microsoft Teams, then select Uninstall.
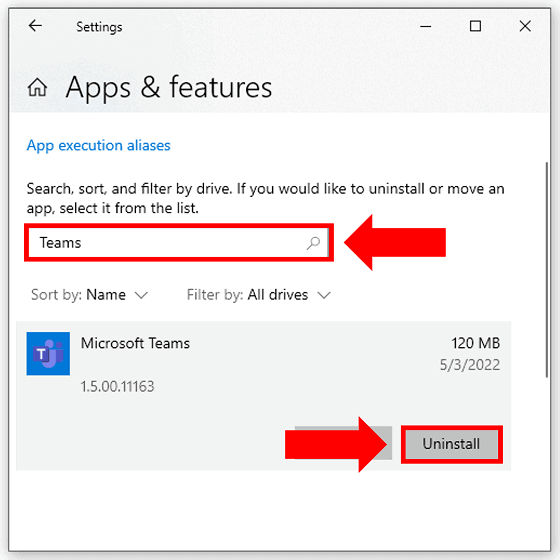
- Now, select Uninstall again in the window that appears, followed by YES to proceed with uninstalling.
- Lastly, select Teams Machine-Wide Installer and click Uninstall. Then follow the same process described in step 5.
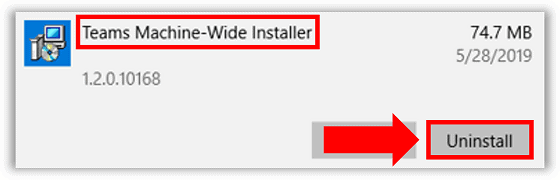
With MS Teams now fully uninstalled from your PC, you are ready to head over to the official Microsoft Teams download page and reinstall the application!
Step 7: Switch To Web Or Mobile
In the unlikely event that you still cannot connect to Microsoft Teams after uninstalling and reinstalling the application, I recommend switching to the web or mobile versions of the app.
The ‘we ran into a problem reconnecting’ issue appears to only affect the Teams desktop application. The web and mobile application versions are unaffected.
As such, as a short term work around, you can try using the web or mobile version while you work with Microsoft Tech support to get the issue sorted.
Notably, should you choose to use the mobile Teams app, it is important to be aware of exactly how much data Teams uses. This is especially true if you have a capped data plan.
Final Thoughts
Not being able to get the MS Teams application to connect can be extremely frustrating. Fortunately, there are a number of proven troubleshooting steps you can follow to get reconnected:
- Quit And Reopen Teams
- Hard Reset Teams
- Clear Teams Cache
- Restart Your Computer
- Check For Microsoft Teams Update
- Uninstall And Reinstall Teams
- Switch To Web Or Mobile
These steps won’t solve this issue for everyone. If the issue persists, you can try contacting Microsoft Support for additional troubleshooting ideas.

Chelsea Ashbrook is a Senior Manager of Corporate Digital Experience at Genentech. Chelsea received her B.A. from the University of Connecticut and has spent the last 11 years working in the technology field.
