My husband and I have owned a few different Epson Printer models over the years, and for the most part they have been extremely reliable. Having said that, one recurring challenge that drives me crazy is Epson Printer WiFi connectivity issue. Here are some proven troubleshooting steps you can follow to get your printer reconnected.
If your Epson Printer won’t connect to WiFi, first power cycle the printer, restart the WiFi network, and relocate the router and printer. If the issue persists, update software and firmware, run Windows printer troubleshooter, and reinstall the printer driver. As a final measure, factory reset the printer and router.
I highly recommend you follow these steps in the exact order outlined below. We will start with the easier troubleshooting steps and then work our way to the more involved fixes.
Importantly, these steps will work for all Epson Printer models.
Step 1: Power Cycle Printer
If your printer WiFi is working just fine one minute and the next it isn’t, the first thing you should always try is performing a power cycle. Power cycle is really just a fancy term for ‘unplug it and plug it back in’.
I know, I know – this fix sounds too simple. Humor me and give this a try first.
Electrical devices have both software and hardware components that can often become overloaded with information, causing all sorts of issue. Epson Printers are no exception.
By removing power to the printer, it essentially refreshes the internal memory (RAM). This effectively allows the printer to function almost as if it were a “new” device.
How To Power Cycle An Epson Printer:
- First, turn off the printer and unplug the power cord from the back of the printer.
- Next, shut down the computer.
- Wait approximately 30 seconds.
- Now, turn the computer back on.
- Plug the power cord back into the printer and turn the printer on.
Go ahead and see if the Wifi connection has been fixed.
If you are still dealing with connectivity issues, advance to step 2.
Step 2: Restart Wifi Network
Internet providers assign temporary IP addresses to each of your devices. Interestingly, these addresses can change at any time.
Sometimes your router doesn’t catch the IP change, which can result in a syncing issue. To test this, you’ll need to restart the entire WiFi network.
To restart the network, first disconnect both the modem and the router from the power supply. Then, wait approximately 2 minutes.
Next, reconnect the modem. Wait another 2 minutes. Finally, reconnect the router and wait 2 more minutes.
Keep in mind that you may have a 2-in-1 router and modem device, also known as a Gateway. If this is the case simply disconnect the Gateway power supply for 2 minutes and then plug it back in to restart the network.
Your internet should now be back up and running! If your WiFi network was truly the issue, you should notice the WiFi light on your device light up, indicating the connection has been reestablished.
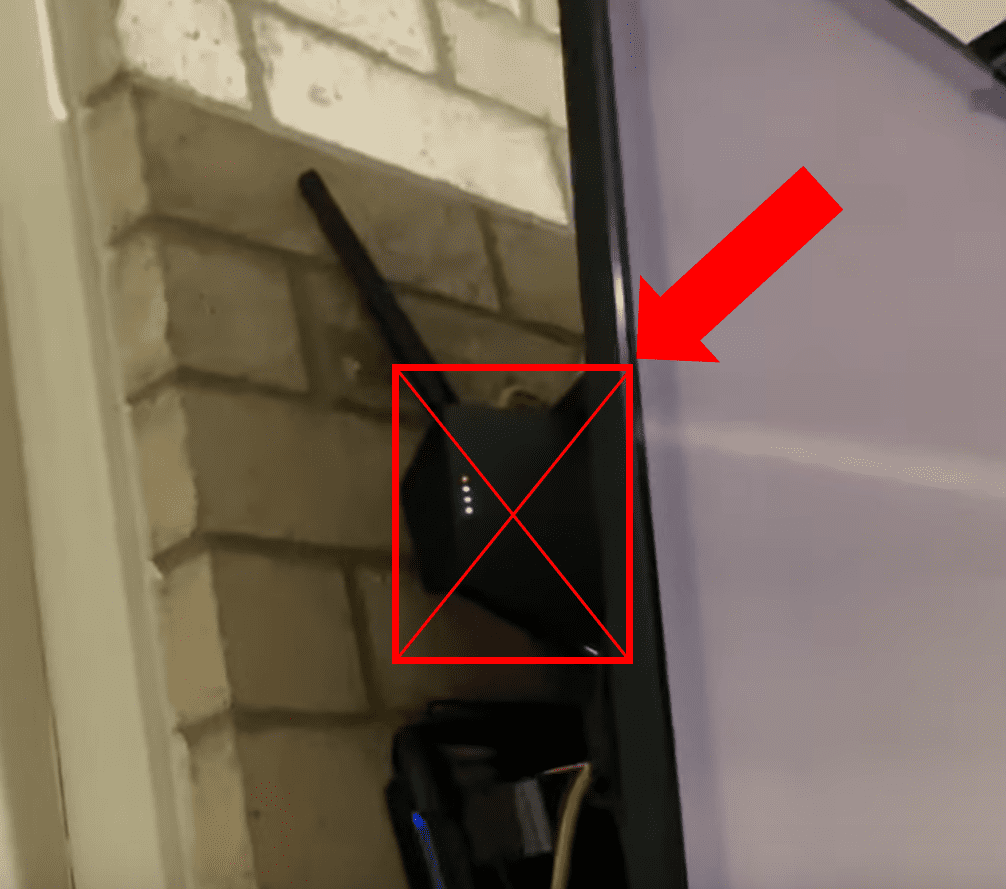
Step 3: Relocate The Router And Printer
The location of your printer and its proximity to the router can have a significant impact on connectivity.
For ideal placement, first make sure your router is in a central, high-up location away from other devices.
Because the router sends signals in every direction, placing it low to the ground or tight against a wall can interfere with the signal. This results in decreased coverage!
Router Location Recommendations:
- Place the router in a central, raised location
- Make sure it is in an open area
- Try to avoid enclosed areas like the corner of a wall
- Move other devices as far away from the router as possible
- Do not place the router behind a TV
Next, try bringing your printer into the same room as the router if possible. Some printer models have inferior WiFi chips that require a fairly strong signal to maintain a connection.
By optimizing the router’s location in your home and minimizing the distance between your router and printer, you dramatically improve your connection.
Step 4: Update Printer Software And Firmware
You should also try updating the printer software and firmware. Printer software and firmware updates change how your printer accomplishes its tasks, which can fix all sorts of problems.
Since your printer is not connected to the WiFi, to update your software and firmware you must first connect your printer to your PC via a USB cable.
Next, download the Epson Software Updater if it is not already available on your PC. Once downloaded, type ‘Epson Software Updater‘ in the search bar and select it from the menu.
Then, within the Updater, click on your printer model, and either check the box next to Software Updater or Firmware Updater and Install Item(s).
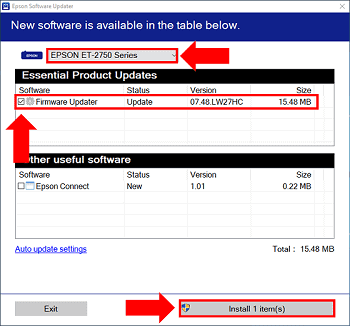
From here you can follow the on-screen instructions.
Important Note: DO NOT use your printer while the updates are underway. You must wait until they have fully completed.
Step 5: Run Windows Printer Troubleshooter
Whenever you encounter a printer related issue, it is always a good idea to run the printer troubleshooting tool that’s built into Windows.
The Windows printer troubleshooter can identify all sorts of software related printer issues. It is easy to run and typically extremely helpful.
To run the printer troubleshooter, navigate to Start > Settings > Devices > Printers & Scanners then click on your model and select Manage followed by Run the troubleshooter.
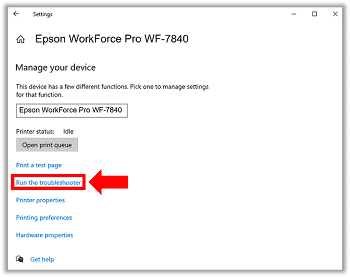
Once initiated, Windows will search through your printer configuration and identify any settings conflicts that may exist.
If an issue is detected, Windows will ask you for permission to apply the relevant fix to get your printer back up and running.
Step 6: Remove And Reinstall Printer Driver
If none of these fixes have solved the problem, it’s highly likely that your driver is corrupt and needs to be reinstalled. Before attempting to reinstall a new driver, you will need to first fully remove and delete the old one.
To delete your current driver, you will need to start by making sure the printer queue is empty. If a print job is in the queue, you CANNOT fully remove the driver.
Go to Start > Settings > Devices > Printers & Scanners then click on your model and select Open Queue. If there are any print jobs listed here, click on them and then push the Delete key.
Next, within the same Printers & Scanners window click on your model and this time select Remove Device.
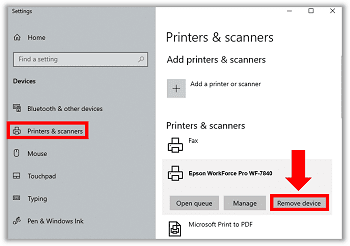
Finally, once again within Printers & Scanners, scroll down beneath the printer names and select Print server properties.
Here under the Drivers tab, you need to select your printer and click Remove.

A prompt will appear asking if you would like to remove the driver only or remove the driver and driver package. Select Remove the driver and driver package and click OK.
Leftover printer files can cause compatibility issues when you attempt to reinstall the new driver. It is therefore critical that you remove both the driver and driver package so that all of the associated files get deleted.
How To Reinstall The Latest Epson Printer Driver
- First, turn on and connect your Epson Printer to your PC
- Then, go to the Epson official website and select either the Mac or Windows version of Epson Connect Printer Setup Utility.
- Lastly, accept the terms and conditions and follow the step-by-step process in the window pop-up to install and register your printer.
- You will be asked to create a new account or you can sign-up with an existing account.
That’s it! Go ahead and try reestablishing your WiFi connection.
Step 7: Factory Reset Printer
By performing a factory reset, you will restore the printer back to factory default settings.
If you have exhausted all other options, a factory reset is the next step.
The two primary ways to factory reset an Epson Printer are by using the reset button on the back of the printer or using the printer Control Panel.
Factory Reset Using The Reset Button
- First, turn off the printer.
- Next, press and hold the reset button on the back of the printer. The reset button is typically located to the right of the ethernet port.
- Then, turn the printer on while still holding the reset button.
- Finally, wait until a message appears on the control panel indicating that the printer is resetting.
Factory Reset Using The Control Panel
- First, press the home button of the printer to open the control panel.
- Next, use the arrow keys to navigate to the Setup menu.
- Then, in the Setup window, use the arrow keys to locate the Restore default settings option and push the OK key.
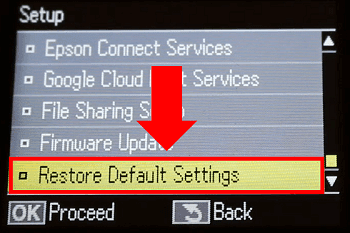
- Finally, on the next screen locate All Settings and select OK.
Whether you need to use the reset button or control panel, and the specific steps you need to take, may vary slightly depending on your model.
If you are having trouble, use the Epson Printer manual look up to confirm.
Step 8: Factory Reset Router
Similarly, another fix you can try is performing a router factory reset.
Unlike power cycling, a factory reset will fully restore your router or to “new”. In the process, any and all custom settings including your username and password will be lost.
Ultimately, this means that you will need to use the information located on the bottom of the device to login into your system and you will need to reestablish your password and SSID. Keep this in mind before proceeding.
Depending on your router model and your specific Internet service provider (ISP), there may be a factory reset push button on the device.
This push button will most likely be located on the back of the router.
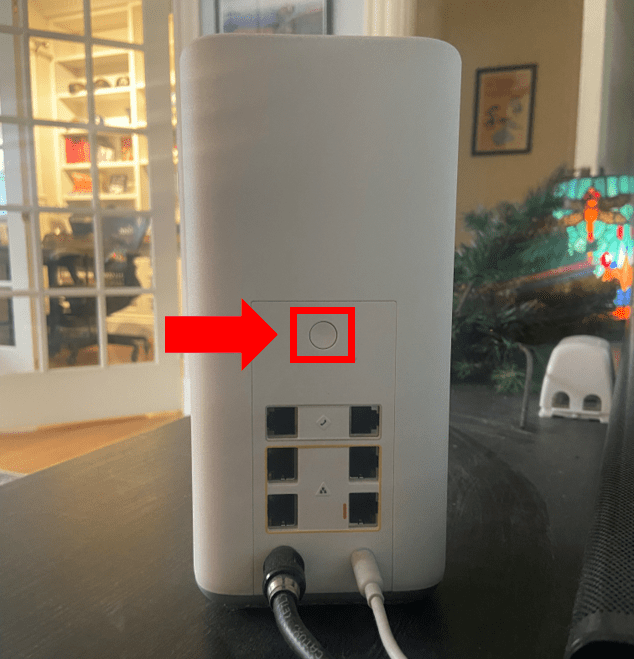
Press and hold the button for 60 seconds. A common mistake is not holding the button long enough. For this reason, I recommend using your cellphone to time the process.
On the other hand, for many router models, you will need to use the reset pinhole button to factory reset the device.

Hold down the Reset button for 30 seconds using a paperclip and then release. Once the router has fully rebooted, the issue should be fixed.
Remember it can take some routers up to 15 minutes to connect to ISP systems! Give the router enough time to do its thing.
Enable Epson Printer Sharing Option
So, you’ve completed each of these steps but you are still encountering WiFi connectivity issues or receiving a filter failed error when attempting to use other computers in your home or network?
It’s possible the error persists because you have not enabled the sharing option.
The sharing option enables the additional computers in your network and your printer to connect.
It is also worth noting that you can use the enable printer sharing functionally as a workaround!
Simply connect your printer directly to either the router or your main PC using an ethernet or USB cable. Once you enable sharing, you will be able to print wirelessly from other laptops and devices in your home.
Enable Epson Printer Sharing On Mac
- First, select the Apple menu and click System Preferences and then Sharing.
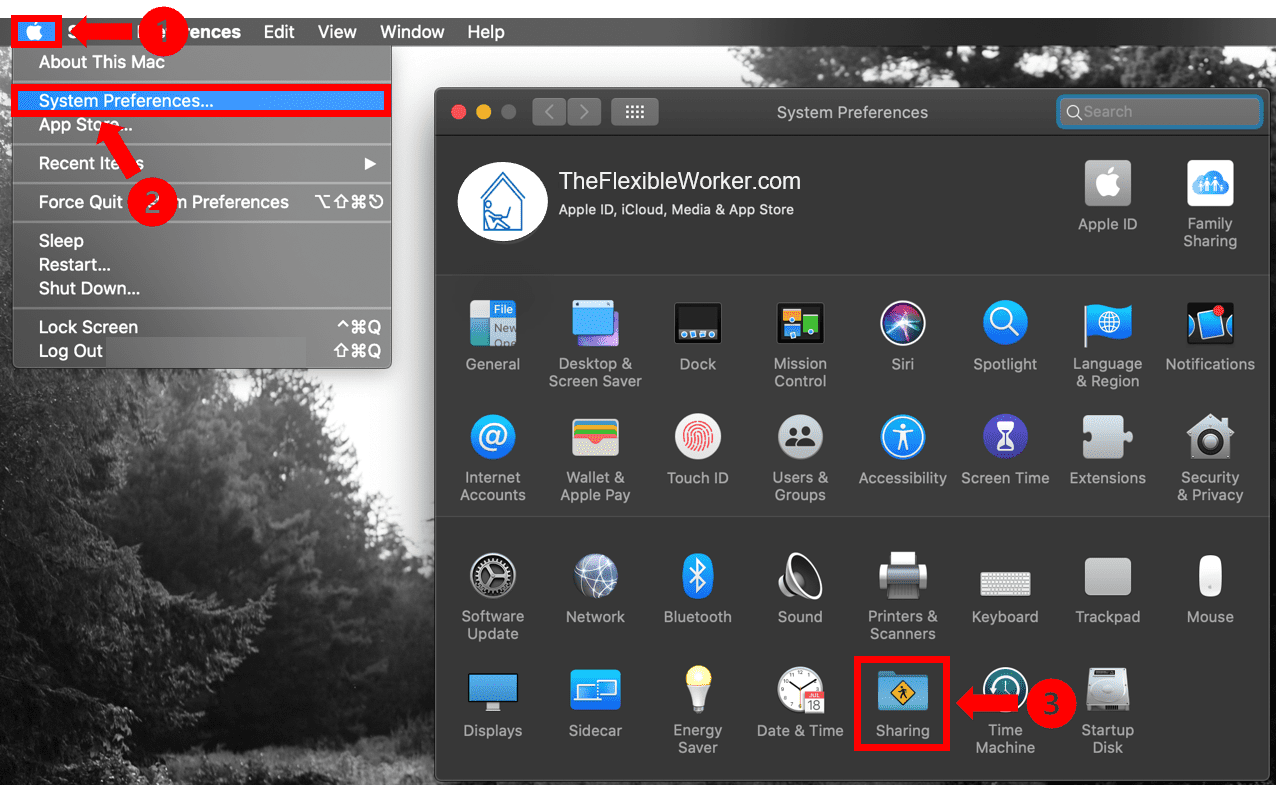
- In Sharing, select the Printer Sharing checkbox.
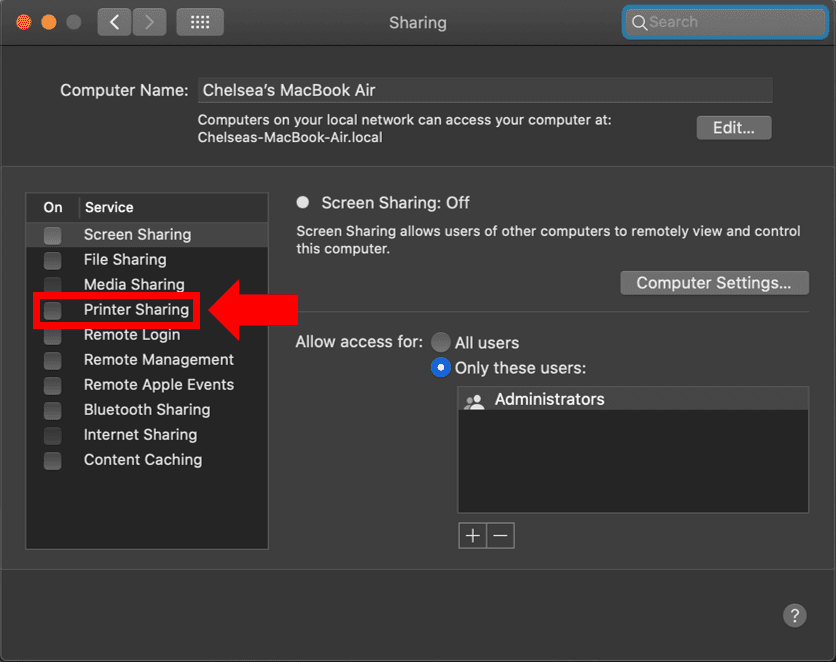
- Underneath the Printers section, select the printer you wish to share.
Notably, this will share your printer with every user on your network. What if you only want specific users to have access? Not a problem. Select the Add button underneath the Users list and add the specific users you desire.
Enable Epson Printer Sharing On Windows 10
- First, select the Start button and select Settings, then Devices and click Printers & scanners.
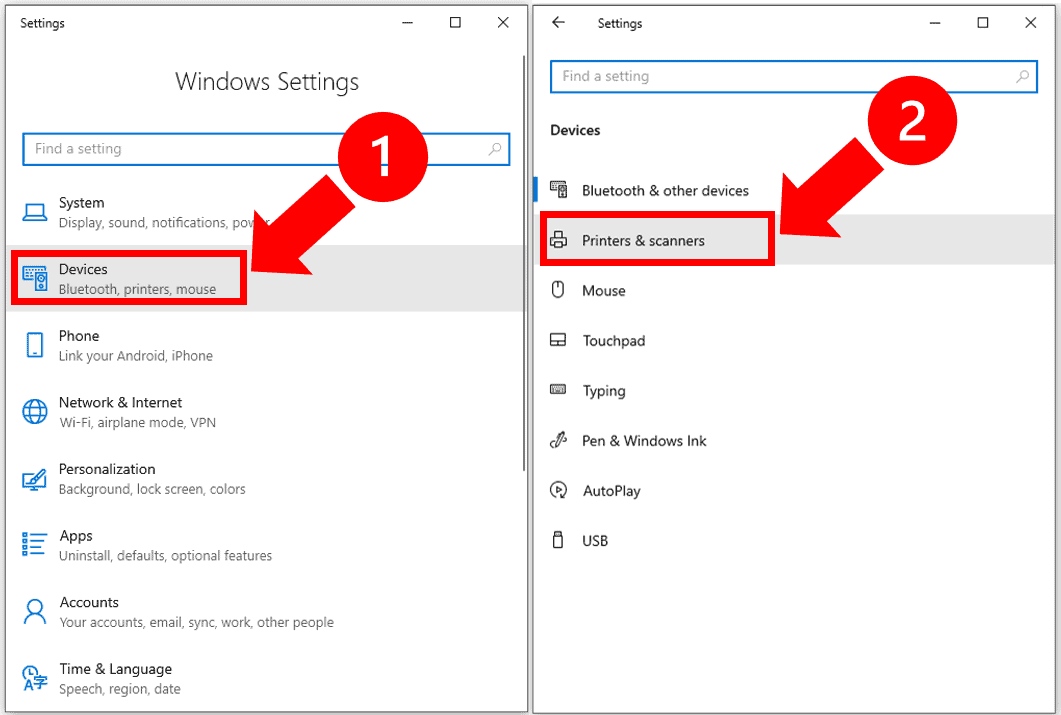
- In the Printers & scanners section, select the printer you wish to share and click Manage.
- Next, select Printer Properties and click the Sharing tab.
- Finally, on the Sharing tab, select Share this printer.
Once you have completed the above steps, restart all associated computers and unplug and restart your printer.
Then, try to print from each computer and check whether the WiFi connection has been established.
Conclusion
If your Epson Printer won’t connect to WiFi, don’t worry. As it turns out, this is a fairly common problem. Try these 8 troubleshooting steps to get reconnected:
- Power cycle printer
- Restart WiFi network
- Relocate the router and printer
- Update printer software and firmware
- Run Windows printer troubleshooter
- Remove and reinstall printer driver
- Factory reset printer
- Factory reset router
Are you still having issues despite attempting each of these fixes? As a next step, you can contact Epson customer support by using your printer model number.
As a last resort, should you need to replace your printer, be sure to first verify your Epson Printer limited warranty and service plan.

Chelsea Ashbrook is a Senior Manager of Corporate Digital Experience at Genentech. Chelsea received her B.A. from the University of Connecticut and has spent the last 11 years working in the technology field.
