Anyone who has used a keyboard long enough knows just how filthy they can get. Dust, oil, grease, and all sorts of debris can build up over time and render your device almost unusable. Fortunately there are a number of highly effective ways to clean your keyboard and get it looking and functioning like new again.
To clean a greasy keyboard, first unplug the device. Next, clean the keycaps in soapy water and clean the keyboard with compressed air, a brush, and isopropyl alcohol. For built-in keyboards, try pressing cleaning slime between the keys. Lastly wipe down the keys with a disinfectant wipe and pat dry.
That’s it! Each of these cleaning methods will make your keyboard like new again.
Read on for a detailed breakdown of each of these approaches. Notably, depending on whether you have an external or built-in keyboard, the techniques will slightly vary.
How To Clean An External Keyboard
Step 1: Remove Power Source
If you are dealing with an external keyboard, start by unplugging the device and removing any batteries.
This is an important first step as keyboards have wires and circuits that are close together which can lead to short-circuiting during a thorough clean.
Step 2: Remove Keycaps
Since the vast majority of external, mechanic keyboards have removable keys, you should also go ahead and remove each of the keycaps.
Before you start removing keys, take a photo the keyboard layout! This will be helpful to use as a reference when you’re ready to put the keys back on.
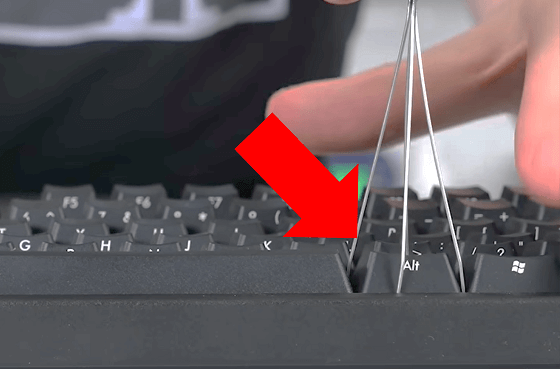
Most mechanical keyboards come with a small keycap puller. To remove a keycap, simply insert the keycap puller on the keycap and gently pull up. If you do not have a keycap puller, you can manipulate a paperclip into an “L” alignment and use that instead.
With all of the keycaps removed, you are ready to start cleaning!
Step 3: Clean And Dry Keycaps
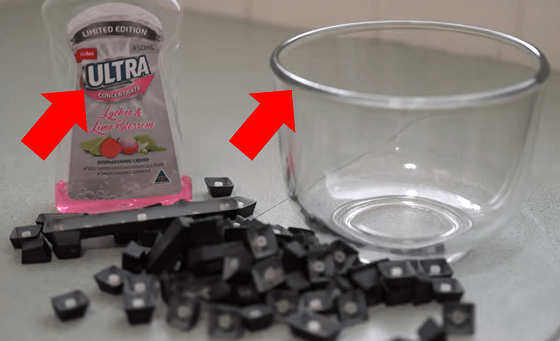
To clean the keycaps, fill a bowl up with warm water a small amount of dishwashing detergent.
Be sure that the water is just warm and not too hot. If the water is too hot, you risk melting the plastic.
Next, place all of the keycaps into the soapy water and mix them around a bit to evenly distribute the soap.
You can now step away for 30 minutes. The idea here is we want to give the soap enough time to dislodge the grease and oils from the keycaps.
After 30 minutes, you can use a standard pasta strainer and running water to remove any excess soap remaining.
Using a towel or rag, scrub and dry each keycap individually. I recommend tapping each cap against a table or hard surface to ensure all water droplets are released.
Finally, place all of the keycaps on a clean towel and allow them to fully dry. This will typically take a few hours.
Step 4: Clean And Dry External Keyboard
To start, turn the keyboard upside down and use good old fashioned gravity and some light tapping to dislodge any larger debris from the switches.
Next, thoroughly brush between the switches with a clean paint brush or old toothbrush that is laying around the house.
Be sure to get inside each of the grooves as it is likely the oil and grease will be fairly caked on.
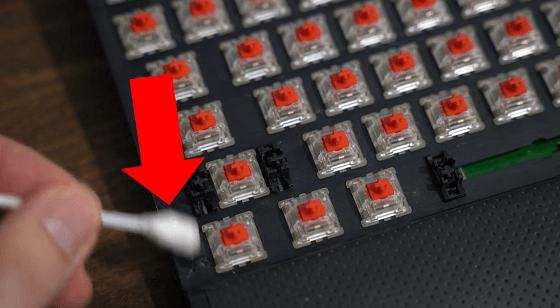
For the more challenging spots and areas you can even use a Q-tip or toothpick with a little bit of isopropyl alcohol.
Notably, it is best NOT to use a vacuum on the keyboard as they are not electrostatic safe.
After you are done brushing, it is also a good idea to hit each of the switches with some compressed air to finish the job. When using compressed air, be careful not to allow too much moisture to build up.
If any moisture does develop, make sure it is fully dry before reconnecting the battery.
Step 5: Reassemble External Keyboard
Once the keyboard and keycaps are all fully dry, you are ready to reassemble your device.
Using the photo you took earlier as a guide, gently push each of the keycaps down on their respective switches.
Pro Tip: While the keyboard is open and accessible, now is a also good time to add a foam insert and place O-Rings on each of the switches if you wish to make your keyboard quieter.
Now go ahead and power your device back on. It’s time to enjoy your freshly cleaned keyboard!
How To Clean A Built-in Keyboard
Step 1: Remove Power Source
For built-in keyboards that are embedded within a laptop or electronic device, you will also need to ensure the device is unplugged and fully powered down before starting.
If the laptop or device has a removable battery, go ahead and remove the battery as well to be safe.
Step 2: Clean Built-in Keyboard
Unlike most external keyboards, removing the keycaps from a built-in keyboard is typically not possible.
But not to worry! There are a few unique techniques you can use to help ensure you achieve a thorough clean.
Similar to an external keyboard, you should start by tapping the device while it is upside down to remove any loose debris. Then follow this up by hitting the keys with some compressed air.
Because built-in keyboard keys are typically more shallow and difficult to access, for the next step, I strongly recommend you obtain some cleaning slime.
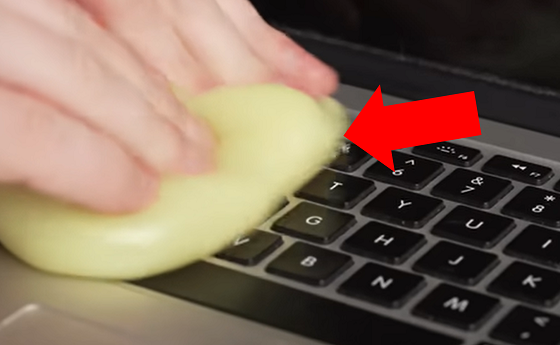
Take the cleaning slime and repeatedly press and roll it into the spaces between the keys. You will be amazed at how much dirt and dust the slime will pick up.
If you do not have access to cleaning slime, clear sticky tape can also work. However, I have found this approach to be far less effective.
Once you are done, use a disinfecting wipe to clean the top of the keyboard keys. I recommend you give the wipe a good squeeze to remove any excess moisture before starting.
Step 3: Dry Built-in Keyboard
Finally, dry and polish the keyboard with a microfiber cloth or paper towel. It is important that you DO NOT use your laptop or electronic device until the keyboard is fully dry!
Once dry, you’re ready to get back to work!
Conclusion
It is extremely common for keyboards to collect oil, grease, dust, and dirt overtime. Before you go looking for a replacement, give these cleaning techniques a try:
- External keyboard: Unplug device and remove all keycaps. Clean keycaps in soapy water and clean the keyboard with a brush and isopropyl alcohol.
- Built-in keyboard: Power down device and repeatedly press and roll cleaning slime between the keys. Then wipe down the keys with a disinfectant wipe and pat dry.
If this post helped you get your keyboard looking and working like new, or if you used your own unique method, let me know in the comments section below!

Chelsea Ashbrook is a Senior Manager of Corporate Digital Experience at Genentech. Chelsea received her B.A. from the University of Connecticut and has spent the last 11 years working in the technology field.
