My company decided to make the change to Microsoft (MS) Teams back in early 2020. Teams is a great platform that I use while working from home daily, but it is not without it’s issues. One issue I have come across is my Teams application lagging, leading me to constantly wonder why is Microsoft Teams so slow?
If Microsoft Teams is running slowly, system memory usage is too high. To fix it, turn off GPU hardware acceleration, clear Teams cache, disable read receipts and backgrounds, and install updates. Additionally, close background applications and bandwidth heavy devices, adjust visual effects, increase virtual memory, and disable Teams in Outlook.
That’s it! Your Teams applications should now be running much more quickly without lagging. Microsoft Teams uses the rendering engine Chromium, which is the same rendering engine used by Edge and Chrome.
Regardless of whether you have Teams running via the desktop app or web app, Chromium is able to detect the amount of memory your PC. Ultimately, Teams’ memory usage is designed to fluctuate based on the amount of memory available at any given point in time.
Fortunately, there a number of ways to reduce your system memory usage both within the Teams app and on your PC in general.
Interested in learning more about how to speed Teams up and keep it from lagging? Read on for a detailed step-by-step breakdown of each of these methods.
Method 1: Turn Off GPU Hardware Acceleration
In an attempt to increase performance, hardware acceleration allows Teams to shift processing from the CPU to other specialized hardware.
By default, Teams has GPU hardware acceleration turned on.
In most cases this is a good thing and leads to optimal performance. In some cases however, this can lead to lagging and freezing of the application.
Let’s test if GPU hardware acceleration is causing your Teams to run slowly by turning it off.
To disable GPU hardware acceleration:
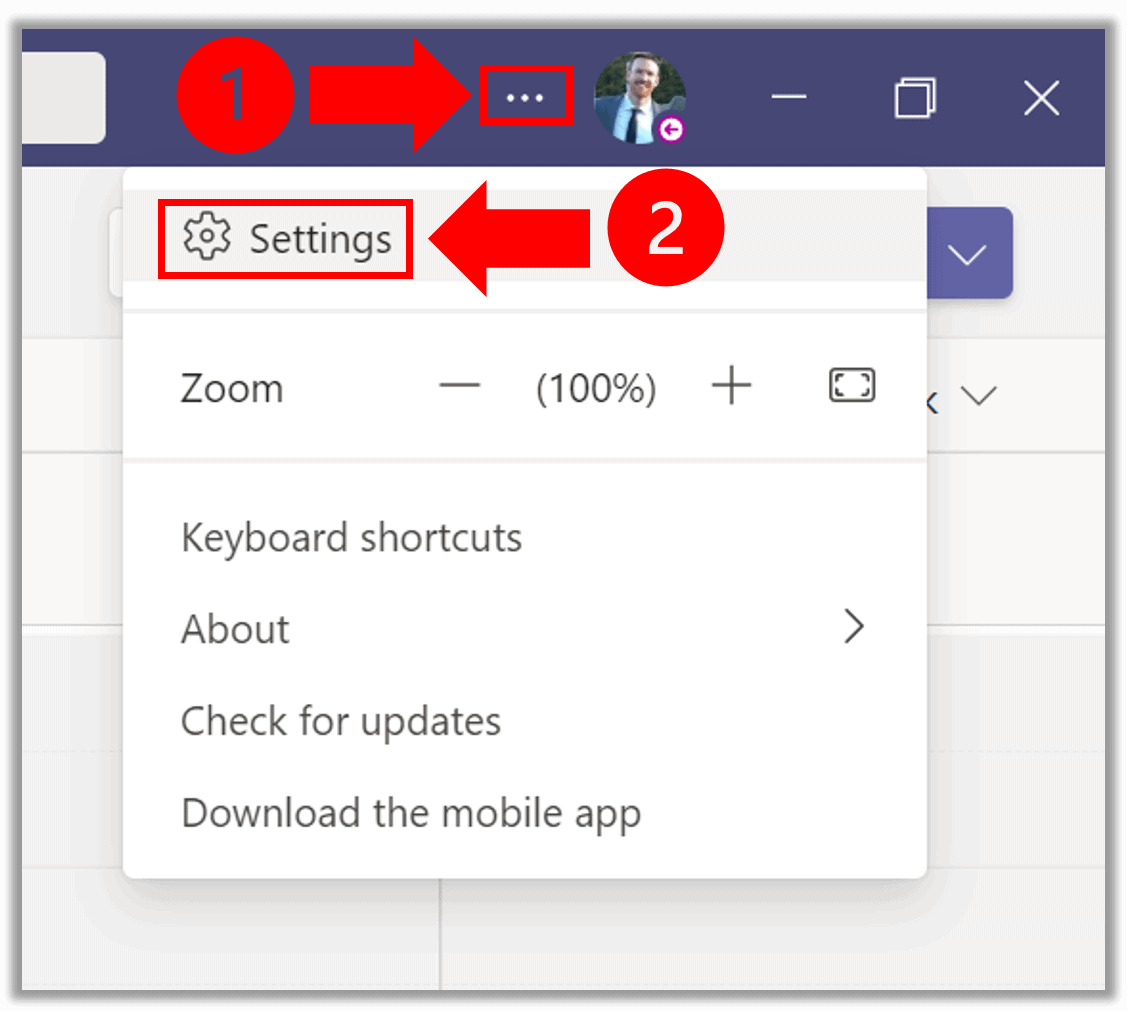
- First, select the Settings and more ellipses symbol (…) in the top, right hand corner of your Teams window and click Settings.

- Next, in the General settings section under Application click the box next to Disable GPU hardware acceleration.
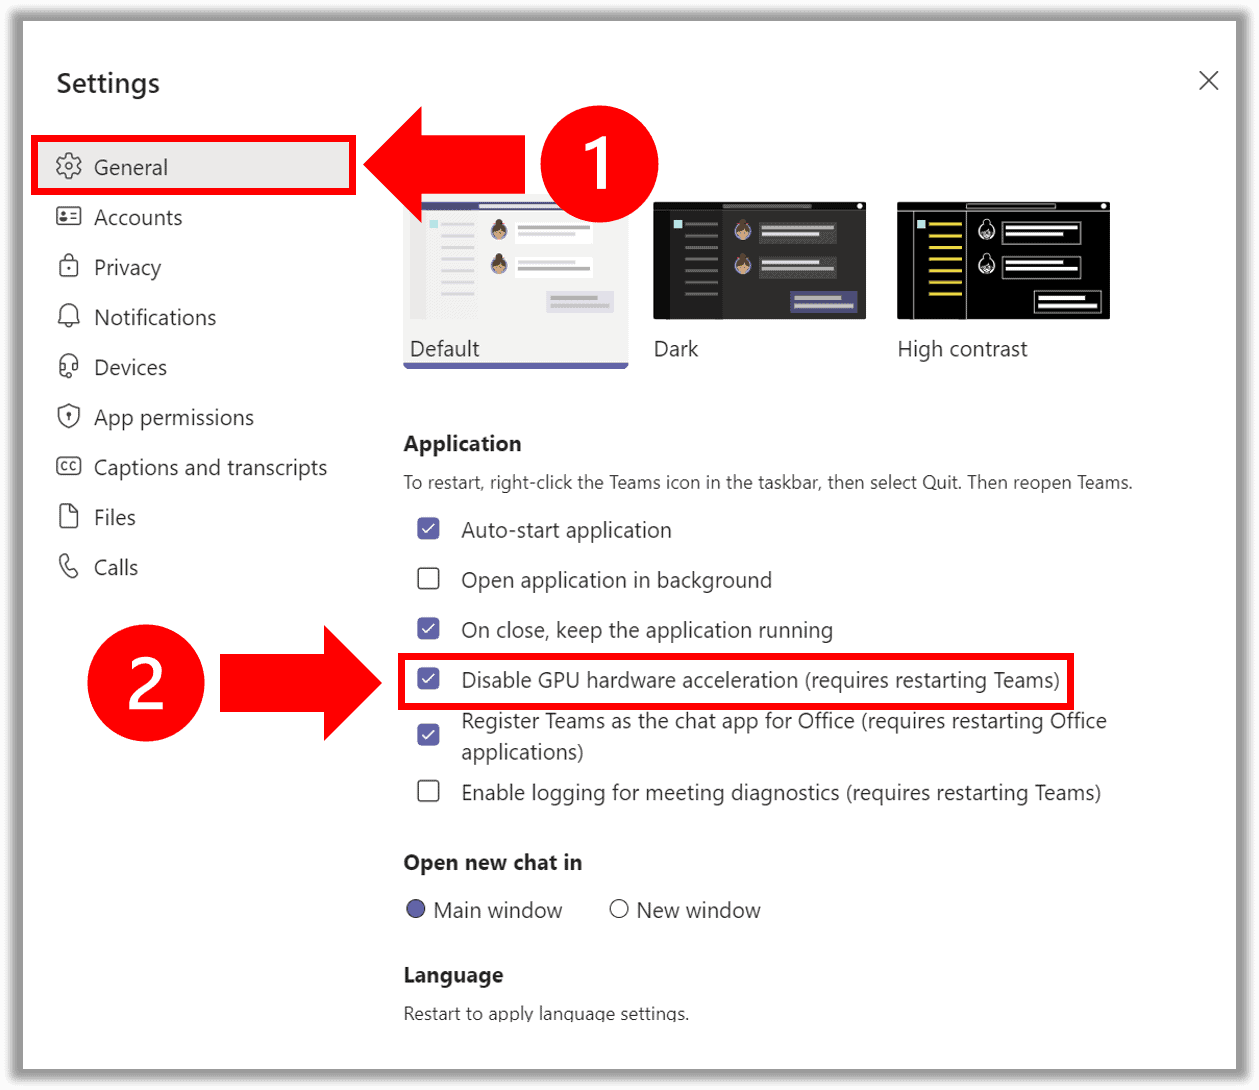
- Finally, close out and restart Microsoft Teams.
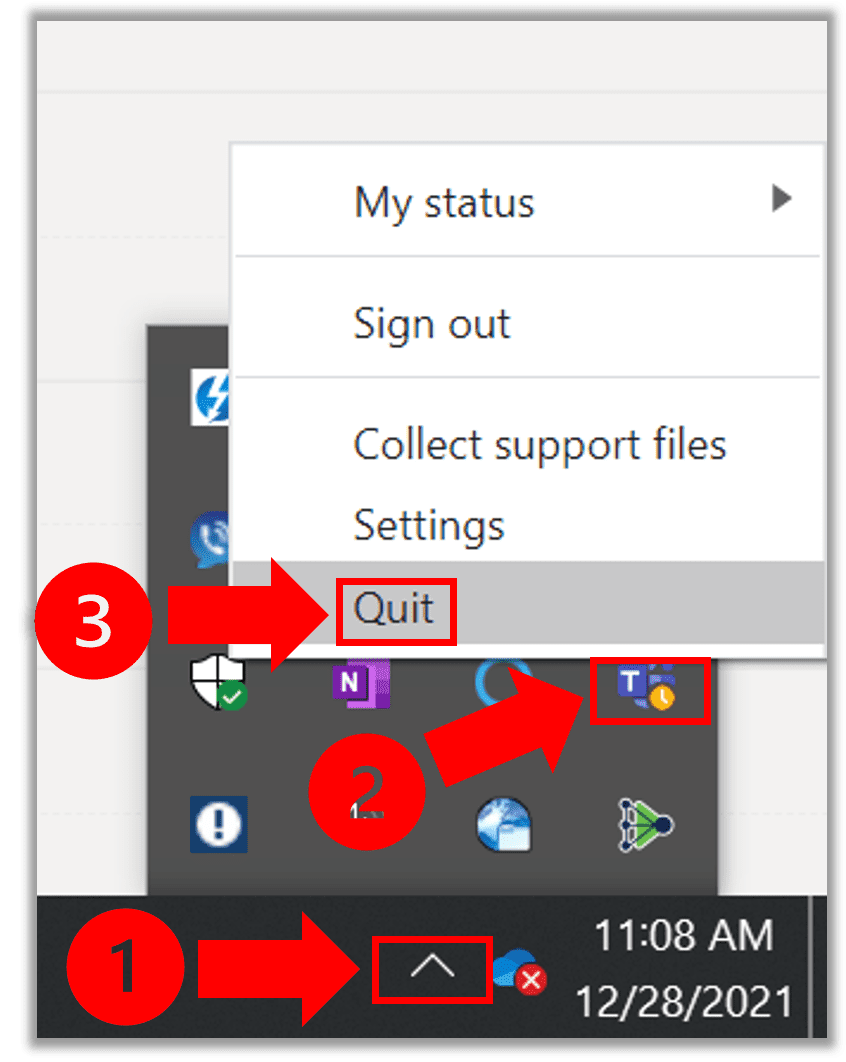
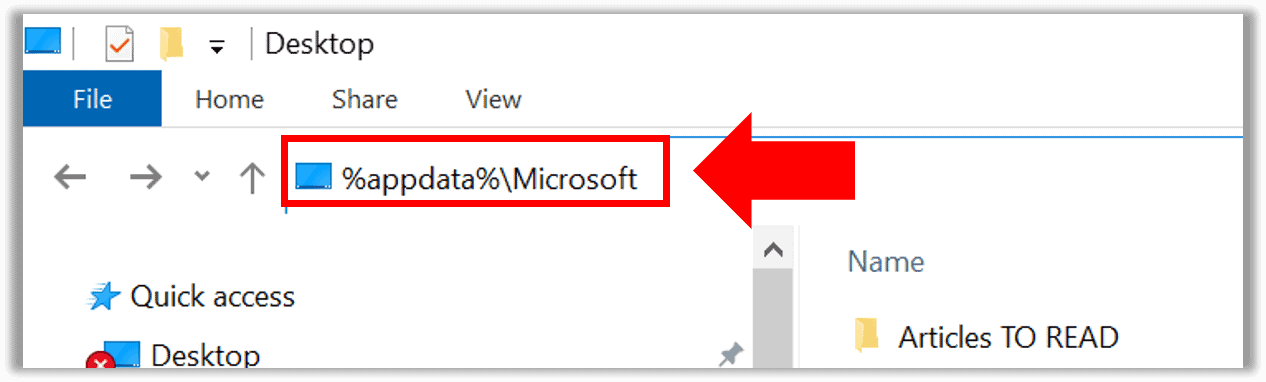
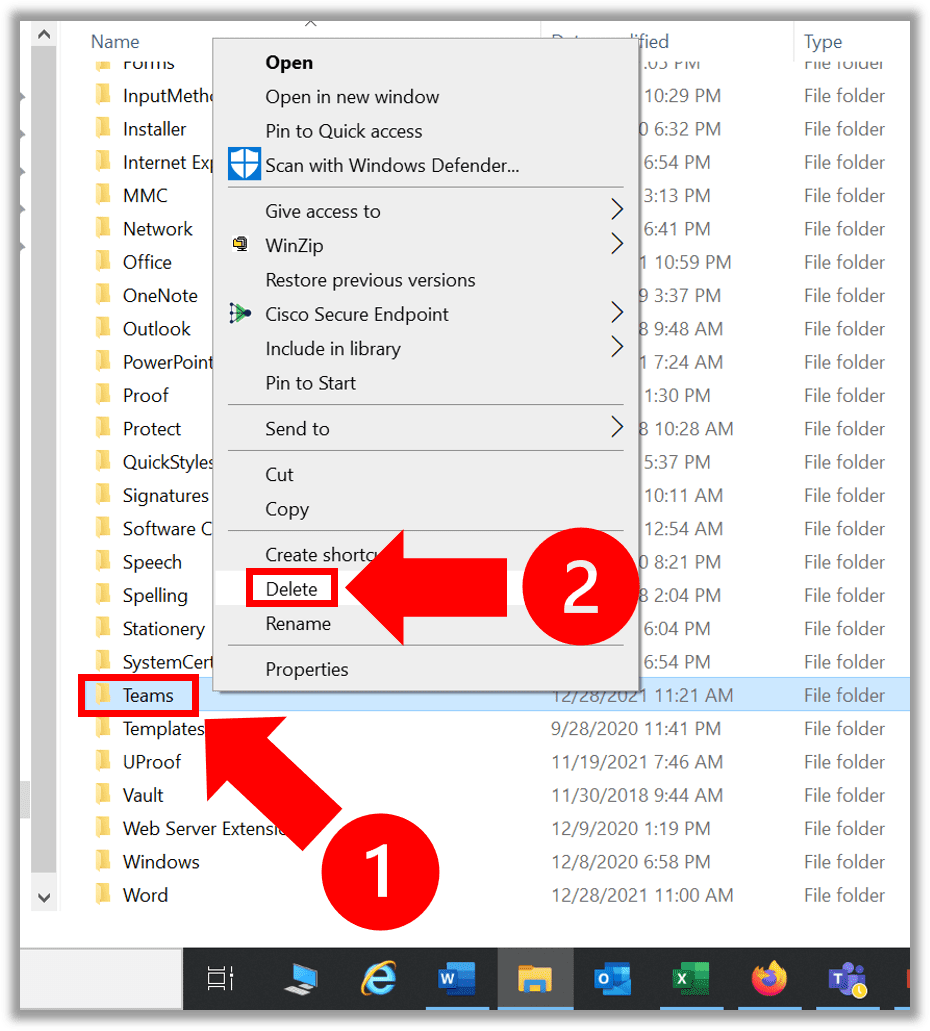
Method 2: Clear Teams Cache
Clearing the Microsoft Teams cache memory is a great way to address a variety of issues with the Teams application.
To clear cache in Teams:
- First, close out of Microsoft Teams and Quit the Teams application from the icon tray.
- Then, use the file explorer to enter and search for the following file path: %appdata%\Microsoft.
- Next, Delete the entire folder named “Teams”.
- Now open the Microsoft Teams Desktop app and sign-in.
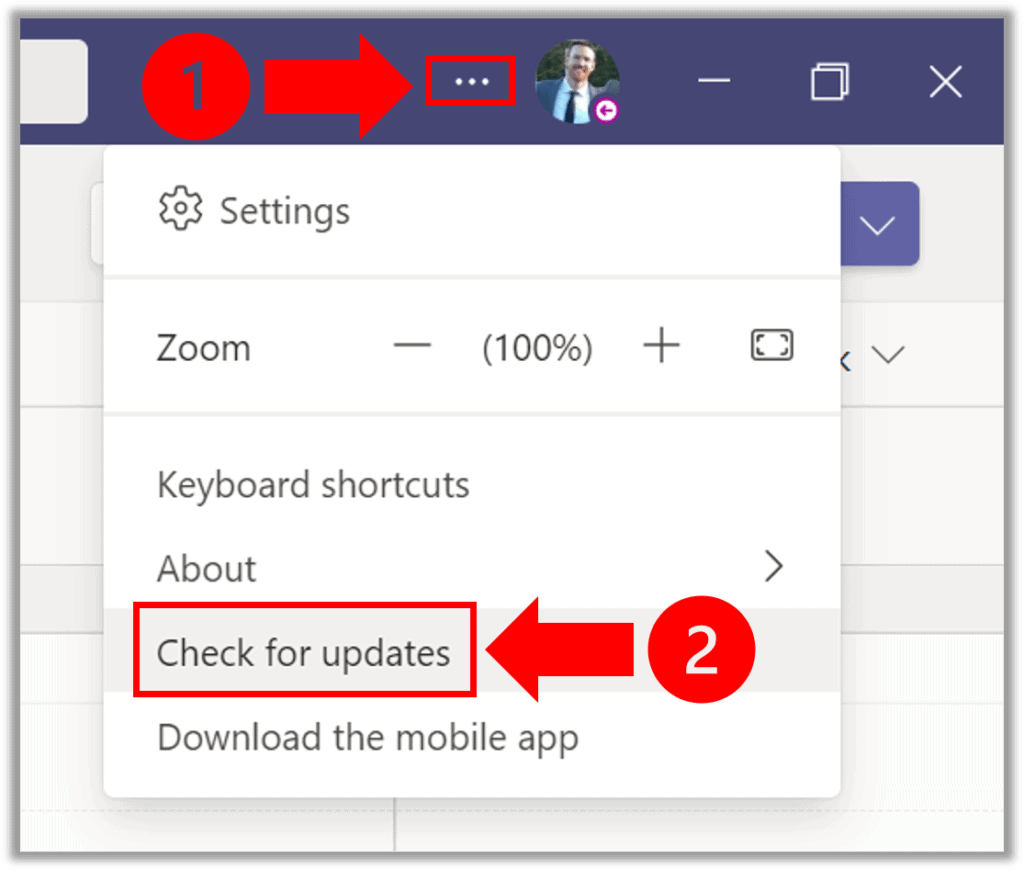
- Finally, click the Settings and more ellipses symbol (…) in the top, right hand corner of your Teams window and select Check for updates.
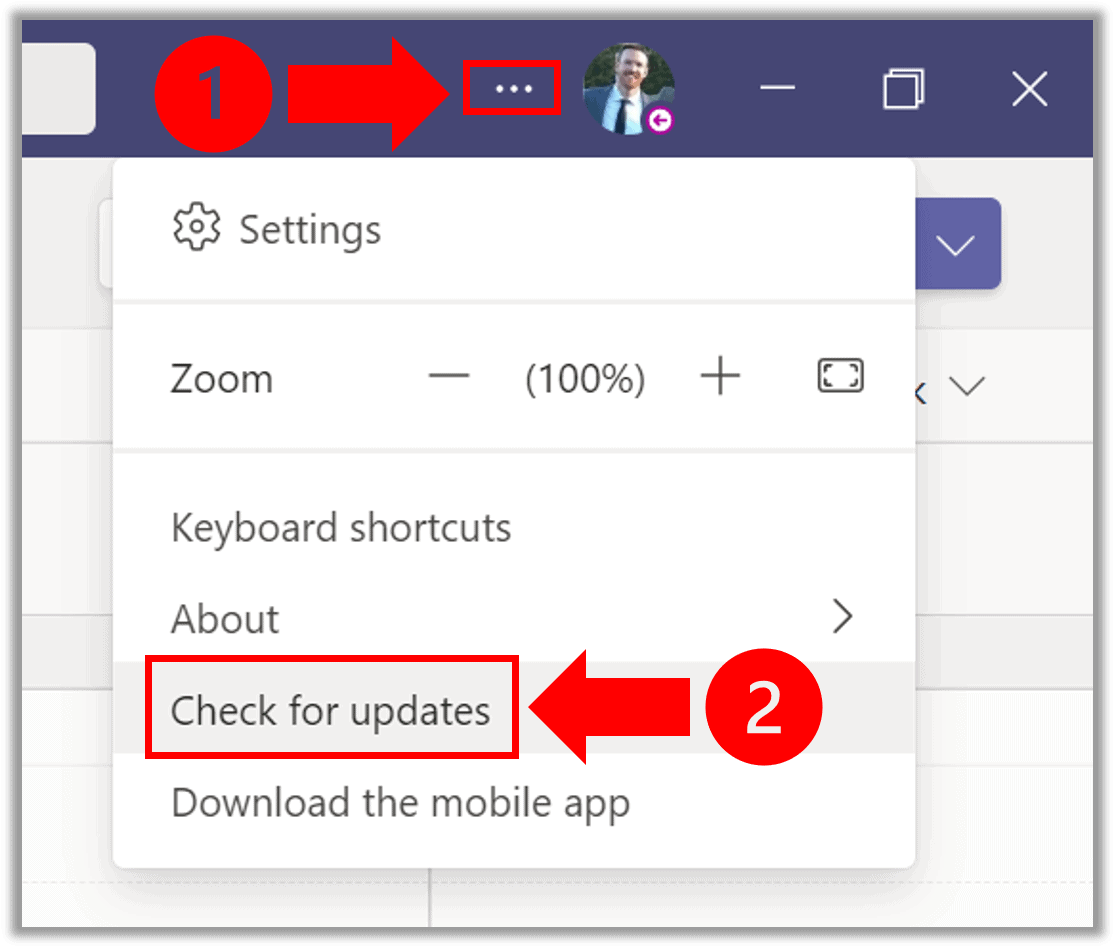
Do not skip the final step of checking for updates!
Many users find that once they clear the Teams cache, certain features revert back to older software versions. By click Check for updates, you force Microsoft Teams to identify the latest updates and push those updates directly into the app.
Method 3: Disable Read Receipts
Another quick and easy way to reduce the amount of memory Teams is using it to disable read receipts.
Beyond just freeing up memory, I personally prefer read receipts to be turned off in general.
I never liked the idea of someone receiving instant confirmation that I’ve seen their message. It puts the pressure on to provide a quick response, even when that may not be the best use of my time in the moment.
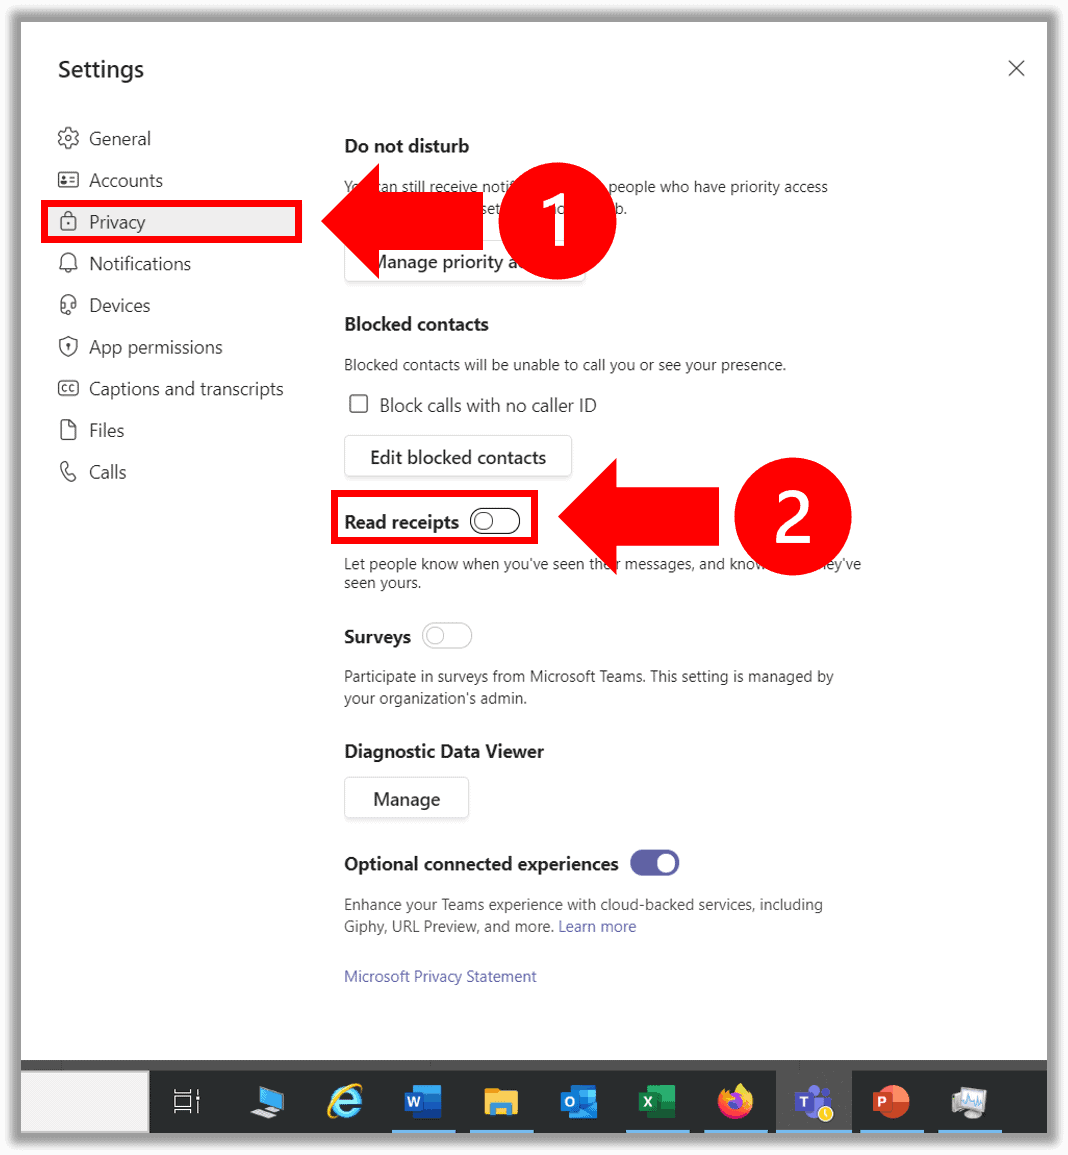
To disable read receipts in Teams:
- First, click the Settings and more ellipses symbol (…) in the top, right hand corner of your Teams window and select Settings.
- Next, select Privacy from the left menu bar and toggle Read receipts to Off.
Method 4: Turn Off Custom Backgrounds
Turning off custom backgrounds, such as the blur effect, can also save some in-app bandwidth usage.
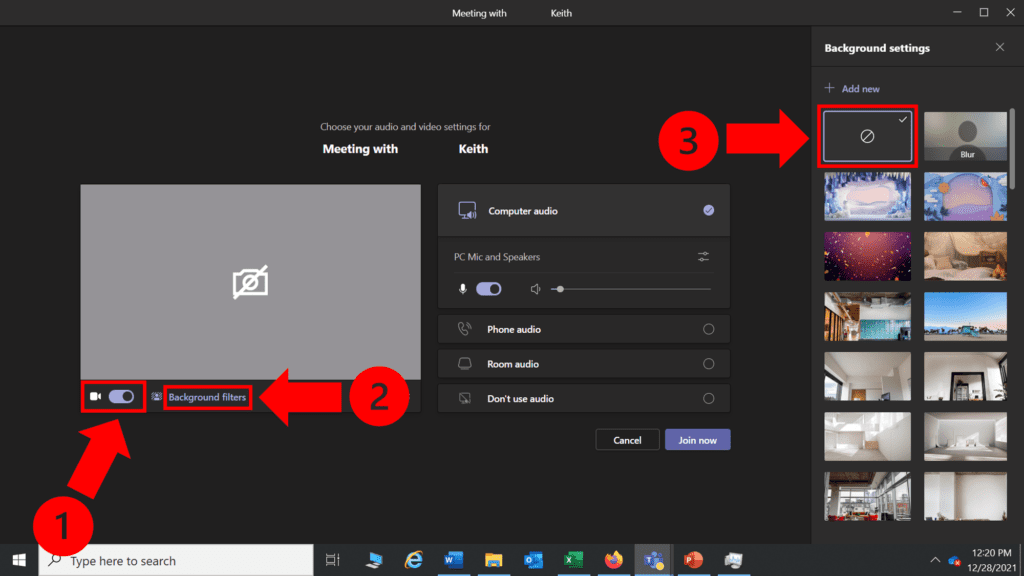
To turn off backgrounds prior to joining a Teams meeting:
- First, at the screen titled Choose your audio and video settings, use the camera icon toggle to turn the camera on.
- Once you have turned on your camera, Teams will automatically activate the Background filters button. Click Background filters and select the empty background filter on the right-hand side of the screen.
Method 5: Check For Microsoft Teams Updates
Microsoft Teams frequently pushes out software updates to enhance application capabilities, performance, security and reliability.
For this reason, it is important to stay up-to-date with the latest Teams version.
In most cases, Teams should update automatically.
You can also check for available updates by first selecting the Settings and more ellipses symbol (…) in the top, right hand corner of your Teams window and then clicking Check for updates.
Method 6: Close Background Applications
So, you’ve made all the above recommended updates but Teams is still running on turtle mode? It’s possible you have too many background applications open.
It’s amazing, how much memory space you can free up by simply closing out of your background applications.
As some quick evidence, while I am writing this post I opened up the Task Manager. Look at how much memory the 8 open tabs in Firefox (2,431.5 MB) are taking up in comparison to Microsoft Teams (235.7 MB)!
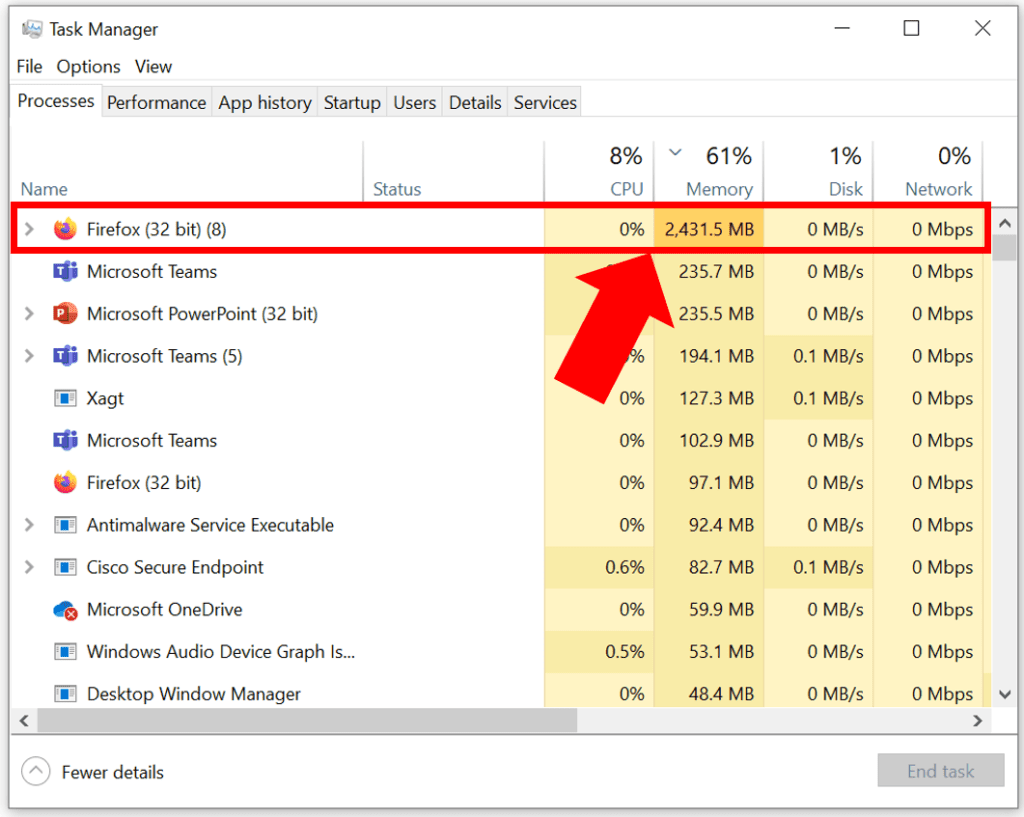
Go ahead and close out of any unnecessary background applications and give your memory a breather.
Method 7: Turn Off Bandwidth Heavy Devices
If you are working from home, it’s possible that your WiFi network bandwidth is overloaded.
Perhaps a family member hogging up all the bandwidth or maybe you have an unwanted, freeloading guest.
To discover all the devices that are currently on your network, login to your router’s interface with the help of the identifying label on the back of the router.

Then, type the provided router address (starting with “http”) into your web browser and use the provided username and password to login.
Once you are logged in you will be able to see all connected devices and their bandwidth usage.
Did you identify the culprit?
Ask them to power off their devices. You can even manually kick devices off the WiFi and change the password. This especially comes in handy if you happen to find an unknown connected device!
Another option you can consider if your WiFi is underperforming, is switching over to mobile and using your cellular data plan. Should you go this route, it is important to understand that Teams data consumption is often higher than historically reported.
Method 8: Adjust Visual Effects In Windows
By default, Windows 10 enables a number of different visual effects.
While these effects enhance your visual experience, they can also take up a fair amount of computer memory space.
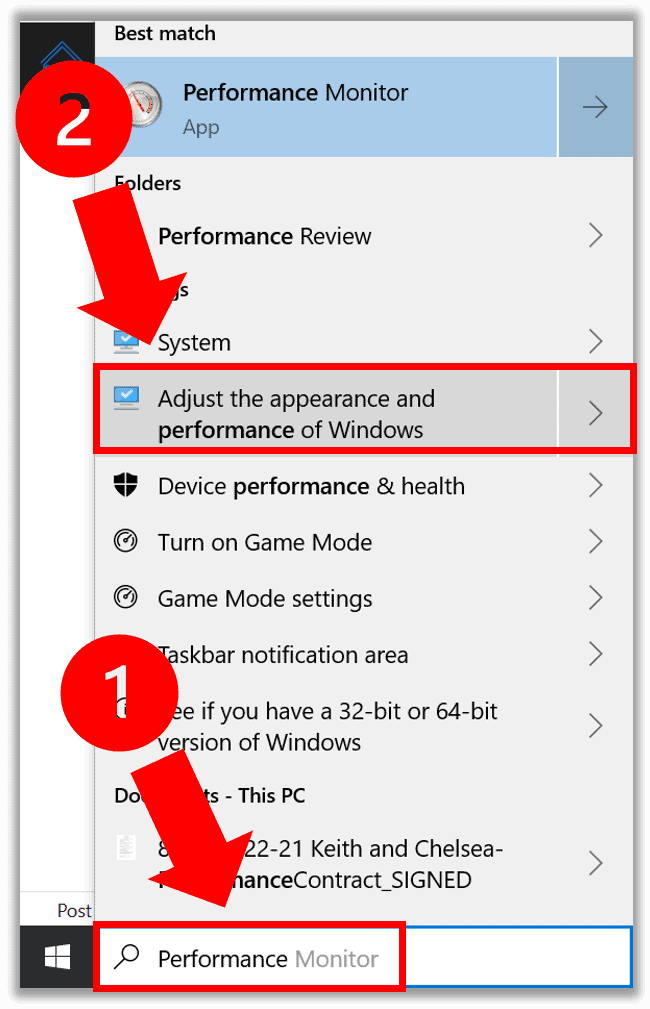
To adjust for best performance in Windows 10:
- First, type performance in the Windows search bar and select Adjust the appearance and performance of Windows.
- Next under the Visual Effects tab, click Adjust for best performance and then Apply.
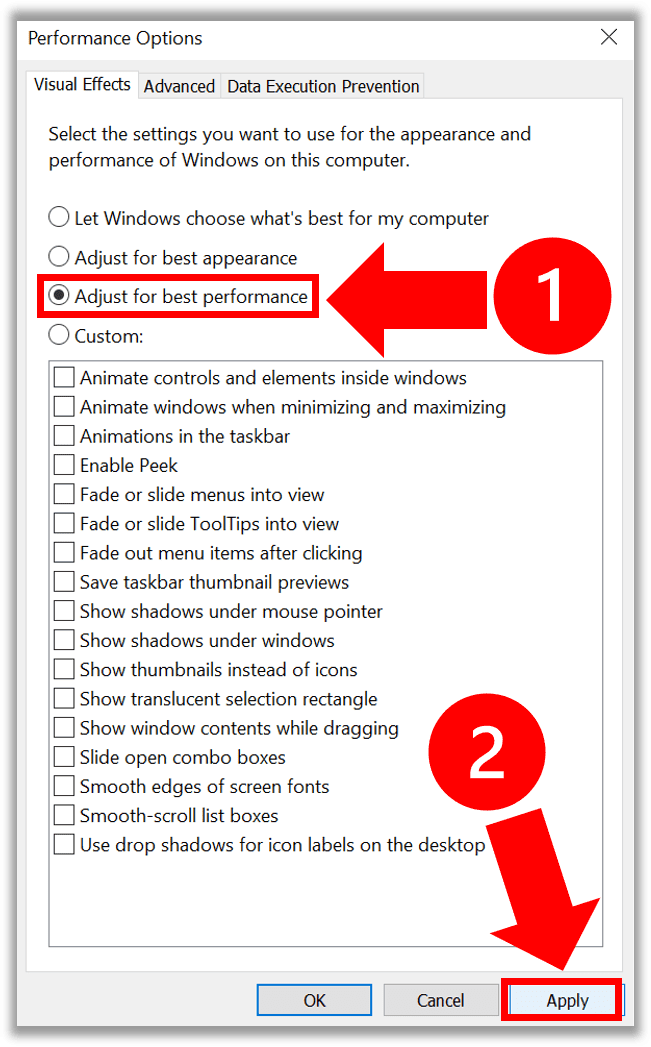
- Finally, restart your computer.
If you have Windows 11 or if you are interested in additional tips to improve Windows performance, you can check out Microsoft’s official support page.
Method 9: Increase Virtual Memory
Another PC adjustment you can make is increasing virtual memory.
By increasing virtual memory you enable your PC to make use of “memory paging” or “paging file”. In essence, memory paging gives your PC access to secondary storage!
To increase virtual memory:
- First, type Advanced system into the taskbar search field and select View advanced system settings.
- Next, in System Properties click the Advanced tab and then select Settings in the Performance area.
- In Performance Options, select the Advanced tab, then select Change in the Virtual memory area.
- Ensure that the Automatically manage paging file size for all drives check box is selected.
- Finally, restart your computer.
Method 10: Disable Team Add-ons In Outlook
If you have tried all of these fixes and your Teams is still running slow or lagging, you may need to disable Team add-ons in Outlook.
This is the last recommended method because disabling Team add-ons in Outlook can be rather inconvenient. By doing so, you will disable compatibility features between Teams and Outlook like direct Teams meeting scheduling in Outlook. Keep this in mind before proceeding.
To disable Team add-ons in Outlook:
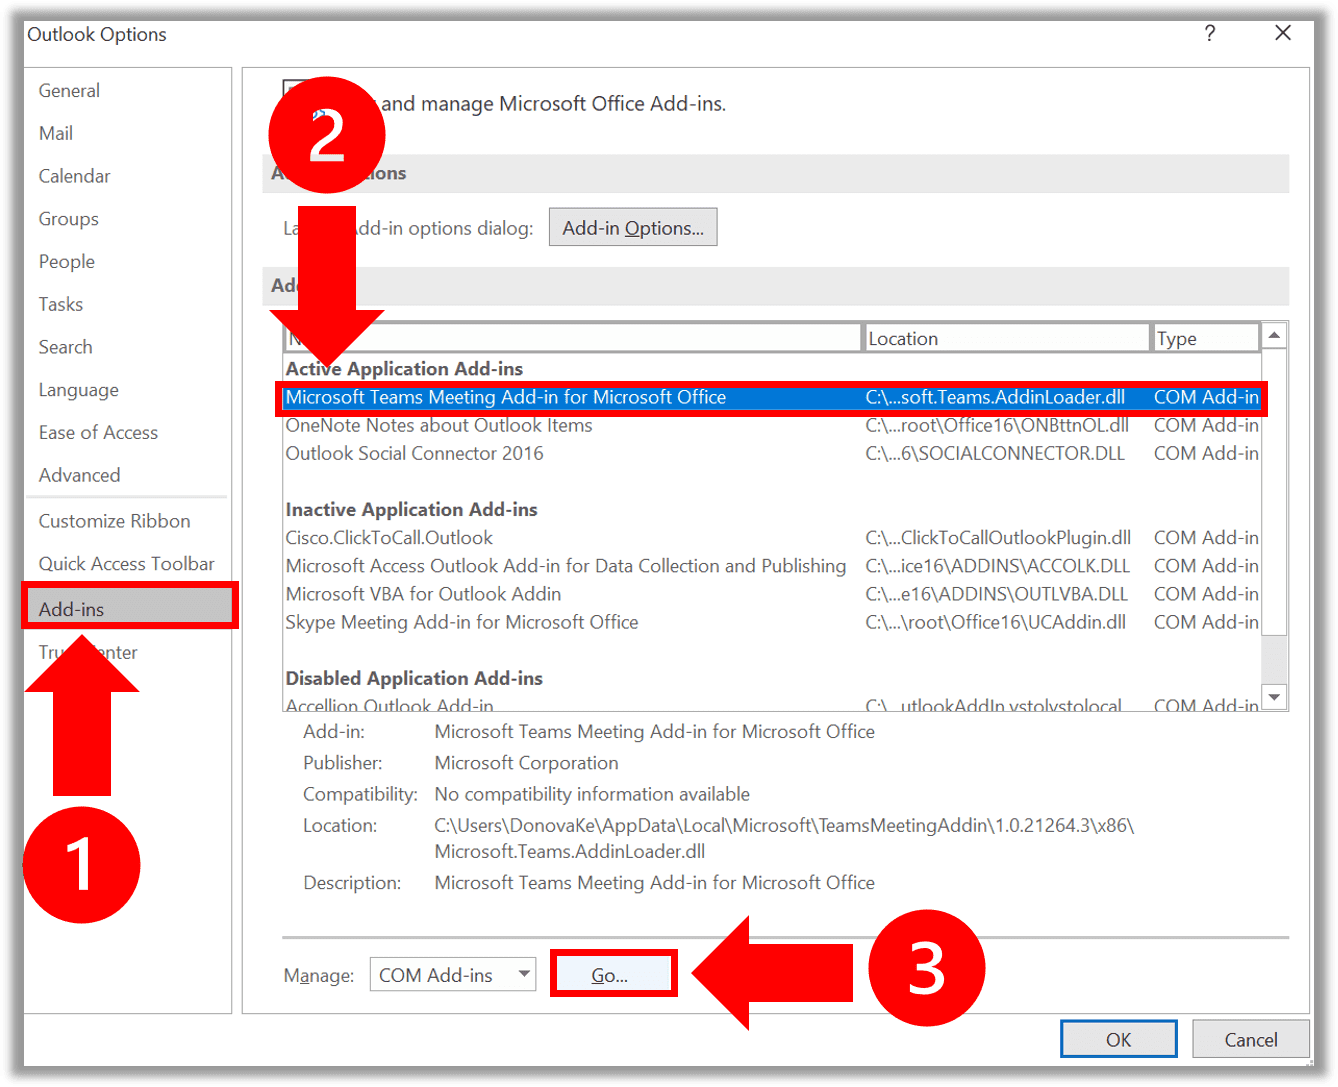
- First, in Outlook click File and then select Options.
- Next, from the menu on the left hand side, click Add-ins and under the Active Application Add-ins section, select Microsoft Teams Meeting Add-in for Microsoft Office and click Go.
- Then, make sure the box next to Microsoft Teams Meeting Add-in for Microsoft Office is checked and select Remove and then OK.
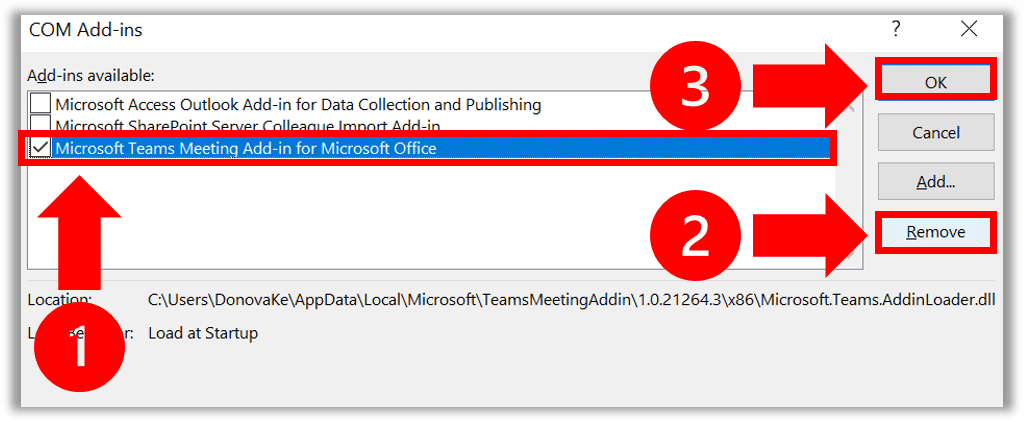
- Lastly, close and restart both Microsoft Outlook and Microsoft Teams.
Conclusion
Does your lagging video, audio and chat have you frustrated and wondering why is Microsoft Teams so slow? Here’s how to speed it up!
- Disable GPU hardware acceleration
- Clear cache
- Disable read receipts
- Disable backgrounds
- Install updates
- Close background applications
- Turn off bandwidth heavy devices
- Adjust visual effects
- Increase virtual memory
- Disable Outlook Teams add-ons
Each of these updates both within the Teams application and on your PC should enable you to get back to business as usual.

Chelsea Ashbrook is a Senior Manager of Corporate Digital Experience at Genentech. Chelsea received her B.A. from the University of Connecticut and has spent the last 11 years working in the technology field.
